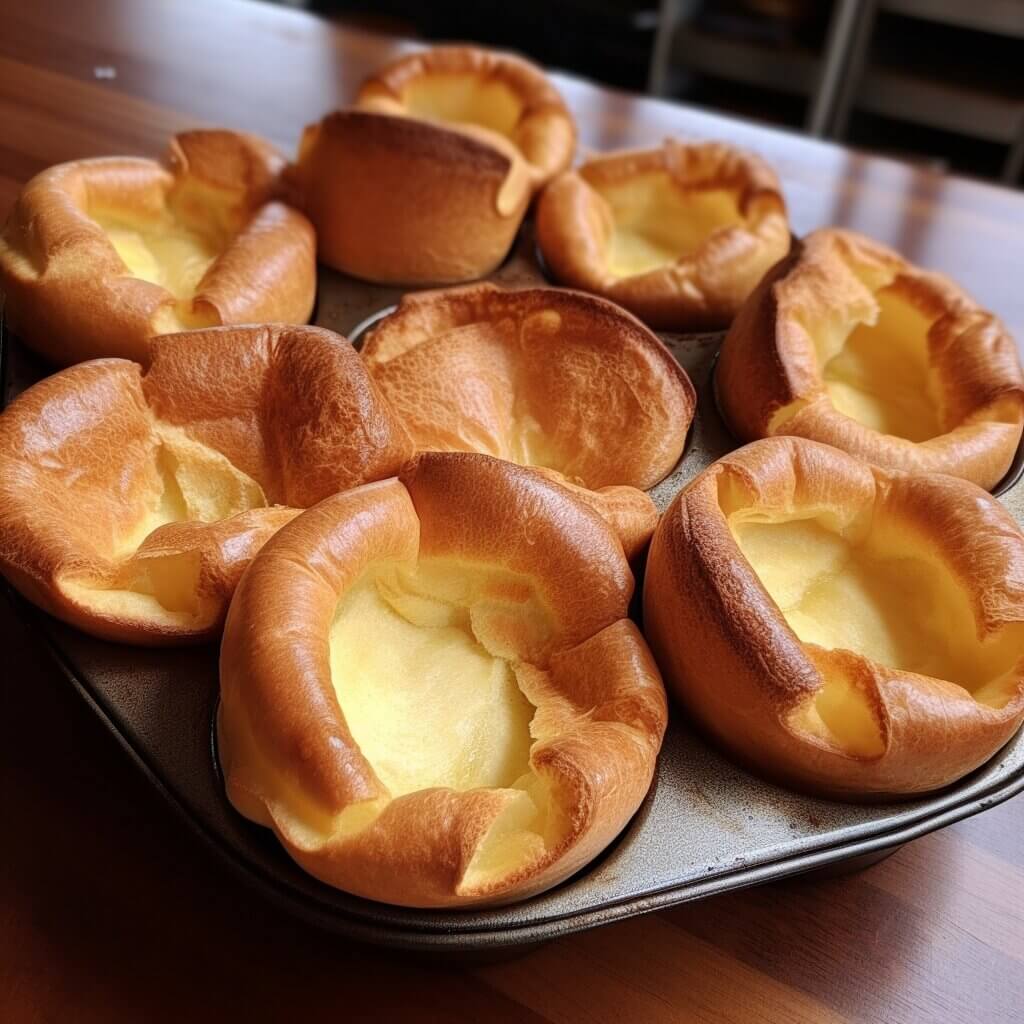
Making perfect Yorkshire puddings truly is an art form. When done right, they emerge from the oven improbably tall, puffed up like little clouds, crispy and browned on the outside but with an airy, delicate interior. Those contrasting textures in each tender bite create Yorkshire pudding magic!
But I wasn’t always the Yorkshire pudding pro I am today. When I first started trying my hand at recreating the ones from my childhood Sunday roasts, it was a bit of a disaster. My first batches came out of the oven looking like flat pancakes. No rise. No crispy edges. Just mushy disappointing puds.
What was I doing wrong? It took plenty of trial and much error before I unlocked the secrets to homemade Yorkshire pudding greatness. From getting the oven rip-roaring hot to chilling the batter thoroughly and resisting peeking during baking, every step matters. Precise ingredients, measurements, and technique make all the difference.
Now when I pull a tray of perfectly puffed Yorkshire puddings from the oven – crispy, golden peaks rising impossibly high over the edges of the pan – it still gives me a thrill after all these years.
While often served alongside roasts like a sort of edible sponge for pan drippings, Yorkshire puddings are equally tasty at breakfast. We love topping them with sweet jam or maple syrup. The contrast of the crispy exterior with the soft, cloud-like interior against the burst of sugary fruit is simple bliss.
So today I’m excited to pass on everything I’ve learned over the years about successfully making Yorkshire puddings at home. I’ll walk you through my recipe step-by-step from mixing the thin batter to getting the oven and oil sizzling hot to baking these beauties to perfection. Follow my tips and techniques, and soon you’ll be pulling bakery-quality Yorkshire puddings from your own oven. Crisp, risen edges. Tall stature. Light and airy middles. Yorkshire pudding glory awaits. So get out your mixing bowl and let’s get puffing!
What type of flour works best?
All-purpose flour gives the lightest, airiest texture versus bread or whole wheat flours. The lower protein content ensures a delicate interior.
Should the eggs be at room temperature?
Yes, cold eggs won’t blend smoothly into the batter which can affect the rise. Bring eggs to room temp before mixing.
What fat makes the best Yorkshire puddings?
Beef drippings lend the most savory flavor while vegetable oil yields lighter puds. Lard or goose fat also work well.
Does resting the batter help?
Chilling the thin batter for at least 30 minutes allows the gluten strands to relax so the puddings can rise higher in the oven.
Should the oven and fat be hot?
Yes, very hot! Preheat the oven and pan to 450° or higher so the batter immediately sizzles and puffs up when poured in.
Why shouldn’t I peek while they bake?
Resist lifting the oven door or the rapid temperature change can cause the Yorkshire puddings to fall before they fully set.
How do I get crispy edges?
Baking in a hot pan on the top oven rack will yield the crispiest edges and peaks. Don’t crowd the pan either.

Prep Time: 5 minutes
Cook Time: 25 minutes
Total Time: 30 minutes
Ingredients:
- 1 cup all-purpose flour
- 1⁄4 teaspoon salt
- 3 large eggs
- 1 1⁄4 cups whole milk
- 1⁄3 cup beef drippings or vegetable oil
Instructions :
- First, gather all the key ingredients required to make the batter: finely sifted all-purpose flour, salt, large eggs at room temperature, ice-cold whole milk straight from the fridge, and the fat of your choice like bubbling hot beef drippings, vegetable oil, or lard to grease the baking tins. Make sure everything is prepped and measured out before you begin mixing. You’ll need 1 cup flour, 1/4 teaspoon salt, 3 eggs, 1 1⁄4 cups cold milk, and 3 tablespoons fat for a standard 12-cup muffin tin. Being able to mix and pour the batter smoothly and efficiently is key for achieving the perfect puffy texture.
- While the oven is heating up, it’s a great idea to chill your large mixing bowl and 12-cup muffin tin in the refrigerator for 10-15 minutes. The process of rapidly chilling and then sizzling hot baking helps create an impressive rise in Yorkshire puddings. The chilled bowl ensures the batter stays cold, and the frigid tin will maximize height too.
- First, add the cup of all-purpose flour and tiny pinch or two of salt to your chilled large mixing bowl. Using a wire whisk, thoroughly blend together the flour and salt, working vigorously to incorporate some air. Be sure there are absolutely no little clumps or dry bits before moving to the wet stage.
- Form a wide well or divet in the center of the flour and carefully crack the 3 eggs here one by one. This avoids errant flour clumps. Then using the same whisk, slowly dribble the milk into the eggs bit by bit while gradually drawing some of the surrounding flour into the liquids. Eventually the combined mixture will become a thin, slippery batter that coats the back of a spoon. Take your time gently whisking during this key stage to achieve a perfectly smooth, lump-free batter – critical for lightness!
- Remove the large 12-cup muffin tin that you chilled earlier from the refrigerator. Evenly divide the greasing agent like oil, beef drippings or lard between all the cups, about 3 tablespoons total or 1 teaspoon per cup. Place on top rack near top of oven to get piping hot. Also remove top oven rack to set aside so it’s handy for quickly sliding tin back in.
- When batter is blended and muffin tin sizzling hot, carefully yet quickly pour or spoon the batter into the searing cups, leaving 1⁄4 inch rim. Rapidly slide tray back into oven on top rack and immediately close oven door. Do not open oven or move trays for 20 minutes during baking or puddings may sink. They need unrelenting heat for an impressive rise. After 20 mins, peek quickly at their progress. Bake 5 mins more if needed to achieve crispy golden peaks.
- When fully risen with crispy edges, immediately remove hot tin to a heat safe surface. Gently coax out puddings so they don’t deflate on cooling. Enjoy straight from oven for ideal texture and height, pairing these fresh crispy crowns with roasts, gravies and jams.
Cooking tips :
- Chill the batter for at least 30 minutes before baking to maximize rise.
- Use hot oil or drippings so the batter immediately sizzles when poured in.
- Do not peek while they bake or they may sink down in the cups.
- Remove them immediately after baking so they don’t deflate.
- Reuse the oil from the first batch to make more.
- Store leftovers in an airtight container and reheat in the oven.