
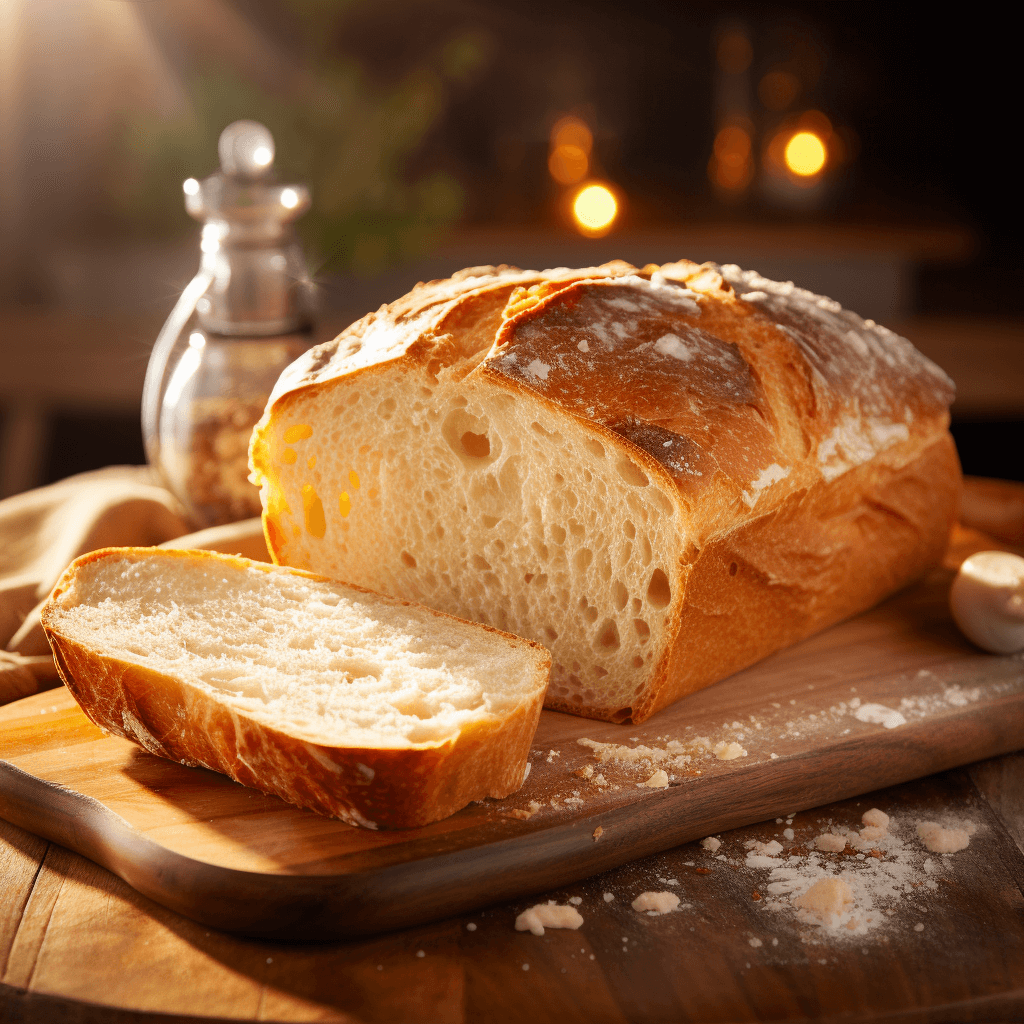
Hey there, lovely readers! You’re in for a real treat today on “Life with Jeviko.” Have you ever yearned for bread that’s more than just…bread? Something that feels like a warm hug to your soul? Meet the simple, yet heartening, Amish White Bread—a staple that your kitchen should not be without.
If you’re anything like me, you cherish the little moments. Whether it’s a morning cuddle with my pet or the smell of fresh bread wafting through the house, it’s the simple joys that make life special. And let me tell you, baking Amish White Bread is one of those ‘feel-good’ rituals you’re going to want to adopt. Why? Because this bread is dense but soft, with a delicate sweetness that complements everything from your morning jam to your lunchtime sandwich.
What type of flour is best for this recipe?
All-purpose flour is your best bet for achieving that soft and fluffy texture that’s a signature of Amish White Bread.
How important is the water temperature for activating yeast?
The water temperature is crucial; it should be between 105°F and 115°F. Too hot, and you risk killing the yeast; too cold, and the yeast won’t activate properly.
Can I use salted butter instead of unsalted butter?
You can, but keep in mind that salted butter may make your bread slightly saltier. You might want to reduce the added salt to balance it out.
Is kneading the dough by hand necessary, or can I use a stand mixer?
While the traditional method involves hand-kneading, a stand mixer with a dough hook will work just fine. Just be cautious not to overmix, as it can make the bread tough.
What’s the ideal place for the dough to rise?
A warm, draft-free spot is ideal. This could be near a sunny window, inside an off oven with the light on, or even inside a microwave after heating a cup of water in it.
Can I skip the second rise? What would happen?
It’s not recommended to skip the second rise. The second rise gives the bread its airy, fluffy texture. Skipping it could result in a denser loaf.
How do I know when the bread is done baking?
The bread should have a golden-brown crust, and it will sound hollow when you tap it on the bottom. You can also insert a thermometer; it should read around 190°F to 200°F.
What can I use as a substitute for active dry yeast?
Instant yeast can be used as a substitute. Use the same amount, but keep in mind that instant yeast may cause the dough to rise a bit faster.
Is it possible to make this bread gluten-free?
While traditional Amish White Bread isn’t gluten-free, you could use a gluten-free flour blend. However, this may alter the texture and flavor.
How should I store the bread to keep it fresh for longer?
Store the bread in an airtight container at room temperature for up to 2-3 days. For longer storage, freezing is advised.
Can I freeze this bread?
Absolutely! Slice it first and then wrap it tightly in plastic wrap followed by aluminum foil. It can be frozen for up to 3 months.
What are some variations I can try with this recipe? Add-ins or flavor tweaks?
Feel free to experiment with herbs like rosemary or oregano, or add in some seeds like sesame or poppy for an added crunch and flavor.
So, let’s get that oven preheating and those hands kneading. Ready? 😊
Prep Time: 1 hour 40 minutes
Cook Time: 30-35 minutes
Total Time: 2 hours 15 minutes
Ingredients:
- 3 1/4 cups all-purpose flour
- 1 teaspoon salt
- 1 packet (or 2 1/4 teaspoons) active dry yeast
- 1 cup warm water (between 105°F and 115°F)
- 1/4 cup unsalted butter, at room temperature
Instructions:
- Combine Your Dry Ingredients: In a large mixing bowl, whisk together the flour, salt, and active dry yeast. Whisking not only combines them but aerates the flour, which will give your bread a nice, fluffy texture.
- Melted Butter Magic: In a different bowl, whisk your room-temperature butter into the warm water. This step infuses the water with buttery goodness, making your bread irresistibly soft and flavorful.
- The Dough Connection: Time to unite the wet and dry realms! Pour your buttery warm water into the flour mixture. Mix until you get a coherent dough—this is the foundation of your bread, so we want it well-blended but not overworked.
- Kneading to Perfection: Sprinkle some flour on a clean surface and get kneading for about 5 to 7 minutes. This is therapeutic—really, try it! Kneading develops the gluten, making your bread springy and chewy.
- Let It Grow: Place your lovingly kneaded dough in a greased bowl and cover it with plastic wrap. Find a warm, cozy spot for your dough baby to rise. It needs about 1 hour to double in size, and this is essential for that soft, airy texture.
- Halve and Shape: After the dough has risen, give it a good punch to release any air bubbles. Then, divide it into two equal parts. Shape each half into a loaf and place them in greased 9×5-inch loaf pans.
- Second Rise: Cover these loaf pans again with plastic wrap and let them chill in a warm place for about 30 minutes. This second rise ensures your bread will have a magnificent, pillow-like crumb.
- Let’s Get Baking!: Preheat your oven to 375°F. Once it’s hot, bake your loaves for 30-35 minutes. You’re looking for a golden-brown crust and a heavenly aroma that makes you want to set up camp in your kitchen.
- Cool It Down: Once baked, let your loaves cool in the pans for 10 minutes. After that, move them to a wire rack so they can cool completely, although snagging a warm slice is completely understandable (and recommended)!
Cooking tips:
- Right Flour: Always use all-purpose flour for a soft and fluffy texture.
- Water Temperature: Make sure the water is between 105°F and 115°F; too hot or too cold and your yeast won’t activate properly.
- Butter Softness: Room temperature butter blends effortlessly, enhancing the bread’s flavor.
- Knead Well: Spend a good 5-7 minutes kneading. It’s crucial for the bread’s texture.
- Rise Time: Patience is key; allow the dough to rise until it has doubled in size for both the first and the second rise.
- Oven Prep: Preheat your oven to 375°F to ensure an even bake right from the start.
- Golden Brown: Aim for a golden-brown crust; it’s not just appealing to the eyes but ensures a well-baked loaf.
- Cooling: Allow the bread to cool for at least 10 minutes in the pan before transferring to a wire rack. This makes slicing easier and helps the texture set.
- Storage: Keep in an airtight container to maintain its freshness. For longer storage, you can also freeze the bread.
- Versatility: Enjoy it fresh, use it for sandwiches, toast it, or even make croutons—this bread is multifaceted.


Can I double the recipe