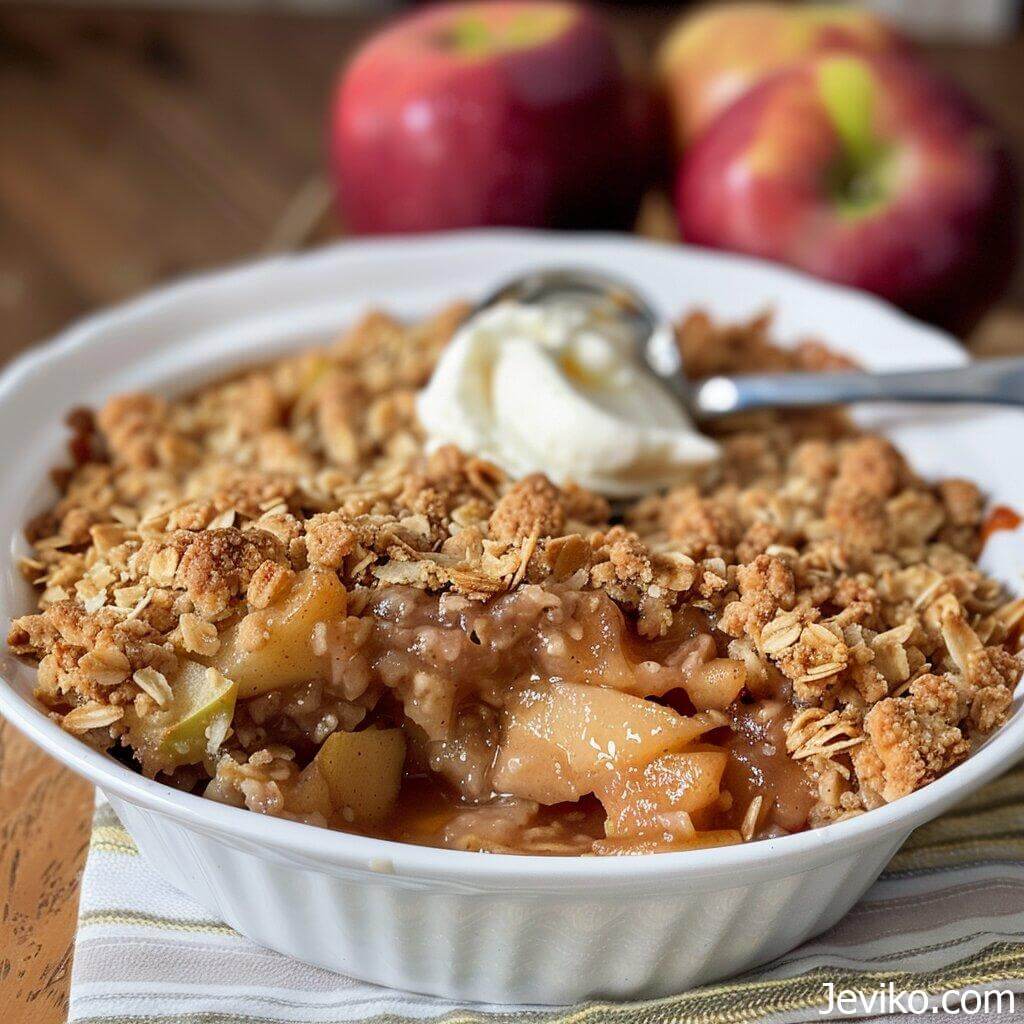
Warm cinnamon apples bubbling around the edges. A buttery, golden topping that’s crisp on top and a little chewy underneath. And that first spoonful that scoops up both layers at once? So good.
This is the kind of dessert that doesn’t need a special occasion. It fits right in on a chilly night. It works for holidays. It disappears at potlucks. And it’s one of the easiest “baked dessert” wins you can make without stressing about frosting, decorating, or perfect slices.
Apple crisp also forgives you. Apples a little too tart? Great. A little too sweet? Still great. Want extra topping? You can do that. Want it more cinnamon-y? Go for it. It’s flexible, friendly, and it makes your kitchen smell amazing.
This is my old fashioned version. Classic flavors. Real butter. Plenty of apples. A topping that bakes up crunchy and clumpy, not sandy.
Make it once, and you’ll know exactly why it’s a forever recipe.
Save this Recipe!
Pop it in your favorites so you’ve got it ready when you need a quick dessert that feels homemade in the best way.
Ingredients
Here I explain the best ingredients for this apple crisp recipe, what each one does, and substitution options. For the exact ingredient measurements, see the recipe card at the bottom of this post.
Apples
This is the heart of the recipe. Use a baking apple that holds its shape and doesn’t turn into applesauce in the oven.
I like a mix. One tart variety plus one sweet, crisp variety gives you better flavor and texture than using only one kind. It also tastes more “old fashioned,” like the kind you’d expect from a cozy, classic dessert.
Granulated sugar + brown sugar
A little white sugar brightens the fruit. Brown sugar adds that deeper, caramel-ish sweetness that makes the filling taste rich.
If your apples are super sweet, you can pull the sugar back a bit. If they’re very tart, keep it as written. The recipe card gives you a balanced starting point.
Lemon juice
This keeps the apple flavor lively and helps prevent that dull, overly sweet taste. It also helps the filling taste fresh even after it bakes.
Flour or cornstarch
This is the thickener. It grabs the apple juices as they bubble and turns them into a glossy, spoonable filling instead of a watery puddle.
Flour gives a slightly more old school texture. Cornstarch makes it clearer and a little silkier. Either works. I list flour in the recipe card, with cornstarch as an easy swap.
Cinnamon, nutmeg, and salt
Cinnamon is non-negotiable here. Nutmeg is optional, but I love the warmth it adds.
And don’t skip the pinch of salt. It makes the apples taste more like apples, and it keeps the topping from tasting one-note sweet.
Vanilla extract
This is a small ingredient that does big work. It rounds out the filling and makes the baked apples smell like a dessert, not just fruit.
Old fashioned crisp topping ingredients
All-purpose flour – Gives the topping structure so it bakes up crisp and clumpy.
Old fashioned rolled oats – Adds that classic crisp texture. If you don’t love oats, you can reduce them and increase the flour.
Brown sugar – The main sweetener in the topping. It also helps it crisp.
Granulated sugar – Helps the topping bake up crunchy, not soft.
Cinnamon + salt – Flavor and balance.
Cold butter – This is what makes those craggy, irresistible clusters. Cold butter cut into the dry ingredients creates pockets that bake into crispy bits.
Optional: chopped pecans or walnuts. They add crunch and a toasty flavor that’s perfect with apples.
Best apples to use
If you’ve ever made a crisp that turned out mushy, the apples are usually the reason. Some apples break down fast in the oven, and you end up with soft filling before the topping even finishes browning.
Here are great choices for baking:
-
Granny Smith – Tart, firm, and classic.
-
Honeycrisp – Sweet, crisp, and holds up well.
-
Braeburn – Balanced flavor, nice texture.
-
Pink Lady – Sweet-tart with a firm bite.
-
Jonagold – Great flavor, especially when mixed with a tart apple.
My favorite move: do half tart, half sweet. It tastes fuller and more interesting, and you don’t have to overdo the sugar to make it taste good.
Peel or don’t peel?
Old fashioned apple crisp is usually peeled. The apples turn tender, the filling feels smooth, and nobody gets a chewy peel in a bite.
If you love a more rustic texture, you can leave some peel on. Just know it will be more noticeable, especially after refrigeration.
Instructions
I’ve included step by step instructions below to make this recipe super easy to follow at home. For the full detailed recipe instructions and ingredient quantities, scroll to the recipe card at the bottom of this post.
1) Prep the oven and pan
Preheat the oven to 350°F.
Grease a 9 x 13-inch baking dish (or a deep 9-inch square dish if you want thicker layers). If your dish is a little smaller, that’s fine. The filling will just be deeper and may need a few extra minutes in the oven.
2) Slice the apples
Core, peel (if desired), and slice the apples.
Aim for slices that are about ¼-inch thick. Too thin and they get mushy. Too thick and they can stay crunchy in the middle. You want tender apples that still hold their shape.
Put the apples in a big mixing bowl. Apples take up a lot of space, so don’t fight a tiny bowl here.
3) Mix the filling
Add the sugars, lemon juice, flour (or cornstarch), cinnamon, nutmeg (if using), salt, and vanilla.
Toss until the apples look evenly coated and you don’t see dry pockets of flour clinging to a few slices. Take 20 extra seconds here. It matters.
Pour the apple mixture into the greased baking dish and spread it out into an even layer. Press it down lightly so the apples settle.
4) Make the crisp topping
In another bowl, whisk together flour, oats, brown sugar, granulated sugar, cinnamon, and salt.
Add the cold cubed butter. Use a pastry cutter, two forks, or your fingertips to work the butter into the dry ingredients until you get a mixture that looks like chunky crumbs.
You want some small pieces and some bigger clumps. Those bigger clumps are the best bites after baking.
If using nuts, stir them in at the end so they stay in larger pieces.
5) Add topping and bake
Sprinkle the topping evenly over the apples.
Don’t pack it down. Keep it loose so heat can circulate and crisp the top.
Bake for 45–55 minutes, or until:
-
the filling is bubbling around the edges (and you can see thick, glossy juices), and
-
the topping is golden brown.
If the topping is browning too fast but the apples aren’t bubbling yet, cover the dish loosely with foil for the last 10–15 minutes.
6) Rest before serving
This part is tough, because it smells incredible. Still, let it rest at least 15–20 minutes.
The filling thickens as it cools. If you scoop it immediately, it will be looser. After a short rest, it turns into that perfect, spoonable apple layer.
Recipe tips
Use a mix of apples
One type works. Two types tastes better. It’s that simple.
A tart apple adds punch. A sweeter apple adds aroma and balance. Together, they taste like the apple crisp you want.
Cut apples evenly
Even slices bake evenly. Uneven slices give you some mushy pieces and some crunchy pieces.
If you’re slicing a big pile, do a quick check halfway through and adjust. It’s worth it.
Don’t underbake
The topping can look done before the apples are actually tender.
The best clue is the bubbling. When the juices bubble thickly around the edges, you’re in the sweet spot. If it’s not bubbling, keep baking.
Make bigger butter clumps
If your topping always turns out sandy, it usually means the butter was worked in too much.
Stop when you still see chunks. Those chunks bake into crisp clusters.
Make ahead tip!
You can mix the crisp topping up to 3 days in advance and store it in an airtight container in the fridge. When you’re ready to bake, toss it once with a fork, sprinkle it over the apples, and bake.
Optional additions and variations
Add nuts
Chopped pecans or walnuts are perfect here. They toast while the crisp bakes and add extra crunch.
If you’re serving a crowd and aren’t sure about allergies, skip them. The crisp is still great without.
Add more spice
Want a stronger spiced flavor? Add one of these:
-
¼ teaspoon ground ginger
-
a tiny pinch of cloves (go light)
-
½ teaspoon apple pie spice
Make it extra “caramel apple”
Add 2 extra tablespoons brown sugar to the filling and a pinch more salt. After baking, drizzle with caramel sauce when serving.
Make it gluten free
Use a 1:1 gluten-free flour blend in the topping. For thickening, use cornstarch instead of flour in the filling.
Also make sure your oats are labeled gluten free, if that matters for your household.
Make it dairy free
Swap the butter for a plant-based butter that’s meant for baking. Use the kind that comes in sticks, not the soft tub spread. You want it cold and cuttable.
Swap in pears
Do half apples, half pears. Pears bake softer, so keep slices slightly thicker. The flavor is mellow and really nice with cinnamon.
What to serve it with
Apple crisp is already a complete dessert, but the toppings are where it turns into something special.
-
Vanilla ice cream – The classic. Cold and creamy against warm crisp.
-
Whipped cream – Light and simple.
-
Greek yogurt – Sounds unusual, tastes great. It adds tang and makes it feel less heavy.
-
Cheddar cheese – Old fashioned and surprisingly good. A thin slice on a warm serving melts slightly and tastes salty-sweet.
-
Coffee or hot tea – Not a topping, but it’s the perfect partner.
If you’re serving it after a big meal, smaller portions with ice cream go a long way. This dessert is rich, even though it’s “just fruit.”
How to store and reheat it
How long will leftovers stay good?
Cover the dish and store it in the refrigerator. It will stay good for up to 5 days.
The topping will soften in the fridge. That’s normal. Reheating brings back a lot of the crisp texture.
How to reheat apple crisp
Oven (best for crisp topping):
Place it in a 350°F oven for 15–20 minutes, or until warmed through.
Microwave (fastest):
Microwave individual servings for 30–60 seconds. The topping won’t be as crisp, but it’s still delicious.
Can you freeze it?
Yes.
For best results, bake it first, cool completely, then wrap tightly and freeze for up to 3 months. Thaw overnight in the fridge, then reheat in the oven to crisp the topping again.
If you freeze it unbaked, the apples can release extra water. It still works, but the filling may be looser.
Frequently asked questions
Why is my filling watery?
Usually one of these:
-
not enough thickener
-
underbaking (the juices didn’t bubble long enough)
-
apples that released a lot of water (some varieties do)
If you know your apples are very juicy, add an extra tablespoon of flour (or an extra teaspoon of cornstarch).
Why is my topping not crunchy?
A few common reasons:
-
butter was too warm
-
the topping was mixed too much
-
the crisp was covered while cooling (traps steam)
Use cold butter, keep some chunks, and let it cool uncovered for at least 20 minutes.
Can I reduce the sugar?
You can.
Start by reducing the filling sugar by ¼ cup total. Don’t cut the topping sugar too much or it won’t crisp the same way.
If you’re using very sweet apples, reducing is easier. If you’re using tart apples, the sugar helps balance.
Can I make this in advance for a holiday?
Yes, and it’s a great make-ahead dessert.
Bake it the day before, cool, refrigerate, then reheat in the oven right before serving. The flavor actually gets better as it sits.
Do I have to use oats?
No. Oats give that classic crisp texture, but you can make it without.
If skipping oats, increase the flour in the topping and keep everything else the same. You’ll end up with more of a streusel-style topping, still delicious.

Old Fashioned Apple Crisp
Ingredients
FOR THE APPLE FILLING
- 10 cups apples peeled and sliced (about 10 medium apples)
- ⅓ cup granulated sugar
- ⅓ cup brown sugar
- 2 tablespoons all-purpose flour or 1 tablespoon cornstarch
- 1 tablespoon lemon juice
- 2 teaspoons ground cinnamon
- ⅛ teaspoon ground nutmeg optional
- 1 teaspoon vanilla extract
- ¼ teaspoon salt
FOR THE CRISP TOPPING
- 1 cup all-purpose flour
- 1 cup old fashioned rolled oats
- ¾ cup brown sugar
- ¼ cup granulated sugar
- 1 ½ teaspoons ground cinnamon
- ½ teaspoon salt
- ½ cup unsalted butter cold and cubed (1 stick)
- ½ cup chopped pecans or walnuts optional
Instructions
- Preheat the oven to 350°F and grease a 9 x 13-inch baking dish.
- Add the sliced apples to a large bowl. Add granulated sugar, brown sugar, flour, lemon juice, cinnamon, nutmeg (optional), vanilla, salt. Toss until evenly coated.
- Spread the apple mixture in the baking dish in an even layer.
- Make the topping: whisk flour, oats, brown sugar, granulated sugar, cinnamon, salt in a bowl. Add cold butter and cut it in until the mixture forms chunky crumbs with some larger clumps. Stir in nuts if using.
- Sprinkle the topping evenly over the apples (don’t pack it down).
- Bake for 45–55 minutes, or until the filling is bubbling around the edges and the topping is golden brown. If the topping browns too quickly, loosely cover with foil for the last 10–15 minutes.
- Rest 15–20 minutes before serving so the filling thickens.