

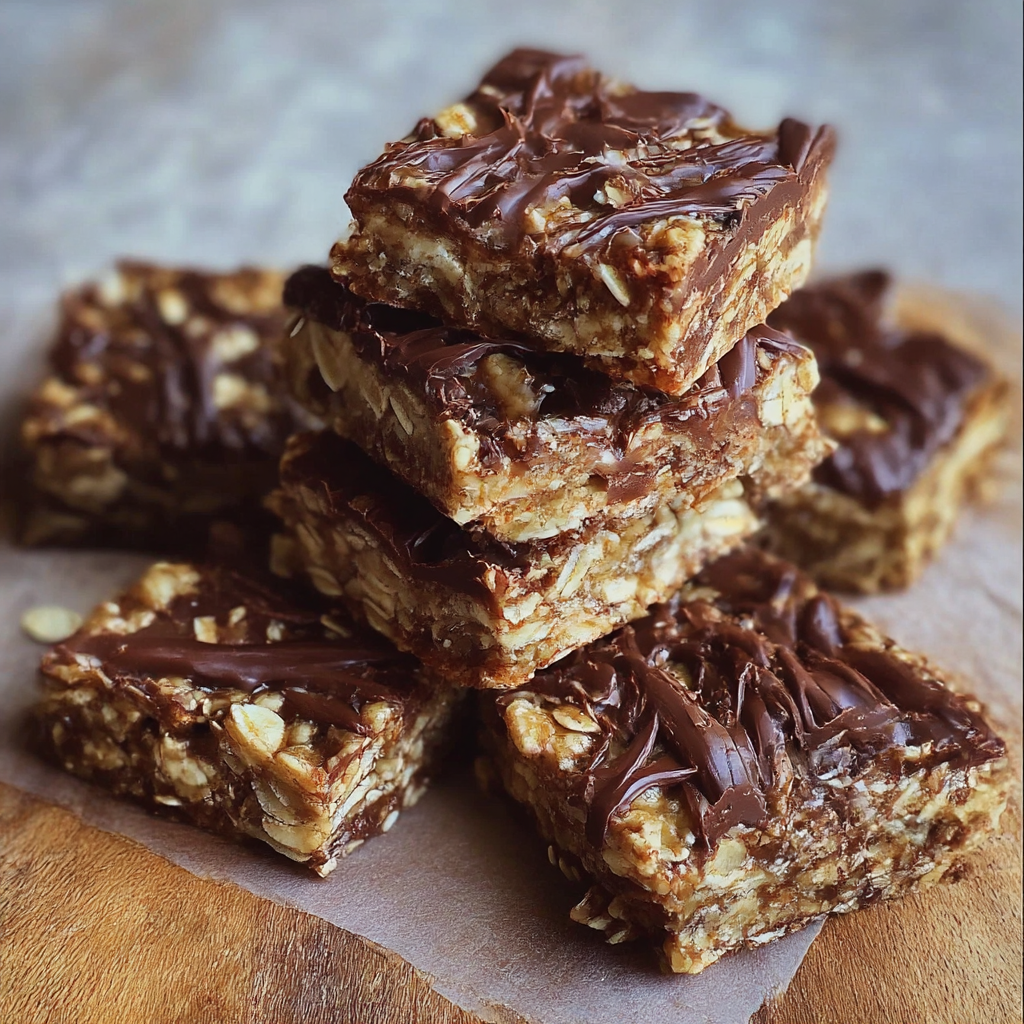
No bake chocolate oat bars are one of those recipes that quietly earns a permanent spot in your kitchen. The ingredients are basic. The method is simple. The end result tastes like you planned ahead… even if you made them in one pan while dinner was finishing up.
Here’s what makes them so satisfying: a buttery oat layer that’s sweet, a little chewy, and lightly toasted from the stovetop heat. In the middle, a thick chocolate layer that sets up fudgy and smooth. Then another oat layer on top, pressed in just enough to hold together without smashing all the good texture out of it. When they’re chilled, the bars slice into clean squares that feel sturdy in your hand but still melt a little as you bite.
They hit that perfect middle ground between dessert and snack. Rich enough to feel like a treat. Easy enough to keep in the fridge for “something sweet” moments.
And this recipe doesn’t ask for fancy equipment. No oven. No mixer. No special pans. A saucepan, a spoon, a lined baking dish, and a little chill time. That’s the whole deal.
If you’ve made no-bake treats before and ended up with bars that crumble, or a filling that turns grainy, or a pan that sticks no matter what you do, don’t worry. This version is built to be reliable. The oat mixture is cooked just long enough to bind. The chocolate layer is melted gently so it stays glossy and smooth. The pan is lined so the bars lift cleanly. Simple steps, big difference.
Why You’ll Love This Recipe
-
No oven needed. Perfect for hot days, small kitchens, or when you just don’t feel like baking.
-
Quick stovetop prep. The “cooking” part takes about 5 minutes.
-
Thick, fudgy center. That chocolate layer sets up like a soft candy bar.
-
Easy to slice and serve. Chill, lift, cut, done.
-
Great for meal prep. Keeps well in the fridge and freezes beautifully.
Frequently Asked Questions (FAQs)
1) Do I have to use peanut butter in the chocolate layer?
No. You can swap in almond butter, sunflower seed butter, or cookie butter. The bars still set up well. Peanut butter adds a classic flavor and helps the chocolate stay creamy, but other spreads work as long as they’re thick and smooth.
2) Why are my bars crumbly when I cut them?
Crumbly bars usually mean either the oat mixture wasn’t cooked long enough to bind, or the bars weren’t chilled long enough to set. Cook the oats until the mixture looks thick and cohesive, and chill at least 2–3 hours before slicing. Pressing the layers firmly (without crushing them) also helps.
3) Can I use quick oats instead of old-fashioned oats?
You can, but the texture will be softer and more compact. Old-fashioned oats give the best chewy bite. If quick oats are what you have, use them and keep the cook time on the shorter side so the mixture doesn’t turn pasty.
4) How do I keep the chocolate layer smooth and not grainy?
Melt the chocolate gently and avoid overheating. Use short microwave bursts or low heat on the stove, stirring often. If the chocolate looks thick, a small spoon of butter or coconut oil can smooth it out.
Ingredients
I’ve included notes and descriptions below for each ingredient in this recipe. For the exact ingredient measurements, jump to the recipe card at the bottom of this post.
Oats
Old-fashioned rolled oats are the best choice for this recipe. They stay chewy and give the bars a hearty texture that doesn’t feel mushy.
Quick oats work in a pinch, but they soften faster and can make the layers more compact. If you use quick oats, press gently and expect a softer bite.
Butter
Butter gives the oat layers their rich flavor and helps everything hold together once chilled. Use unsalted butter if you can, then you control the salt level. If you only have salted butter, reduce any added salt slightly.
Brown sugar
Brown sugar brings moisture and that warm caramel-like sweetness that makes these bars taste like more than “oats and chocolate.” Light brown sugar is classic. Dark brown sugar makes the flavor deeper and a touch richer.
Vanilla extract
Vanilla doesn’t scream for attention, but it makes the bars taste finished. Add it after the butter and sugar melt so the flavor stays clean.
Salt
Salt matters in no-bake bars. Chocolate and butter are both rich, and a pinch of salt keeps the sweetness from feeling heavy. If you like a salted chocolate vibe, flaky sea salt on top is a great finishing move.
Chocolate chips (or chopped chocolate)
Semi-sweet chocolate is the most balanced choice. Milk chocolate is sweeter and softer. Dark chocolate feels more intense and less sugary.
Use whatever you love, just melt it gently.
Peanut butter (or another creamy nut/seed butter)
Peanut butter makes the filling creamy and helps the chocolate layer set into that fudgy texture instead of a brittle snap. Choose creamy, not crunchy, for the smoothest middle layer.
Optional helpers
These aren’t required, but they’re useful when you want to tweak the texture:
-
A tablespoon of butter or coconut oil can help chocolate melt smoother.
-
A couple tablespoons of chopped nuts add crunch.
-
Mini chocolate chips sprinkled into the top oat layer look pretty and add little pops of chocolate.
Instructions
I’ve included step-by-step instructions below to make this recipe easy to follow at home. For the full detailed recipe instructions and ingredient quantities, scroll to the recipe card at the bottom of this post.
1) Prep the pan first
Line an 8×8-inch baking dish with parchment paper, leaving an overhang on two sides. This makes lifting the bars out simple and clean.
Lightly grease the parchment if you want extra insurance, but it’s usually not necessary.
2) Make the oat mixture
In a medium saucepan over medium heat, melt the butter.
Add brown sugar and salt. Stir until the sugar dissolves and the mixture looks smooth and glossy, about 1–2 minutes.
Remove from heat and stir in vanilla.
Add the oats and stir until every oat looks coated. Return the pan to the heat for 1–2 minutes, stirring constantly. You’re not trying to “cook” the oats like oatmeal. You’re warming everything so it binds together.
The mixture should look thick, cohesive, and slightly sticky.
3) Press in the first layer
Scoop about half of the oat mixture into the lined pan.
Press it firmly into an even layer. A spatula works well, or use the bottom of a measuring cup for a smooth, compact base.
4) Melt the chocolate filling
In a microwave-safe bowl, combine chocolate chips and peanut butter.
Microwave in 20–30 second bursts, stirring well between each, until smooth. Keep it gentle. Chocolate can overheat fast.
No microwave? Melt in a small saucepan on low heat, stirring constantly.
5) Spread the filling
Pour the melted chocolate mixture over the oat base.
Spread it into an even layer, reaching the corners.
6) Add the top oat layer
Drop the remaining oat mixture over the chocolate in small clumps.
Press gently to cover. You want it to stick, not sink. Don’t press so hard that chocolate pushes up through the top (unless you like that look—still tasty).
7) Chill until firm
Refrigerate for 2–3 hours, or until the bars feel firm when you press lightly on the top.
Lift them out using the parchment overhang, place on a cutting board, and slice into squares.
Choosing the right oats
Oats do most of the heavy lifting in this recipe. They’re the structure, the chew, the “cookie-like” base. Which means the kind of oats you use changes the final bite.
Old-fashioned rolled oats
These give the best texture. Chewy. Slightly hearty. Not dense. The layers feel like a soft oat cookie.
Quick oats
Quick oats absorb moisture faster, so the mixture can feel more compact. Still good, just softer. If that’s what you have, keep the cook time shorter and don’t press the layers too aggressively.
Steel-cut oats
Not for this recipe. They won’t soften properly without longer cooking, and the bars won’t hold together in a pleasant way.
If you love that classic “no-bake bar” chew, old-fashioned rolled oats are the sweet spot.
How to get bars that hold together
No-bake bars can sometimes fall apart when you pick them up. The fix usually isn’t complicated, it’s just a couple small habits.
Cook the oat mixture briefly
That 1–2 minutes back on the stove after adding oats? It matters. It helps the sugar and butter bind everything, so the oats cling to each other once chilled.
Press with purpose
Press the bottom layer firmly so it becomes a stable base. The top layer needs a lighter touch. Firm enough to stick, but not so firm that it compresses into a hard slab.
Chill long enough
Warm bars slice messy. Soft chocolate smears. The layers slide. Give the pan time in the fridge so everything firms up.
If you’re in a hurry, the freezer can speed it up. About 30–40 minutes in the freezer usually firms them enough to cut, then move them to the fridge so they don’t turn icy.
Use parchment
Parchment isn’t just for easy removal. It helps you lift the whole slab out and slice on a stable surface, which leads to cleaner cuts.
Chocolate layer tips
The chocolate layer is the star, so you want it smooth and creamy.
Melt gently
Chocolate can go from “almost melted” to overheated fast. Short bursts, lots of stirring. When it looks like it’s not melting, stir anyway. Chocolate holds shape even when it’s warm, so stirring reveals the real texture.
Peanut butter makes it silky
Peanut butter softens the chocolate layer and keeps it from turning brittle. It also makes the center feel fudgier, which is the whole appeal here.
Want a thicker chocolate layer?
Add a little more chocolate and peanut butter, keeping the ratio similar. The bars will be richer and slightly taller.
Want a thinner chocolate layer?
Use slightly less filling and spread it thinner. The bars taste more oat-forward, less candy-bar-like.
Add a finish
A pinch of flaky salt on top is a simple upgrade. It makes the chocolate taste deeper and keeps the sweetness balanced.
Sweetness and salt balance
These bars are meant to taste like a treat. Sweet, rich, satisfying.
But there’s a fine line between “sweet in a good way” and “sweet in a heavy way.” Salt keeps the recipe on the right side of that line.
-
If your peanut butter is salted, you may need less added salt.
-
If your chocolate is very sweet (milk chocolate), a pinch of salt helps even more.
-
If you like that salted chocolate vibe, finish the top with flaky salt after pressing in the final layer.
One more detail: brown sugar sweetness can vary by brand and by whether it’s packed tightly. If you prefer less sweetness, you can reduce the brown sugar slightly and the bars will still bind well, especially if you press firmly and chill fully.
Easy variations
Once you’ve made the classic version, it’s hard not to start playing with it. These variations keep the recipe simple and still feel like the same dessert.
Double chocolate oat bars
Stir 2 tablespoons cocoa powder into the butter and brown sugar mixture before adding oats. It gives the oat layers a chocolate-cookie vibe.
Chocolate coconut oat bars
Mix ½ cup shredded coconut into the oat mixture. It adds sweetness and a slightly chewy texture that works well with the chocolate.
Crunchy nut version
Sprinkle chopped toasted pecans, walnuts, or peanuts over the chocolate layer before adding the top oat layer. Crunchy, rich, and very snackable.
Espresso chocolate bars
Add ½ teaspoon instant espresso powder to the melted chocolate and peanut butter. You won’t taste coffee candy, you’ll just taste deeper chocolate.
Peanut butter swirl
Reserve a spoonful of melted peanut butter and drizzle it over the chocolate layer. Drag a knife through gently to create a swirl, then top with oats.
Pretzel twist
Add a handful of crushed pretzels between the chocolate and top oat layer. Sweet + salty + crunchy in one bite.
Allergy-friendly swaps
If you need to adjust this recipe for allergies or preferences, you can still get a really good result.
Peanut-free
Use sunflower seed butter or a peanut-free nut butter. Choose a thick, creamy spread so the chocolate layer still sets nicely.
Dairy-free
Swap butter for a plant-based butter that’s meant for baking. Use dairy-free chocolate chips. The bars still bind and chill well.
Gluten-free
Use certified gluten-free oats. Many oats are naturally gluten-free but processed near wheat, so certified is the safer choice if gluten matters.
Lower sweetness option
Use dark chocolate, reduce the brown sugar slightly, and add flaky salt on top. It still tastes like dessert, just less candy-like.
Serving ideas
These bars are flexible. Serve them straight from the fridge for clean, firm squares, or let them sit for a few minutes for a softer bite.
-
Cut into small squares for dessert trays and parties.
-
Cut into larger bars for lunchboxes or snack prep.
-
Stack them with parchment between layers so they don’t stick.
-
Serve with coffee, tea, or a cold glass of milk. Simple and classic.
If you’re taking them to a gathering, keep them chilled until serving. They hold up fine at room temperature for a while, but they’re neatest and prettiest when cool.
Storage and freezing
This is the kind of recipe that gets better after a day in the fridge. The layers firm, the flavors settle, and slicing becomes even cleaner.
Refrigerator
Store bars in an airtight container in the fridge for up to 7 days. Place parchment between layers so they don’t stick.
Room temperature
They can sit out for a couple hours while serving, but the chocolate layer softens. If your kitchen is warm, keep them chilled until right before serving.
Freezer
Freeze bars for up to 2 months. Wrap the slab or individual pieces tightly, then store in a freezer-safe container.
To thaw, move them to the fridge overnight or let them sit at room temperature for 20–30 minutes.
Troubleshooting
If you’ve had no-bake bars go wrong before, you’re not alone. Most issues come down to heat and chill time.
Bars are too crumbly
-
The oat mixture may not have cooked long enough to bind.
-
The layers may not have been pressed firmly enough.
-
They may have been sliced too soon.
Fix for next time: cook oats briefly after mixing, press the base firmly, chill longer.
Chocolate layer is too hard
-
Too much chocolate without enough peanut butter can set too firm.
-
Overheating chocolate can change texture slightly.
Fix for next time: keep a balanced ratio of chocolate to peanut butter and melt gently.
Chocolate looks grainy
That usually means overheated chocolate or a small amount of moisture sneaking in.
Fix for next time: melt in short bursts and keep bowls/spoons completely dry.
Bars are too soft
-
Not chilled long enough.
-
Too much butter or not enough oats.
Fix for now: chill longer, or pop them in the freezer for 20–30 minutes before slicing.
No Bake Chocolate Oat Bars
Ingredients
Oat Layers
- ½ cup unsalted butter
- 1 cup light brown sugar packed
- ½ teaspoon salt
- 1 teaspoon vanilla extract
- 3 cups old-fashioned rolled oats
Chocolate Filling
- 1 ½ cups semi-sweet chocolate chips or chopped chocolate
- ¾ cup creamy peanut butter
Optional
- Flaky sea salt for topping
- 1 tablespoon coconut oil or butter to help chocolate melt smoother
- ½ cup chopped nuts for crunch
Instructions
- Line an 8x8-inch pan with parchment paper, leaving an overhang for lifting.
- In a saucepan over medium heat, melt butter. Stir in brown sugar and salt until smooth, 1–2 minutes. Remove from heat and stir in vanilla.
- Add oats and stir until coated. Return to heat for 1–2 minutes, stirring constantly, until thick and cohesive.
- Press half of the oat mixture firmly into the pan.
- Melt chocolate chips and peanut butter together (microwave in short bursts or on low heat), stirring until smooth. Spread over the oat base.
- Drop the remaining oat mixture over the chocolate and press gently to cover.
- Chill 2–3 hours until firm. Lift out, slice into squares, and serve.
Notes


love your recipes. Thanks for sharing
This Amish white bread will for sure be on my table this week.
The no cook oat bars are not far behind.I enjoy reading the details you share!!
So enjoy your recipies, so satisfying. Keep em coming for more yum.
looks yummy but can’t get the recipe, for some reason.