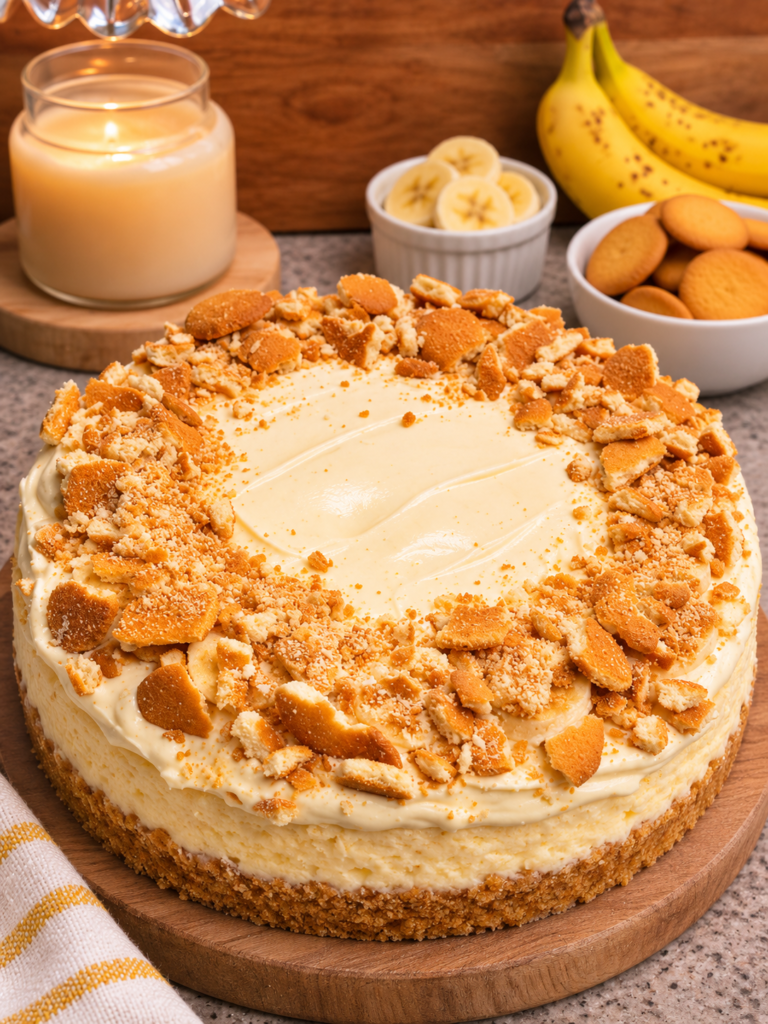
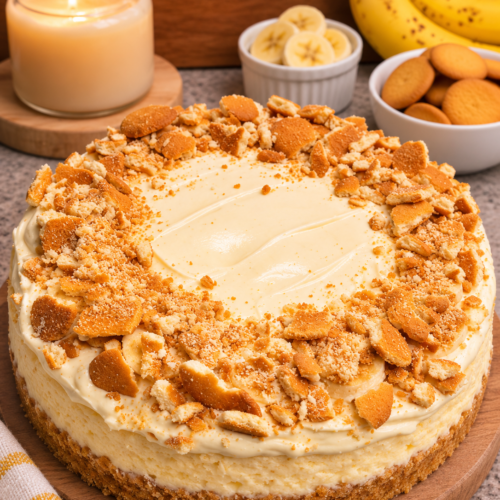
Make the best Creamy Banana Pudding Cheesecake with this easy, delicious no-bake dessert recipe! A buttery vanilla wafer cookie crust is filled with rich cream cheese, fluffy vanilla pudding, and layers of sweet, fresh bananas. Finished with homemade whipped cream, crushed vanilla wafers, and more banana slices, this cheesecake combines two classic desserts into one incredibly creamy treat!
If you love banana pudding and homemade cheesecake, you’re going to fall in love with this recipe!
We’re talking a thick, buttery vanilla wafer crust topped with the most delicious vanilla cheesecake filling.
And hidden inside? A layer of sweet, fresh bananas that gives every slice that classic banana pudding flavor.
So good!
I love making desserts that combine two familiar favorites, especially when they don’t require turning on the oven. This Creamy Banana Pudding Cheesecake has everything you love about traditional banana pudding, but with the rich, smooth texture of cheesecake.
For this recipe, I like using a simple vanilla wafer cookie crust.
It’s made with crushed vanilla wafers, melted butter, and a little sugar.
The mixture is pressed into a springform pan, then refrigerated until firm.
Next comes the creamy cheesecake filling!
Softened cream cheese is mixed with powdered sugar and vanilla, then combined with thick vanilla pudding and freshly whipped cream.
The result is a wonderfully smooth filling that’s rich without feeling too heavy.
And because we’re using instant pudding, there’s no need to cook a custard on the stovetop.
I like adding a layer of fresh banana slices between two layers of cheesecake filling.
That way, you get a little banana in every bite, without having too much fruit sitting on top of the dessert.
Once the cheesecake is assembled, it goes into the refrigerator until completely chilled and firm.
Then comes my favorite part.
Decorating!
A generous swirl of homemade whipped cream, a few golden vanilla wafer cookies, and fresh banana slices make this cheesecake look beautiful.
It’s perfect for birthday celebrations, family dinners, holiday gatherings, summer parties, or Sunday dessert.
And the best part? You can make most of it the day before serving!
In fact, I recommend preparing the cheesecake ahead of time because it needs several hours in the refrigerator to set.
That makes this such a convenient dessert when you’re entertaining.
Just add the whipped cream, fresh bananas, and cookie decorations shortly before serving.
Every slice has the delicious combination of buttery cookie crust, creamy cheesecake, sweet vanilla pudding, and fresh bananas.
Definitely a dessert you’ll want to make again!
Why you’ll love this recipe
There are so many reasons to love this Creamy Banana Pudding Cheesecake! It’s easy to prepare, full of banana flavor, and perfect for sharing.
- It’s completely no-bake. You don’t need to turn on the oven to make the crust or cheesecake filling. Just mix, assemble, and refrigerate until firm.
- It combines two delicious desserts. Rich cheesecake and classic banana pudding come together in one creamy dessert with plenty of vanilla flavor.
- The vanilla wafer crust is amazing. Crushed vanilla wafers and melted butter create a sweet, buttery crust that pairs perfectly with the cheesecake filling.
- It’s packed with fresh bananas. A layer of banana slices inside the cheesecake adds delicious fruit flavor and creates a beautiful surprise when you cut into it.
- It’s perfect for making ahead. Prepare the cheesecake the day before your gathering, then add the fresh toppings shortly before serving.
I also love how easy it is to customize!
You can add a little caramel sauce, make individual cheesecake cups, or use banana cream pudding mix for an even stronger banana flavor.
There are so many delicious ways to enjoy this dessert.
What is Banana Pudding Cheesecake?
Banana Pudding Cheesecake is a dessert that combines the flavors of classic banana pudding with the rich, smooth texture of cheesecake.
Traditional banana pudding is usually made with layers of vanilla wafers, vanilla pudding, fresh bananas, and whipped cream.
Cheesecake, on the other hand, has a thick cream cheese filling and a buttery cookie crust.
For this recipe, I combine the best parts of both desserts!
The base is made with crushed vanilla wafers instead of traditional graham crackers.
The filling combines sweetened cream cheese, vanilla pudding, and whipped cream.
And a layer of sliced bananas adds the fresh fruit flavor you expect from homemade banana pudding.
The finished dessert is decorated with more whipped cream, vanilla wafer cookies, and fresh banana slices.
I especially love that this version doesn’t require baking.
The cream cheese and thick instant pudding help the filling become firm as it chills.
Once refrigerated for several hours, the cheesecake can be sliced and served just like a traditional cheesecake.
The texture is lighter than a dense baked cheesecake, with a smooth, mousse-like creaminess.
It’s rich, sweet, and absolutely delicious!
Ingredients
Here I explain the best ingredients for this Creamy Banana Pudding Cheesecake recipe, what each one does, and substitution options. For the exact ingredient measurements, see the recipe card at the bottom of this post.
For the vanilla wafer crust
Vanilla wafer cookies – you’ll need 2 cups of finely crushed vanilla wafer crumbs. I love using vanilla wafers for this cheesecake because they give the crust that classic banana pudding flavor. You’ll need approximately 55-65 regular-sized cookies, depending on the brand and size. Measure the crumbs after crushing for the most accurate amount.
Unsalted butter – you’ll need 6 tablespoons of melted butter. The butter combines with the cookie crumbs to create a crust that holds together after chilling. I recommend unsalted butter so the crust doesn’t become too salty.
Granulated sugar – you’ll need 1 tablespoon. Vanilla wafers are already sweet, so you only need a little extra sugar to help bind the crust and give it a delicious flavor.
For the creamy cheesecake filling
Cream cheese – you’ll need 16 ounces of full-fat brick-style cream cheese, softened. Cream cheese creates the rich, creamy base of the cheesecake. I recommend using full-fat cream cheese because it sets more firmly than reduced-fat varieties.
Powdered sugar – you’ll need ½ cup. Powdered sugar adds sweetness without creating a grainy texture. It blends smoothly into the softened cream cheese.
Instant vanilla pudding mix – you’ll need one 3.4-ounce package. Vanilla pudding gives the filling that familiar banana pudding flavor. Make sure to use instant pudding mix, not cook-and-serve pudding.
Whole milk – you’ll need 1 cup of cold whole milk. The milk is combined with the instant pudding mix to create a thick pudding. This recipe uses less milk than the standard package directions because the pudding needs to be firm enough for cheesecake.
Heavy whipping cream – you’ll need 1 cup of cold heavy whipping cream. Whipping the cream separately makes the cheesecake filling light and fluffy.
Vanilla extract – you’ll need 1 teaspoon. Vanilla adds a delicious flavor that pairs perfectly with the cream cheese, pudding, and bananas.
Fresh bananas – you’ll need 2 medium ripe bananas for the filling. Choose bananas that are yellow with a few small brown spots. They should be sweet and flavorful but still firm enough to slice.
For the whipped cream topping
Heavy whipping cream – you’ll need ¾ cup of cold heavy whipping cream. This creates a beautiful, fluffy topping for the finished cheesecake.
Powdered sugar – you’ll need 2 tablespoons. It adds a little sweetness and helps the whipped cream hold its shape.
Vanilla extract – you’ll need ¼ teaspoon. Vanilla gives the whipped cream a delicious homemade flavor.
For decorating
Vanilla wafer cookies – approximately 8-10 additional cookies are perfect for decorating the cheesecake.
Fresh bananas – you’ll need 1 medium banana, sliced shortly before serving.
You can also add a little crushed vanilla wafer cookie around the edges of the cheesecake for extra texture.
That’s everything you need to make this rich, creamy, banana-filled dessert!
What’s the best pudding mix for Banana Pudding Cheesecake?
For this recipe, I recommend instant vanilla pudding mix.
It creates a delicious classic banana pudding flavor without overpowering the fresh bananas.
I especially love the combination of vanilla pudding and real banana slices.
The vanilla filling is rich and creamy, while the bananas provide a fresh, naturally sweet flavor.
You can also use instant banana cream pudding mix.
This is a great option if you prefer a stronger banana flavor throughout the cheesecake.
Simply replace the vanilla pudding mix with the same size package of instant banana cream pudding mix.
Prepare it with the same amount of cold milk.
Both versions are delicious!
One important thing to remember is that you need to use instant pudding, not cook-and-serve pudding.
Instant pudding thickens when mixed with cold milk.
Cook-and-serve pudding requires heating and won’t work the same way in this no-bake filling.
I also recommend following the milk measurement in this recipe rather than the directions printed on the pudding package.
Using the full amount of milk listed for regular pudding can make the cheesecake filling too soft.
For the best results, use one 3.4-ounce package of instant pudding with 1 cup of cold whole milk.
What’s the best crust for Banana Pudding Cheesecake?
My favorite crust for this recipe is made with vanilla wafer cookies.
Vanilla wafers are one of the signature ingredients in traditional banana pudding.
Using them for the cheesecake crust brings that familiar flavor into every slice.
They’re slightly sweet, buttery, and have a mild vanilla flavor.
When combined with melted butter, the crushed cookies create a delicious crust that holds together after chilling.
I recommend crushing the cookies into fine crumbs.
Large cookie pieces can make the crust crumbly and difficult to slice.
A food processor works great for this.
Simply pulse the cookies until they resemble fine sand.
You can also place the cookies in a zip-top bag and crush them with a rolling pin.
Once the crumbs are mixed with melted butter, press the mixture firmly into the bottom of the springform pan.
I like using the bottom of a measuring cup to create an even, compact layer.
Then refrigerate until firm.
No baking required!
Can you use graham crackers instead?
Absolutely!
If you don’t have vanilla wafer cookies, you can make the crust with graham cracker crumbs.
Use 2 cups of finely crushed graham crackers and the same amount of melted butter.
You can also use shortbread cookies for a richer, buttery crust.
For the classic banana pudding flavor, though, vanilla wafers are definitely my first choice.
What’s the best banana for cheesecake?
For this recipe, I recommend using ripe but firm bananas.
Look for bananas that are bright yellow with a few small brown spots.
At this stage, they’re sweet and flavorful but still firm enough to slice.
Very green bananas won’t have the same sweetness.
Overripe bananas can become too soft and mushy inside the cheesecake.
I like using bananas that are ripe enough to eat on their own but still hold their shape when cut.
Since this recipe includes a layer of banana slices inside the filling, texture is important.
The bananas should be tender, but not falling apart.
I recommend slicing them approximately ¼ inch thick.
That creates a nice layer without making the cheesecake difficult to cut.
And don’t slice the bananas until you’re ready to use them!
Freshly sliced bananas taste best and are less likely to turn brown before the cheesecake is assembled.
How to make Creamy Banana Pudding Cheesecake
I’ve included detailed step-by-step instructions below to make this recipe super easy to prepare at home. For the full recipe instructions and ingredient quantities, scroll to the recipe card at the bottom of this post.
You’ll need a 9-inch springform pan, mixing bowls, an electric hand mixer, a whisk, and a rubber spatula.
I also recommend using a small offset spatula to smooth the cheesecake filling.
Step 1. Prepare the springform pan
Start by preparing a 9-inch springform pan.
Lightly grease the bottom of the pan with nonstick cooking spray.
You can also line the bottom with parchment paper to make transferring the cheesecake easier.
Make sure the sides of the springform pan are securely attached.
Set the prepared pan aside while you make the vanilla wafer crust.
Step 2. Crush the vanilla wafers
Place the vanilla wafer cookies in a food processor.
Pulse until they become fine crumbs.
Measure 2 cups of crumbs and transfer them to a medium mixing bowl.
If you don’t have a food processor, place the cookies in a large zip-top bag.
Seal the bag and use a rolling pin to crush them.
I recommend making the crumbs as fine as possible.
Fine crumbs create a firmer crust that’s easier to slice.
Step 3. Make the vanilla wafer crust
Add 6 tablespoons of melted unsalted butter and 1 tablespoon of granulated sugar to the cookie crumbs.
Stir until everything is evenly combined.
The mixture should resemble damp sand.
When pressed between your fingers, the crumbs should hold together.
I love how the melted butter brings out the sweet vanilla flavor of the cookies!
Step 4. Press the crust into the pan
Transfer the cookie crumb mixture to the prepared springform pan.
Use the back of a spoon or the bottom of a measuring cup to press it into an even layer.
I recommend pressing firmly, especially around the edges.
This helps the crust hold together when you remove the cheesecake from the pan.
Try to keep the thickness even across the bottom.
You don’t need to press the crust up the sides for this recipe.
A thick, buttery bottom crust is perfect!
Step 5. Chill the crust
Place the springform pan in the refrigerator for approximately 20 minutes.
This allows the melted butter to firm up and helps the cookie crumbs hold together.
I recommend leaving the crust in the refrigerator while you prepare the cheesecake filling.
It’s an easy step that helps keep the bottom of the cheesecake neat when slicing.
Step 6. Beat the cream cheese
Place 16 ounces of softened cream cheese in a large mixing bowl.
Use an electric hand mixer to beat the cream cheese for approximately 1-2 minutes, until completely smooth.
Scrape down the sides and bottom of the bowl with a rubber spatula.
Make sure there aren’t any lumps remaining.
This is one of the most important steps for a smooth cheesecake!
Cold cream cheese can leave little lumps, so make sure it has softened before mixing.
Step 7. Add the powdered sugar and vanilla
Add ½ cup of powdered sugar and 1 teaspoon of vanilla extract to the cream cheese.
Beat on medium-low speed until smooth and creamy.
The mixture should look thick and slightly fluffy.
Scrape down the bowl again.
I recommend tasting a small amount at this point.
The pudding mixture will add more sweetness, so you don’t need to make the cream cheese overly sweet.
Set the bowl aside while you prepare the pudding.
Step 8. Make the vanilla pudding
In a separate mixing bowl, combine one 3.4-ounce package of instant vanilla pudding mix with 1 cup of cold whole milk.
Whisk for approximately 2 minutes, or until the mixture begins to thicken.
The pudding should be noticeably thicker than regular prepared pudding because we’re using less milk.
Allow it to stand for approximately 3 minutes.
It will become even thicker as it sits.
This thick pudding helps the cheesecake filling hold its shape after chilling.
Step 9. Combine the pudding and cream cheese
Add the thick vanilla pudding to the cream cheese mixture.
Use an electric mixer on low speed to beat until everything is smooth and evenly combined.
Scrape down the sides of the bowl as needed.
You should have a thick, creamy mixture with a delicious vanilla pudding flavor.
I love how this combination tastes like banana pudding and cheesecake at the same time!
Don’t worry if the mixture looks very thick at this point.
The whipped cream will make it lighter.
Step 10. Whip the heavy cream
Pour 1 cup of cold heavy whipping cream into a separate chilled mixing bowl.
Using an electric mixer, beat the cream until stiff peaks form.
This generally takes approximately 2-4 minutes, depending on the mixer.
The whipped cream should hold its shape when the beaters are lifted.
Be careful not to overwhip.
You want a smooth, fluffy texture, not a grainy mixture.
Step 11. Fold the whipped cream into the filling
Add approximately one-third of the whipped cream to the cream cheese and pudding mixture.
Use a rubber spatula to gently fold it in.
This loosens the thick filling.
Next, add the remaining whipped cream in two additions.
Continue folding until the mixture is smooth, fluffy, and evenly combined.
I recommend using gentle folding motions rather than vigorous stirring.
You want to preserve the air in the whipped cream.
This is what gives the cheesecake its wonderfully light texture.
Step 12. Add the first layer of cheesecake
Remove the chilled crust from the refrigerator.
Spoon approximately one-third of the cheesecake filling over the vanilla wafer crust.
Use an offset spatula or the back of a spoon to spread it into an even layer.
This first layer helps protect the crust from the moisture in the bananas.
I recommend spreading it all the way to the edges of the pan.
Step 13. Add the banana slices
Peel 2 medium ripe bananas.
Slice them into approximately ¼-inch rounds.
Arrange the banana slices in a single, even layer over the cheesecake filling.
I recommend placing the bananas close together so every slice of cheesecake contains plenty of fruit.
Leave a small border around the edge of the pan.
This allows the remaining cheesecake filling to surround the bananas and helps keep them covered.
If you have a few extra banana slices, you can enjoy them while finishing the recipe!
Step 14. Add the remaining cheesecake filling
Spoon the remaining cheesecake mixture over the banana layer.
Spread it gently with an offset spatula.
I recommend working carefully so the banana slices stay in place.
Smooth the filling all the way to the edges of the springform pan.
Make sure the bananas are completely covered.
This helps reduce their exposure to air while the cheesecake chills.
Smooth the top into an even layer.
You should have a thick, beautiful cheesecake ready for the refrigerator!
Step 15. Refrigerate until firm
Cover the springform pan loosely with plastic wrap or a fitted lid.
Place the cheesecake in the refrigerator for at least 6 hours.
For the best results, I recommend refrigerating it overnight.
This allows the pudding and cream cheese filling to become firm enough to slice.
Don’t try to remove the cheesecake from the pan too early!
The filling needs time to set.
After several hours, the top should feel firm and the cheesecake should hold its shape when the springform ring is removed.
How to make the homemade whipped cream topping
The whipped cream topping is one of my favorite parts of this dessert!
It makes the cheesecake look beautiful and adds another layer of creamy vanilla flavor.
I recommend preparing it shortly before serving.
Step 1. Chill the mixing bowl
Place a medium mixing bowl and your electric mixer beaters in the refrigerator for approximately 10 minutes.
This step is optional, but it helps the heavy cream whip more easily.
Make sure the cream is cold.
Step 2. Add the whipped cream ingredients
Pour ¾ cup of cold heavy whipping cream into the mixing bowl.
Add 2 tablespoons of powdered sugar and ¼ teaspoon of vanilla extract.
Begin mixing on low speed.
Once everything is combined, increase to medium-high speed.
Step 3. Whip until firm
Continue beating until stiff peaks form.
The whipped cream should be thick enough to hold its shape when piped.
I recommend stopping as soon as the cream becomes firm.
Overwhipping can make it grainy.
Transfer the whipped cream to a piping bag fitted with a large star tip.
You can also use a spoon if you prefer a more casual topping.
Step 4. Refrigerate until ready to decorate
Keep the whipped cream refrigerated until you’re ready to serve the cheesecake.
I recommend decorating the cheesecake after it’s completely chilled.
That way, the whipped cream will sit beautifully on top without sinking into the filling.
How to decorate Banana Pudding Cheesecake
Once the cheesecake has chilled and become firm, it’s time to add the finishing touches!
This is one of my favorite parts of the recipe.
The combination of fluffy whipped cream, fresh bananas, and golden vanilla wafers makes the cheesecake look beautiful.
Step 1. Remove the springform pan
Remove the chilled cheesecake from the refrigerator.
Carefully run a thin knife around the inside edge of the pan if needed.
Release the springform ring and gently lift it away.
I recommend working slowly to keep the sides of the cheesecake smooth.
Transfer the cheesecake to a serving plate if desired, leaving the base underneath for support.
Step 2. Pipe the whipped cream
Use the piping bag to add swirls of whipped cream around the outside edge of the cheesecake.
I like creating approximately 10-12 swirls.
This makes it easy to decorate each slice with a little whipped cream.
You can also spread a thin layer of whipped cream over the entire top if you prefer.
Both options are delicious!
Step 3. Add the vanilla wafers
Place a few whole vanilla wafer cookies between the whipped cream swirls.
You can also crush 2-3 cookies and sprinkle the crumbs over the center.
I love the combination of golden cookies and white whipped cream.
It makes the dessert look just like classic banana pudding!
Step 4. Add fresh banana slices
Peel and slice 1 medium banana shortly before serving.
Arrange the slices on top of the cheesecake.
I recommend adding them at the last minute because bananas naturally turn brown after being cut.
You can place one slice beside each whipped cream swirl or arrange them in a circle around the center.
Step 5. Slice and serve
Use a sharp knife to cut the cheesecake into approximately 12 slices.
For the neatest cuts, wipe the knife clean between slices.
I also recommend running the knife under hot water, then drying it before cutting.
The warm blade helps create smooth slices through the creamy filling.
Serve chilled and enjoy!
Every bite has buttery vanilla wafer crust, rich cheesecake filling, sweet bananas, and fluffy whipped cream.
Recipe tips
This Creamy Banana Pudding Cheesecake is easy to prepare, but I’ve included a few helpful tips to make sure it turns out perfectly every time.
Use full-fat cream cheese. Brick-style cream cheese creates the thickest and creamiest filling.
Soften the cream cheese before mixing. This helps prevent lumps in the cheesecake.
Use instant pudding mix. Cook-and-serve pudding won’t work the same way in this recipe.
Measure the milk carefully. Use only 1 cup of milk with the pudding mix. Too much milk can make the cheesecake too soft.
Keep the heavy cream cold. Cold cream whips more easily and creates a light, fluffy filling.
Whip the cream to stiff peaks. This helps the cheesecake hold its shape after chilling.
Fold gently. Avoid overmixing after adding the whipped cream so the filling stays fluffy.
Use ripe but firm bananas. Overripe bananas can become mushy inside the cheesecake.
Cover the bananas completely. Keeping the banana layer underneath the cheesecake filling helps reduce browning.
Chill for at least 6 hours. Overnight chilling gives the cheesecake the firmest texture and cleanest slices.
Add fresh decorations before serving. Banana slices and vanilla wafer cookies look and taste best when added shortly before serving.
How to make a thick and creamy no-bake cheesecake
One of the most important parts of this recipe is getting the filling thick enough to slice.
Since this is a no-bake cheesecake, we’re not using eggs or baking the filling to help it set.
Instead, the structure comes from the cream cheese, thick instant pudding, and whipped cream.
I recommend using full-fat brick-style cream cheese.
It has a thick consistency and becomes firm again when refrigerated.
Next, prepare the instant pudding with only 1 cup of cold milk.
This creates a much thicker pudding than the standard dessert preparation.
Once the pudding has thickened, mix it into the sweetened cream cheese.
The mixture should be thick and creamy.
Then gently fold in whipped heavy cream.
I love how the whipped cream makes the filling lighter without turning it into a thin pudding.
Another important step is chilling.
You need to refrigerate the cheesecake long enough for the cream cheese and pudding mixture to become firm.
I recommend at least 6 hours.
If you have the time, overnight is even better!
When the cheesecake is completely chilled, the filling should hold its shape when sliced.
The texture will be softer than a dense baked cheesecake, but still thick, creamy, and delicious.
How to keep bananas from turning brown
One of the most common questions about banana pudding desserts is how to keep the bananas from turning brown.
Fresh bananas naturally darken after being sliced and exposed to air.
This happens because of a natural reaction between enzymes in the fruit and oxygen.
While the browning doesn’t immediately make the bananas unsafe to eat, it can change the appearance of the dessert.
For this recipe, I recommend slicing the bananas only when you’re ready to assemble the cheesecake.
Don’t cut them several hours ahead.
I also like placing the banana slices between two layers of cheesecake filling.
This helps reduce their exposure to air.
Make sure the top layer completely covers the bananas.
For the decorative banana slices, wait until shortly before serving.
They’re much more exposed to air, so they’ll brown faster.
You can brush the slices very lightly with diluted lemon juice if you’d like, but use only a tiny amount.
Too much lemon juice can change the flavor of the cheesecake.
For the freshest appearance, I recommend decorating the cheesecake right before bringing it to the table.
How to get clean cheesecake slices
There’s nothing better than cutting into a creamy cheesecake and seeing that beautiful banana layer inside!
And there are a few simple tricks to help you get clean slices.
First, make sure the cheesecake is fully chilled.
I recommend refrigerating it overnight if possible.
A cheesecake that’s only been chilled for a couple of hours may still be too soft.
Next, use a long, sharp knife.
Run the blade under hot water, then dry it with a clean towel.
Carefully cut through the cheesecake in one smooth motion.
After each slice, wipe the knife clean.
This prevents extra filling from building up on the blade and smearing across the next piece.
If the cheesecake becomes soft while serving, return it to the refrigerator for approximately 20 minutes.
I also recommend cutting the cheesecake into 12 slices.
This gives you generous portions without making each slice too difficult to handle.
The finished slices should show a thick layer of creamy cheesecake with sweet banana pieces inside and a buttery vanilla wafer crust underneath.
Can you make Banana Pudding Cheesecake ahead of time?
Absolutely!
This is one of my favorite make-ahead desserts.
Since the cheesecake needs at least 6 hours to chill, preparing it the day before serving is actually ideal.
I recommend making the crust and cheesecake filling the evening before your gathering.
Assemble the cheesecake with the banana layer, cover it, and refrigerate overnight.
The next day, prepare the whipped cream topping.
Remove the cheesecake from the springform pan and decorate with whipped cream, vanilla wafers, and fresh banana slices.
This method saves time and gives the filling plenty of opportunity to become firm.
You can also prepare the vanilla wafer crumbs ahead of time.
Store the crushed cookies in an airtight container until you’re ready to make the crust.
I don’t recommend decorating the cheesecake with fresh banana slices the night before.
The bananas may turn brown, and the cookies can soften as they sit against the whipped cream.
For the prettiest presentation, decorate shortly before serving.
Recipe variations
One of my favorite things about this recipe is how easy it is to create different flavors!
The original creamy banana pudding cheesecake is delicious, but there are plenty of ways to make it your own.
Banana cream pudding cheesecake
For a stronger banana flavor, replace the instant vanilla pudding mix with instant banana cream pudding mix.
Use the same 3.4-ounce package size and 1 cup of cold whole milk.
Prepare the filling according to the original instructions.
The banana cream pudding adds banana flavor throughout the entire cheesecake, while the fresh banana slices provide extra texture.
I love this version if you want a more pronounced banana pudding taste!
Caramel banana pudding cheesecake
Bananas and caramel are such a delicious combination.
Prepare the cheesecake according to the original recipe.
Once chilled, drizzle approximately ¼ cup of thick caramel sauce over the top.
Add whipped cream, vanilla wafers, and fresh banana slices.
You can also add a tiny pinch of flaky sea salt to balance the sweetness.
The caramel pairs beautifully with the buttery vanilla wafer crust.
Chocolate banana pudding cheesecake
If you love chocolate and bananas together, this variation is for you!
Replace the instant vanilla pudding mix with instant chocolate pudding mix.
Prepare it with the same amount of milk.
Combine with the cream cheese mixture and fold in the whipped cream.
Layer with fresh bananas and refrigerate until firm.
For decorating, add chocolate curls or mini chocolate chips alongside the whipped cream.
Banana pudding cheesecake with caramelized bananas
For an extra special topping, cook banana slices briefly in butter and brown sugar.
Melt 1 tablespoon of butter in a skillet.
Add 1 tablespoon of brown sugar and stir until combined.
Add 1 sliced banana and cook gently for approximately 1-2 minutes per side.
Allow the topping to cool completely before spooning it over the chilled cheesecake.
I recommend adding this topping just before serving.
The warm caramel flavor is delicious with the cool vanilla cheesecake.
Mini banana pudding cheesecakes
If you’re preparing dessert for a party, try making individual cheesecake cups!
Instead of using a springform pan, divide the vanilla wafer crust mixture between small dessert cups.
Press the crumbs into the bottoms.
Add a layer of cheesecake filling, a few banana slices, and another layer of filling.
Refrigerate until firm.
Top with whipped cream and mini vanilla wafers.
I love this variation because everyone gets their own little dessert!
Banana pudding cheesecake with a graham cracker crust
If you prefer traditional cheesecake crust, replace the vanilla wafer crumbs with graham cracker crumbs.
Use the same quantity of crumbs and melted butter.
The graham cracker crust has a slightly different flavor, but it’s still delicious with the banana pudding filling.
Peanut butter banana cheesecake
For a delicious combination of peanut butter and bananas, add ⅓ cup of creamy peanut butter to the cream cheese mixture.
Beat until smooth before adding the pudding.
You may need to let the peanut butter soften slightly so it combines easily.
Continue preparing the cheesecake as directed.
I love decorating this version with crushed peanut butter cookies and a few fresh banana slices.
Frequently asked questions
Is Banana Pudding Cheesecake baked or no-bake?
This recipe is completely no-bake!
The vanilla wafer crust is chilled instead of baked, and the cheesecake filling sets in the refrigerator.
It uses cream cheese, thick instant pudding, and whipped cream to create a rich, creamy texture.
No eggs or oven required.
Can you use banana pudding mix instead of vanilla?
Absolutely!
Instant banana cream pudding mix is a great substitute.
Use one 3.4-ounce package with 1 cup of cold milk.
It will give the cheesecake a stronger banana flavor.
I recommend using the same fresh banana layer for the best texture.
Can you make this cheesecake without instant pudding?
You can, but you’ll need to change the filling recipe.
Instant pudding helps thicken and stabilize this no-bake cheesecake.
Without it, the filling may be too soft to slice cleanly.
For the most reliable results, I recommend using the pudding mix listed in the recipe.
Why didn’t my no-bake cheesecake set?
The cheesecake may not have chilled long enough, or the filling may contain too much liquid.
Make sure to use full-fat brick-style cream cheese and only 1 cup of milk with the pudding mix.
I also recommend whipping the heavy cream until stiff peaks form before folding it into the filling.
Refrigerate for at least 6 hours.
If it’s still soft, allow it to chill overnight before slicing.
Can you use low-fat cream cheese?
You can, but I recommend full-fat cream cheese for the best results.
Reduced-fat cream cheese may create a softer filling.
Since this cheesecake isn’t baked, the thickness of the cream cheese is especially important.
If using reduced-fat cream cheese, the finished texture may be less firm.
Can you use frozen bananas?
I don’t recommend frozen bananas for the filling.
Frozen bananas become soft and release moisture after thawing.
This can make the cheesecake watery and change the texture.
Fresh, ripe but firm bananas give the best results.
Can you use whipped topping instead of heavy cream?
Yes!
You can replace the 1 cup of heavy whipping cream used in the filling with approximately 2 cups of thawed whipped topping.
Gently fold it into the cream cheese and pudding mixture.
The texture and sweetness may vary slightly.
For the richest homemade flavor, I prefer freshly whipped heavy cream.
Do you need gelatin for this recipe?
No!
The combination of full-fat cream cheese, thick instant pudding, and whipped cream provides enough structure when properly chilled.
I recommend following the ingredient measurements carefully and allowing the full chilling time.
You don’t need gelatin for the original recipe.
Can you make Banana Pudding Cheesecake in a regular pie dish?
Yes!
You can use a deep 9-inch pie dish instead of a springform pan.
The cheesecake will still taste delicious.
However, it may be a little more difficult to remove clean slices because the sides of the dish can’t be released.
I recommend using a springform pan for the neatest presentation.
Can you double the recipe?
Absolutely!
This cheesecake is perfect for feeding a crowd.
You can double all of the ingredients and prepare two separate 9-inch cheesecakes.
I recommend making two rather than one very large cheesecake because the filling needs enough time to chill evenly.
A double batch makes approximately 24 servings.
Can you freeze Banana Pudding Cheesecake?
You can freeze a no-bake cheesecake, but I don’t recommend freezing this fully assembled version.
Fresh bananas can become mushy and watery after thawing, and the pudding-based filling may change texture.
For the best results, prepare the cheesecake fresh and refrigerate it.
If you want to prepare dessert well ahead of time, you can freeze the vanilla wafer crust separately, then make the filling closer to serving.
What to serve with Banana Pudding Cheesecake
This Creamy Banana Pudding Cheesecake is delicious served on its own, but there are plenty of ways to make it even more special!
Fresh whipped cream is one of my favorite toppings. It adds a light, fluffy texture that pairs beautifully with the rich cheesecake filling.
Caramel sauce is another delicious option. A little drizzle adds a buttery sweetness that tastes wonderful with bananas.
Chocolate sauce creates a delicious chocolate banana combination.
Fresh strawberries add a bright, fruity flavor that balances the creamy filling.
Toasted coconut is perfect if you want to add a little tropical flavor and crunch.
Coffee is a wonderful drink to serve alongside cheesecake, especially after dinner.
Iced coffee is another great option for summer parties.
For a dessert table, I love placing the cheesecake on a beautiful cake stand.
Pipe whipped cream around the edges, add fresh banana slices, and tuck a few vanilla wafer cookies between the swirls.
It’s a simple decoration that makes the cheesecake look extra special!
How to make Banana Pudding Cheesecake for a party
One of my favorite things about this dessert is how easy it is to serve when entertaining.
Since the cheesecake can be prepared the day before, there’s very little work left to do when guests arrive.
I recommend making the cheesecake the evening before your party.
Prepare the vanilla wafer crust, mix the filling, add the banana layer, and refrigerate overnight.
The next day, prepare the whipped cream topping.
Remove the springform ring and transfer the cheesecake to your serving plate.
Pipe whipped cream around the outside edge.
Add fresh banana slices and vanilla wafer cookies shortly before serving.
If you’re making the cheesecake for a birthday party, you can also sprinkle additional crushed cookies around the sides.
For a summer gathering, I love decorating with a few fresh strawberries.
They add beautiful color and a refreshing flavor.
Keep the finished cheesecake refrigerated until it’s time for dessert.
I recommend serving it chilled for the best creamy texture.
How to store leftover Banana Pudding Cheesecake
This cheesecake is best enjoyed fresh, but leftovers can be stored in the refrigerator.
Because the filling contains cream cheese, pudding, heavy cream, and fresh bananas, refrigeration is important.
How to refrigerate
Transfer leftover cheesecake to an airtight container.
You can also cover the springform pan tightly with plastic wrap.
Store in the refrigerator at 40°F or below for up to 3 days.
For the best flavor and appearance, I recommend enjoying it within 1-2 days.
The banana slices inside the cheesecake may gradually darken, and the vanilla wafer crust can become softer as it absorbs moisture.
That’s normal for a banana pudding dessert.
If the cheesecake is already decorated, the fresh bananas on top may brown more quickly.
You can remove the older banana decorations and add fresh slices before serving leftovers.
How long can cheesecake sit out?
Since this dessert contains dairy ingredients and fresh fruit, it should remain refrigerated until serving.
Don’t leave the cheesecake at room temperature for more than 2 hours.
If you’re serving it outdoors or in temperatures above 90°F, refrigerate it within 1 hour.
For parties, I recommend cutting the slices you need and keeping the remaining cheesecake refrigerated.
Can you freeze leftovers?
I don’t recommend freezing leftover banana pudding cheesecake.
The bananas may become watery after thawing, and the creamy filling can lose some of its smooth texture.
For the best results, refrigerate leftovers and enjoy them within a few days.
Can you make the cheesecake without the fresh banana layer?
Yes!
If you want a dessert that holds its appearance a little longer, you can leave the fresh banana slices out of the filling.
Use instant banana cream pudding mix instead of vanilla pudding mix to keep the banana flavor.
Then add fresh banana slices only when serving.
This variation won’t have the same fresh banana texture inside, but it’s still a delicious, creamy banana cheesecake.
More easy banana desserts
If you love this Creamy Banana Pudding Cheesecake, there are so many other delicious banana desserts to try!
Classic banana pudding is always a favorite. Layers of vanilla wafers, creamy pudding, fresh bananas, and whipped cream come together for a comforting homemade dessert.
Banana pudding cheesecake cups are perfect for parties. Vanilla wafer crumbs, creamy cheesecake filling, and fresh bananas are layered in individual serving glasses.
Banana cream pie is another delicious option. A buttery crust is filled with creamy vanilla custard and sliced bananas, then topped with whipped cream.
No-bake banana cheesecake bars are perfect when you want a dessert that’s easy to slice and serve.
Banana split cheesecake combines creamy cheesecake with bananas, strawberries, chocolate, and whipped cream for a fun dessert.
Caramel banana pudding adds rich caramel flavor to classic banana pudding layers.
Banana bread cheesecake is another wonderful option if you love the combination of bananas and cream cheese.
I love having a collection of easy banana desserts that can be prepared for family dinners, birthday parties, or holiday gatherings.
They’re creamy, sweet, and always a delicious way to use fresh bananas.
This Creamy Banana Pudding Cheesecake is definitely one to save!
With a buttery vanilla wafer crust, rich cheesecake filling, thick vanilla pudding, and layers of sweet bananas, it’s a delicious combination of two classic desserts.
Prepare it the day before, refrigerate until firm, and decorate with fresh whipped cream, vanilla wafers, and banana slices just before serving.
Every slice is filled with creamy, delicious banana pudding flavor!
Creamy Banana Pudding Cheesecake
Ingredients
For the vanilla wafer crust
- 2 cups finely crushed vanilla wafer cookie crumbs
- 6 tablespoons unsalted butter melted
- 1 tablespoon granulated sugar
For the banana pudding cheesecake filling
- 16 ounces full-fat brick-style cream cheese softened
- ½ cup powdered sugar
- 1 teaspoon vanilla extract
- 1 package 3.4 ounces instant vanilla pudding mix
- 1 cup cold whole milk
- 1 cup cold heavy whipping cream
- 2 medium ripe but firm bananas sliced into ¼-inch rounds
For the whipped cream topping
- ¾ cup cold heavy whipping cream
- 2 tablespoons powdered sugar
- ¼ teaspoon vanilla extract
For decorating
- 8-10 vanilla wafer cookies whole or crushed
- 1 medium ripe banana freshly sliced
Instructions
- Prepare the pan. Lightly grease a 9-inch springform pan or line the bottom with parchment paper.
- Make the crust. In a mixing bowl, combine finely crushed vanilla wafer cookies, melted butter, and granulated sugar. Stir until the crumbs resemble damp sand.
- Press the crust. Transfer the mixture to the prepared pan. Press firmly into an even layer across the bottom using a spoon or measuring cup.
- Chill the crust. Refrigerate for approximately 20 minutes while preparing the cheesecake filling.
- Beat the cream cheese. In a large mixing bowl, beat softened cream cheese with an electric mixer for 1-2 minutes, until completely smooth.
- Add sugar and vanilla. Add powdered sugar and vanilla extract. Beat until creamy and evenly combined.
- Prepare the pudding. In a separate bowl, whisk the instant vanilla pudding mix with 1 cup of cold whole milk for approximately 2 minutes. Allow to stand for 3 minutes, until thickened.
- Combine the filling. Add the thick pudding to the cream cheese mixture. Beat on low speed until smooth and well combined.
- Whip the cream. In a separate chilled bowl, whip 1 cup of cold heavy whipping cream until stiff peaks form.
- Fold together. Gently fold the whipped cream into the cream cheese and pudding mixture in several additions, until smooth and fluffy.
- Add the first layer. Spoon approximately one-third of the cheesecake filling over the chilled vanilla wafer crust. Spread into an even layer.
- Layer the bananas. Slice 2 ripe but firm bananas into ¼-inch rounds. Arrange them in an even layer over the cheesecake filling, leaving a small border around the edge.
- Add the remaining cheesecake. Spoon the remaining cheesecake filling over the bananas. Spread gently until smooth, making sure the banana slices are completely covered.
- Chill. Cover and refrigerate for at least 6 hours, or preferably overnight, until completely firm.
- Make the whipped cream topping. Beat ¾ cup of cold heavy whipping cream with 2 tablespoons of powdered sugar and ¼ teaspoon of vanilla extract until stiff peaks form.
- Remove the springform ring. Carefully release the chilled cheesecake from the pan and transfer to a serving plate.
- Decorate. Pipe whipped cream swirls around the edge of the cheesecake. Add whole or crushed vanilla wafer cookies and freshly sliced banana pieces.
- Slice and serve. Cut into 12 slices using a sharp knife, wiping the blade clean between cuts. Serve chilled.