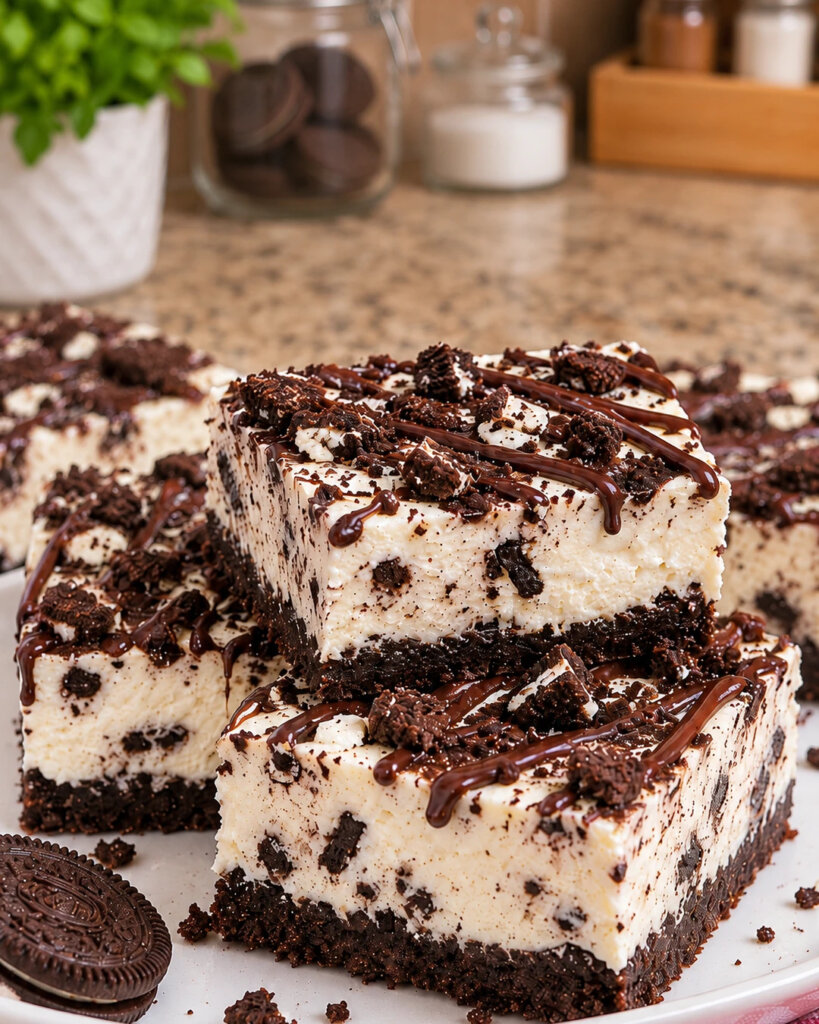
Make the best No-Bake Oreo Cheesecake Bars with this easy, creamy, and delicious dessert recipe! A buttery Oreo cookie crust is topped with a rich, fluffy cheesecake filling loaded with chunks of chocolate sandwich cookies. With just 7 simple ingredients and no oven required, these cookies and cream cheesecake bars are perfect for birthday parties, holiday celebrations, summer gatherings, or anytime you’re craving a sweet treat! Prepare them ahead of time, let them chill in the refrigerator, and slice them into perfectly creamy cheesecake bars that everyone will love.
If you love Oreo cookies and cheesecake, you’re going to fall in love with this recipe!
We’re talking a thick, chocolatey Oreo crust topped with the most delicious creamy cheesecake filling, with chunks of crunchy chocolate cookies in every bite.
And the best part? You don’t even have to turn on the oven!
I love desserts that look impressive but are actually really easy to make. These Oreo Cheesecake Bars are exactly that! You only need a handful of ingredients, a mixing bowl, and an 8-inch square baking pan to prepare this delicious cookies and cream dessert.
For this recipe, I like to start with a simple Oreo cookie crust made with crushed cookies and melted butter. The mixture gets pressed into the bottom of the pan to create a rich, chocolatey base.
Next comes the creamy cheesecake filling!
Softened cream cheese is mixed with powdered sugar and vanilla extract, then combined with freshly whipped cream to create a light, fluffy texture.
Chopped Oreos are folded into the filling, so every bite has little pieces of chocolate cookies surrounded by creamy cheesecake.
Spread everything over the crust, refrigerate until firm, and you’ve got one seriously delicious dessert!
I especially love making these cheesecake bars for parties because they can be prepared the day before. There’s no need to worry about baking a cheesecake, checking for cracks, or waiting for it to cool.
Just mix, spread, chill, and serve!
These bars are also a great option when you want to make a homemade dessert during the warmer months without heating up your kitchen.
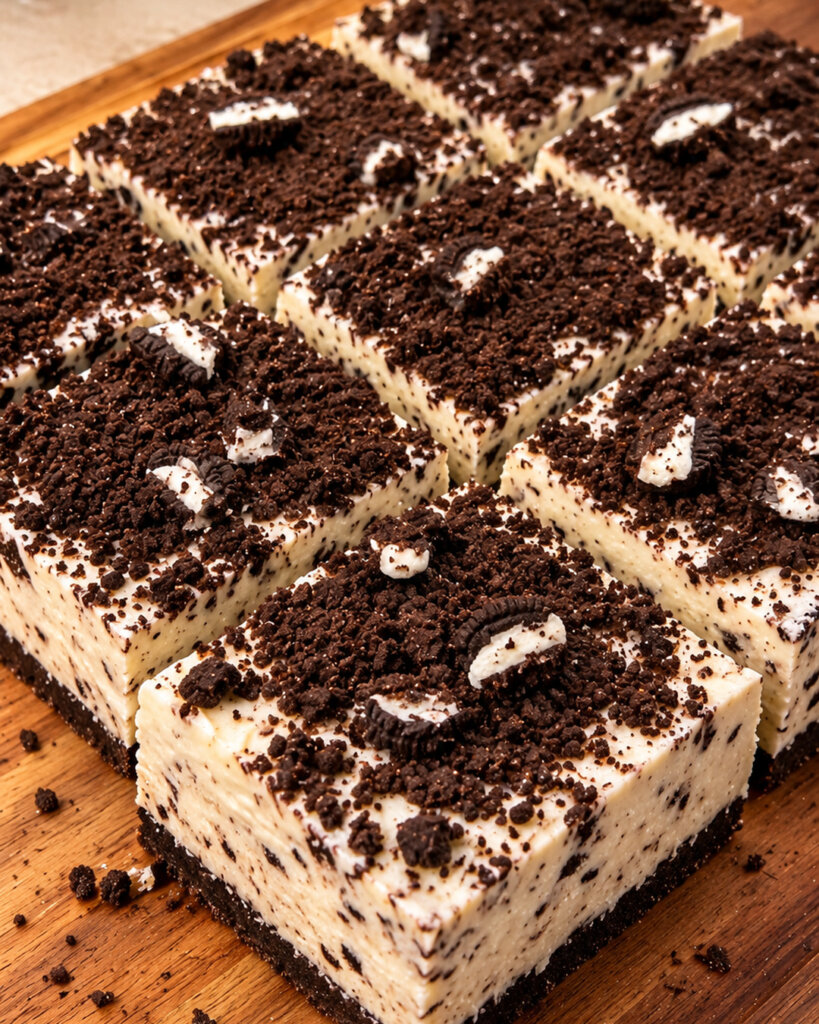
Top them with extra Oreo crumbs or crushed cookies for a beautiful finish, then slice and enjoy!
Why you’ll love this recipe
There are so many reasons to love these No-Bake Oreo Cheesecake Bars! They’re easy to prepare, packed with cookies and cream flavor, and perfect for just about any occasion.
- You don’t need an oven. This recipe is completely no-bake, which makes it perfect for summer parties or whenever you want a delicious dessert without turning on the oven. The refrigerator does all the work of setting the cheesecake filling.
- You only need 7 ingredients. Oreo cookies, butter, cream cheese, powdered sugar, vanilla extract, and heavy whipping cream are all you need to create this delicious dessert. And since the Oreos are used in both the crust and filling, the ingredient list is extra simple!
- The filling is incredibly creamy. The combination of softened cream cheese and freshly whipped cream creates a light, fluffy texture that’s rich without being overly heavy. It’s the perfect contrast to the crunchy chocolate cookie crust.
- They’re perfect for making ahead. These cheesecake bars need at least 6 hours in the refrigerator, so they’re a great dessert to prepare the day before a party. Once they’re chilled, simply slice and serve.
- They’re easy to customize. You can add chocolate ganache, drizzle melted chocolate over the top, or use different Oreo flavors to make a new version of this delicious cheesecake dessert.
And if you’re a fan of cookies and cream ice cream, you’re going to love the flavor of these bars!
The combination of vanilla cheesecake filling and chocolate sandwich cookies is simple, classic, and so delicious.
Ingredients
Here I explain the best ingredients for this Oreo Cheesecake Bars recipe, what each one does, and substitution options. For the exact ingredient measurements, see the recipe card at the bottom of this post.
For the Oreo crust
Oreo cookies – you’ll need 24 Oreo cookies to make the crust. I recommend using regular Oreo cookies, including the cream filling. There’s no need to scrape out the filling before crushing them! The chocolate cookies add a rich flavor, while the cream filling helps bind the crumbs together. You can use a food processor to crush the cookies or place them in a sealed plastic bag and crush them with a rolling pin.
Unsalted butter – you’ll need 5 tablespoons of melted butter to combine with the crushed cookies. The butter helps hold the Oreo crumbs together, creating a firm crust after chilling. I recommend using unsalted butter because the cookies already have plenty of flavor. Salted butter will also work if that’s what you have available.
For the cheesecake filling
Cream cheese – you’ll need two 8-ounce packages of cream cheese, for a total of 16 ounces. I highly recommend using full-fat, brick-style cream cheese for the best flavor and texture. Allow it to soften at room temperature before mixing, so you can create a smooth filling without lumps. Avoid using whipped cream cheese or cream cheese spread from a tub, since these products have a different texture and may prevent the bars from setting as firmly.
Powdered sugar – adds sweetness to the cheesecake filling without creating a grainy texture. You’ll need ¾ cup of powdered sugar, also called confectioners’ sugar. I recommend using powdered sugar instead of granulated sugar because it dissolves more easily into the cream cheese.
Vanilla extract – just 1 teaspoon adds a wonderful vanilla flavor that pairs perfectly with the chocolate cookies. I recommend using pure vanilla extract for the best flavor, but imitation vanilla extract will also work.
Heavy whipping cream – this is what gives the cheesecake filling its delicious light and fluffy texture! You’ll need 1 cup of cold heavy whipping cream. The cream is whipped until stiff peaks form, then gently folded into the cream cheese mixture. Make sure you’re using heavy whipping cream, rather than half-and-half or regular milk, because it needs enough fat to whip properly.
Oreo cookies – you’ll need another 10 Oreo cookies, roughly chopped, to fold into the cheesecake filling. I recommend chopping them into small pieces instead of crushing them into fine crumbs. This gives the bars delicious chunks of chocolate cookies in every bite!
Optional toppings – additional Oreo crumbs, chopped cookies, or a drizzle of melted chocolate are all delicious ways to finish these cheesecake bars.
Do you need to remove the cream from the Oreos?
No! You can use the entire Oreo cookie, including the cream filling, when making both the crust and cheesecake filling.
In fact, I recommend leaving the cream filling inside the cookies.
When you crush the Oreos for the crust, the cookie filling mixes with the chocolate crumbs and melted butter to create a delicious base that holds together after chilling.
The cream filling also adds a little extra sweetness to the crust.
For the cheesecake filling, simply chop the whole cookies into small pieces.
There’s no need to separate them or remove anything.
This makes the recipe even easier, and I’m always a fan of saving a few extra steps in the kitchen!
Instructions
I’ve included step-by-step instructions below to make this recipe super easy to follow at home. For the full detailed recipe instructions and exact ingredient quantities, scroll to the recipe card at the bottom of this post.
You’ll need an 8-inch by 8-inch baking pan, a mixing bowl, and an electric mixer to prepare these cheesecake bars.
I recommend using a stand mixer or a hand mixer for whipping the cream and beating the cream cheese.
Step 1. Prepare the baking pan
Start by lining an 8-inch square baking pan with parchment paper.
Leave a little extra parchment paper hanging over two opposite sides of the pan.
This creates handles that will make it much easier to lift the cheesecake out of the pan once it’s chilled.
I highly recommend this step!
Without parchment paper, removing individual cheesecake bars from the baking pan can be difficult, especially since the filling is soft and creamy.
You can also use aluminum foil if you don’t have parchment paper, but I prefer parchment because it releases from the crust more easily.
Set the prepared pan aside while you make the Oreo crust.
Step 2. Make the Oreo cookie crust
Place 24 Oreo cookies in a food processor.
Pulse until the cookies are crushed into fine crumbs.
You want the crumbs to have a texture similar to coarse sand, without large cookie pieces remaining.
If you don’t have a food processor, place the cookies in a large resealable plastic bag.
Seal the bag and use a rolling pin to crush them until fine.
Transfer the crushed cookies to a medium mixing bowl.
Pour 5 tablespoons of melted butter over the Oreo crumbs.
Stir until all of the crumbs are evenly coated in butter.
The mixture should resemble wet sand and hold together when pressed between your fingers.
Step 3. Press the crust into the pan
Transfer the Oreo crumb mixture to the prepared baking pan.
Spread it evenly across the bottom of the pan.
Use the bottom of a measuring cup or a flat-bottomed glass to press the crumbs into a firm, even layer.
Make sure to press the mixture into the corners and along the edges.
This helps the crust hold together when the cheesecake is sliced into bars.
I like pressing the crust down firmly, but not so aggressively that it becomes overly compact.
Place the pan in the refrigerator for approximately 15-20 minutes while you prepare the cheesecake filling.
This gives the butter time to firm up and helps create a sturdy base for the creamy filling.
Step 4. Prepare the cream cheese mixture
Add 16 ounces of softened cream cheese to a large mixing bowl.
Using an electric hand mixer or stand mixer, beat the cream cheese on medium speed for approximately 1-2 minutes, or until smooth and creamy.
Add ¾ cup of powdered sugar and 1 teaspoon of vanilla extract.
Continue beating for another 1-2 minutes, until everything is fully combined.
Scrape down the sides of the bowl with a spatula to make sure all of the ingredients are mixed evenly.
The filling should be smooth, thick, and free of cream cheese lumps.
If you’re having trouble getting a smooth texture, the cream cheese may still be too cold.
I recommend allowing the cream cheese to soften before mixing instead of trying to beat cold cream cheese into the filling.
Step 5. Whip the heavy cream
Pour 1 cup of cold heavy whipping cream into a separate mixing bowl.
Using an electric mixer fitted with the whisk attachment, beat the cream on medium-high speed until stiff peaks form.
This generally takes approximately 2-4 minutes, depending on your mixer.
You’ll know the cream is ready when you lift the beaters and the whipped cream forms peaks that hold their shape without falling over.
Be careful not to overwhip the cream!
If you continue beating after stiff peaks form, the cream can become grainy and eventually begin separating into butter and liquid.
Stop mixing as soon as the whipped cream is thick, fluffy, and holds its shape.
Step 6. Combine the cheesecake filling
Add approximately one-third of the whipped cream to the cream cheese mixture.
Use a rubber spatula to gently fold it into the filling.
This helps lighten the cream cheese mixture before adding the remaining whipped cream.
Next, add the rest of the whipped cream in two additions.
Gently fold until everything is combined and you no longer see large streaks of whipped cream.
Try not to stir too aggressively during this step.
The air incorporated into the whipped cream helps give the cheesecake its light, fluffy texture.
If you mix too much, the filling can lose some of that wonderful airy consistency.
Step 7. Fold in the Oreo cookies
Roughly chop 10 Oreo cookies into small pieces.
I recommend leaving some pieces a little larger than others.
This gives the cheesecake filling a delicious combination of smaller chocolate cookie pieces and larger chunks of Oreos.
Add the chopped cookies to the cream cheese mixture.
Use a spatula to gently fold them into the filling until evenly distributed.
You should now have a thick, creamy cookies and cream cheesecake filling with plenty of Oreo pieces throughout.
And trust me, it’s going to be hard not to grab a spoonful right now!
Step 8. Assemble the cheesecake bars
Remove the prepared Oreo crust from the refrigerator.
Spoon the cheesecake filling evenly over the chilled crust.
Use an offset spatula or the back of a spoon to gently spread the mixture into an even layer.
Make sure the filling reaches all four corners of the baking pan.
Smooth the top as much as possible.
If you’d like, sprinkle a few additional crushed Oreo cookies over the top.
You can also save the topping until right before serving, which will keep the cookie pieces a little crunchier.
Step 9. Refrigerate the cheesecake
Cover the baking pan with plastic wrap or a lid, making sure it doesn’t touch the surface of the cheesecake.
Place the pan in the refrigerator for at least 6 hours.
I highly recommend refrigerating the cheesecake overnight if you have the time.
This allows the filling to become firmer and makes the bars easier to slice.
Unlike traditional baked cheesecake, this recipe doesn’t contain eggs or gelatin.
Instead, the combination of cream cheese and whipped cream firms up as it chills.
The finished texture will be creamy and fluffy rather than as dense as a traditional baked cheesecake.
If the filling still feels too soft after 6 hours, leave it in the refrigerator for another hour or two before slicing.
Step 10. Slice and serve
Once the cheesecake is fully chilled, remove the pan from the refrigerator.
Use the parchment paper handles to carefully lift the cheesecake out of the baking pan.
Place it on a large cutting board.
Using a sharp knife, slice the cheesecake into 16 bars.
I recommend wiping the knife clean with a paper towel between cuts.
This helps create clean edges and prevents the filling from sticking to the knife.
For especially neat slices, you can place the cheesecake in the freezer for approximately 15-20 minutes before cutting.
Don’t leave it in the freezer too long unless you want a frozen cheesecake dessert!
Top each bar with additional Oreo crumbs or chopped cookies, if desired.
Serve immediately, or return the bars to the refrigerator until you’re ready to enjoy them.
Recipe tips
These cheesecake bars are incredibly easy to make, but I’ve included a few tips to help you get the best results every time!
Use full-fat cream cheese. I recommend using brick-style cream cheese instead of whipped cream cheese or spreadable cream cheese. The higher fat content gives the filling a richer flavor and helps it hold its shape after chilling.
Make sure the cream cheese is softened. Cold cream cheese can leave lumps in the filling, even after mixing. Allow it to soften before beating it with the powdered sugar and vanilla extract.
Keep the heavy whipping cream cold. Cold cream whips more easily and holds its shape better. I recommend keeping it in the refrigerator until you’re ready to use it.
Whip the cream until stiff peaks form. This is an important step for creating a cheesecake filling that sets properly. If the whipped cream is too soft, the bars may not hold their shape as well when sliced.
Fold the whipped cream gently. Use a spatula to fold the whipped cream into the cream cheese mixture instead of beating everything together with an electric mixer. This helps preserve the airy texture.
Crush the crust cookies finely. Fine Oreo crumbs combine more evenly with melted butter and create a crust that’s easier to slice.
Chill the crust before adding the filling. Refrigerating the crust for 15-20 minutes helps it firm up, making it easier to spread the cheesecake mixture on top.
Don’t rush the chilling time. The cheesecake needs at least 6 hours in the refrigerator to become firm enough for slicing. Overnight chilling is even better!
Use a clean knife for slicing. Wipe the knife between cuts to create neat, bakery-style cheesecake bars.
How to make the best no-bake cheesecake filling
The filling is what makes these Oreo Cheesecake Bars so delicious!
It’s rich and creamy, but has a lighter texture than a traditional baked cheesecake.
The secret is using both cream cheese and freshly whipped heavy cream.
Cream cheese gives the filling its classic cheesecake flavor and thick consistency.
Powdered sugar adds just enough sweetness, while vanilla extract balances the slightly tangy flavor of the cream cheese.
The heavy whipping cream is what makes the filling extra special.
When heavy cream is whipped, it incorporates air and becomes thick and fluffy.
Gently folding the whipped cream into the cream cheese mixture creates a filling that’s lighter than one made with cream cheese alone.
But there’s one important thing to remember!
You want to whip the heavy cream separately before combining it with the cream cheese.
Simply pouring liquid cream into the cheese mixture won’t create the same fluffy texture.
I also recommend folding the whipped cream into the cream cheese in several additions.
The first addition loosens the thick cream cheese mixture, making it easier to incorporate the remaining whipped cream without losing too much air.
Once everything is combined, gently fold in the chopped Oreo cookies.
Try not to overmix the filling after adding the cookies. Too much stirring can break the cookies into tiny pieces and turn the filling gray.
A few chocolate cookie crumbs throughout the cheesecake are perfectly fine, but you want to keep some larger pieces for that delicious cookies and cream texture.
Do you need gelatin for no-bake cheesecake?
No! You don’t need gelatin to make this recipe.
The combination of full-fat cream cheese and heavy whipping cream provides enough structure for the cheesecake to firm up in the refrigerator.
As the filling chills, the cream cheese becomes firmer and the whipped cream helps the mixture hold its shape.
This creates a soft, creamy cheesecake that’s easy to scoop and slice after sufficient refrigeration.
It’s worth mentioning that this version will have a lighter texture than a cheesecake made with gelatin.
If you’re looking for a very firm cheesecake that can sit at room temperature for an extended period, a gelatin-stabilized recipe may be a better option.
But for a delicious homemade dessert that’s served chilled, I love the simple combination of cream cheese and whipped cream.
No extra ingredients required!
How to get clean cheesecake slices
If you’re making these cheesecake bars for a birthday party or special occasion, you might want them to look extra neat when served.
Luckily, there are a few easy ways to get beautiful, clean slices!
First, make sure the cheesecake is completely chilled before removing it from the pan.
I recommend at least 6 hours in the refrigerator, although overnight is even better.
Next, use the parchment paper handles to lift the entire cheesecake out of the pan.
This makes it much easier to slice than trying to cut and remove individual bars while they’re still inside the baking dish.
Use a large, sharp knife to cut the cheesecake into even portions.
For 16 bars, make three evenly spaced cuts in one direction, then three cuts in the opposite direction.
Wipe the knife with a clean paper towel after each cut.
If the filling is sticking to the knife, you can dip the blade into warm water, then dry it completely before making the next cut.
Another easy trick is to place the chilled cheesecake in the freezer for 15-20 minutes before slicing.
This firms up the filling slightly and makes it easier to cut without smearing the creamy layers.
Once sliced, return the bars to the refrigerator until you’re ready to serve.
Recipe variations
One of my favorite things about this dessert is how easy it is to change the flavors!
You can use different Oreo varieties, add chocolate toppings, or mix other ingredients into the cheesecake filling.
Here are a few delicious variations to try.
Chocolate Oreo cheesecake bars
If you’re a serious chocolate lover, you’re going to love this variation!
Melt 4 ounces of semisweet chocolate and allow it to cool until it’s no longer warm.
Beat the melted chocolate into the cream cheese mixture before folding in the whipped cream.
Continue preparing the cheesecake according to the recipe instructions.
The result is a rich chocolate cheesecake filling loaded with Oreo cookies!
You can also top the finished bars with chocolate shavings for even more chocolate flavor.
Peanut butter Oreo cheesecake bars
Chocolate and peanut butter are always a delicious combination!
For this variation, beat ½ cup of creamy peanut butter into the softened cream cheese mixture along with the powdered sugar and vanilla.
Continue preparing the cheesecake as directed.
The peanut butter adds a rich, nutty flavor that pairs perfectly with the chocolate cookie crust.
For an extra special finish, drizzle melted peanut butter over the chilled cheesecake before slicing.
Golden Oreo cheesecake bars
Want to make a vanilla version of this delicious dessert?
Simply replace the regular chocolate Oreos with Golden Oreos!
Use 24 Golden Oreos for the crust and another 10 chopped cookies for the filling.
The result is a creamy vanilla cheesecake with a sweet cookie crust and plenty of crunchy cookie pieces.
This is a great option if you prefer vanilla desserts over chocolate.
Mint Oreo cheesecake bars
If you love the combination of mint and chocolate, try using mint-flavored Oreos.
Replace the regular Oreos with mint Oreos in both the crust and filling.
You can also add a very small amount of peppermint extract to the cream cheese mixture for an extra minty flavor.
I recommend starting with just ⅛ teaspoon because peppermint extract can be strong.
Top the finished bars with extra mint Oreo crumbs or chocolate shavings.
Oreo cheesecake bars with chocolate ganache
For an extra rich dessert, top the cheesecake with a layer of chocolate ganache.
Heat ½ cup of heavy cream until hot but not boiling.
Pour it over 4 ounces of finely chopped semisweet chocolate.
Let it sit for 2 minutes, then stir until smooth.
Allow the ganache to cool to room temperature before spreading it over the already chilled cheesecake.
Return the pan to the refrigerator until the chocolate topping is set.
This creates a beautiful layer of chocolate over the creamy cookies and cream filling!
Frequently asked questions
How long does no-bake cheesecake take to set?
For this recipe, I recommend refrigerating the cheesecake for at least 6 hours.
This gives the cream cheese and whipped cream mixture time to become firm enough for slicing.
If you have the time, I highly recommend letting the cheesecake chill overnight.
The longer chilling time makes it easier to lift the cheesecake out of the pan and cut it into neat bars.
Remember, this filling is meant to be creamy and fluffy rather than as firm as a traditional baked cheesecake.
Can you make these cheesecake bars without heavy whipping cream?
Heavy whipping cream is one of the main ingredients that gives this recipe its light, fluffy texture.
You can use prepared whipped topping as a substitute, but the flavor and consistency will be slightly different.
If using whipped topping, replace the 1 cup of liquid heavy whipping cream with approximately 2 cups of prepared whipped topping.
Fold it into the cream cheese mixture just as you would the freshly whipped cream.
I prefer using real heavy whipping cream because it gives the filling a richer flavor and doesn’t add as much sweetness.
Why didn’t my cheesecake set?
If your cheesecake filling is too soft after chilling, there are a few possible reasons.
The heavy cream may not have been whipped until stiff peaks formed, or the cream cheese may have been too warm when mixed.
Using spreadable cream cheese instead of brick-style cream cheese can also affect the texture.
Another possibility is that the cheesecake simply needs more time in the refrigerator.
If the filling is still soft after 6 hours, refrigerate it for another 2-3 hours before checking again.
For easier slicing, you can also place the cheesecake in the freezer for a short time before serving.
Can you use Double Stuf Oreos?
Yes, you can use Double Stuf Oreos, but I recommend regular Oreos for the most predictable crust texture.
Double Stuf cookies contain more cream filling, which can make the crust softer when combined with melted butter.
If you’re using them, start with slightly less melted butter and add more only if needed to bring the crumbs together.
Regular Oreos give the crust a nice balance of chocolate cookie crumbs and cream filling.
For the cheesecake mixture, either variety will work!
Can you make Oreo cheesecake bars ahead of time?
Absolutely! This is one of my favorite desserts to make ahead of time.
Since the cheesecake needs at least 6 hours to chill, preparing it the day before serving is actually ideal.
You can make the entire dessert, cover it tightly, and refrigerate it overnight.
I recommend waiting to add any extra crushed cookies on top until shortly before serving if you want them to stay crunchy.
When you’re ready to serve, lift the cheesecake out of the pan, slice it into bars, and enjoy!
Can you make this recipe in a 9-inch square pan?
Yes! You can use a 9-inch square baking pan instead of an 8-inch square pan.
The ingredients and instructions will stay the same.
The main difference is that the crust and cheesecake filling will be slightly thinner because they’re spread over a larger surface.
The chilling time should still be at least 6 hours.
For thicker cheesecake bars, I recommend sticking with the 8-inch square pan.
Can you double the recipe?
Yes! This recipe is easy to double when you’re making dessert for a larger group.
Double all of the ingredients and prepare the cheesecake in a 9-inch by 13-inch baking dish.
The cheesecake layers will be a little thicker than the original, so I recommend refrigerating it overnight for the best results.
You can cut the larger cheesecake into approximately 24 bars, depending on the serving size you prefer.
This is a great option for birthday parties, holiday gatherings, or potlucks!
What to serve with Oreo cheesecake bars
These Oreo Cheesecake Bars are delicious on their own, but you can also serve them with a few simple toppings to make them extra special!
Whipped cream is a classic topping for cheesecake. Add a small dollop of freshly whipped cream to each bar just before serving.
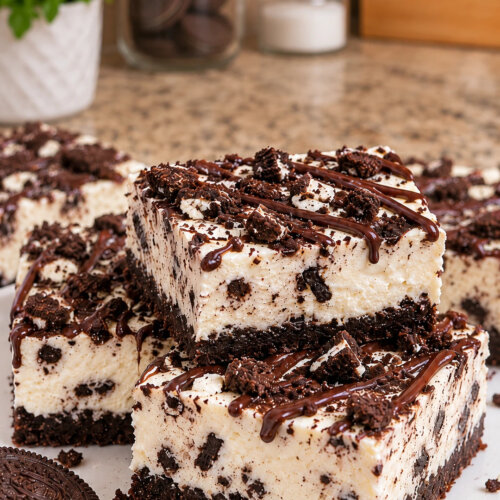
Chocolate sauce is another delicious option. A drizzle of chocolate syrup or melted chocolate adds even more rich chocolate flavor.
Fresh strawberries pair wonderfully with the creamy cheesecake filling. The slightly tart fruit balances the sweetness of the Oreo cookies.
Vanilla ice cream is a great addition if you’re serving these bars as part of a dessert platter. A small scoop alongside a chilled cheesecake bar is always delicious!
Extra Oreo cookies are my favorite simple garnish. You can sprinkle finely crushed cookie crumbs over the bars or add half of an Oreo cookie to each serving.
For a party, I like arranging the cheesecake bars on a large platter with a few extra cookies scattered around the edges.
It’s an easy dessert presentation that looks beautiful without requiring much extra work!
How to make them ahead of time
These cheesecake bars are perfect for preparing ahead of time because they need several hours to set in the refrigerator.
I recommend making them the evening before you plan to serve them.
Prepare the Oreo crust, mix the cheesecake filling, and spread everything in the lined baking pan.
Cover the pan and refrigerate overnight.
The next day, you can lift the cheesecake out of the pan and slice it into bars right before serving.
If you’re preparing these for a party, you can also slice the bars a few hours in advance.
Arrange them in a single layer in a covered container and refrigerate until you’re ready to serve.
I recommend keeping them cold until serving time, since the filling will soften as it warms.
If you’re adding whipped cream or extra crushed Oreo cookies as toppings, wait until shortly before serving for the freshest appearance and texture.
How to store and freeze leftovers
One of the best things about this dessert is that it’s easy to store in the refrigerator or freezer.
And if you have leftover cheesecake bars, they’re just as delicious the next day!
How to store them
Place leftover cheesecake bars in an airtight container.
I recommend arranging them in a single layer so the creamy filling doesn’t get pressed down by other bars.
If you need to stack them, place a sheet of parchment paper between the layers.
Store the cheesecake in the refrigerator for up to 4 days.
For the best texture, keep the bars cold until you’re ready to eat them.
The Oreo crust may soften slightly as it sits, but the cheesecake filling will stay rich and creamy.
Can you freeze Oreo cheesecake bars?
Yes! These cheesecake bars are a great dessert to freeze for later.
First, refrigerate the cheesecake until fully set.
Slice it into individual bars, then arrange them on a parchment-lined baking sheet.
Place the baking sheet in the freezer for approximately 1-2 hours, or until the bars are firm.
Once frozen, wrap each bar tightly in plastic wrap and place them in a freezer-safe container or bag.
Freeze for up to 2 months for the best quality.
When you’re ready to enjoy them, thaw the cheesecake bars in the refrigerator for several hours or overnight.
You can also enjoy them slightly frozen for a firmer, ice cream-like texture!
I recommend adding any extra Oreo toppings after thawing, so the cookies stay as crunchy as possible.
More easy no-bake desserts
If you love these Oreo Cheesecake Bars, there are so many other delicious desserts you can make without turning on the oven!
No-bake chocolate cheesecake is another great option for chocolate lovers. A chocolate cookie crust and rich chocolate cheesecake filling make a delicious dessert that’s perfect for special occasions.
Cookies and cream pudding dessert combines layers of chocolate cookies, vanilla pudding, and whipped cream for an easy dessert that can be prepared ahead of time.
Peanut butter cheesecake bars are perfect if you love the combination of creamy peanut butter and chocolate. A chocolate cookie crust pairs perfectly with the rich peanut butter filling.
No-bake strawberry cheesecake is a delicious option when fresh strawberries are in season. The creamy cheesecake filling and sweet strawberry topping make a beautiful summer dessert.
Chocolate Oreo truffles are another easy treat made with crushed Oreo cookies and cream cheese. They’re perfect for holiday dessert platters or homemade gifts.
I love having a collection of easy desserts that don’t require baking, especially when I’m preparing food for a party or family gathering.
These Oreo Cheesecake Bars are definitely one to add to your dessert rotation!
With a buttery chocolate cookie crust, a light and creamy cheesecake filling, and plenty of Oreo pieces in every bite, they’re a delicious treat that’s easy enough to make anytime.
Prepare them the night before, give them plenty of time to chill, and don’t forget an extra sprinkle of Oreo crumbs before serving!
No-Bake Oreo Cheesecake Bars Recipe
Ingredients
For the Oreo crust:
- 24 Oreo cookies finely crushed
- 5 tablespoons unsalted butter melted
For the cheesecake filling:
- 16 ounces cream cheese softened
- ¾ cup powdered sugar
- 1 teaspoon vanilla extract
- 1 cup cold heavy whipping cream
- 10 Oreo cookies roughly chopped
Optional topping:
- Extra crushed Oreo cookies or Oreo crumbs
Instructions
- Prepare the pan. Line an 8-inch by 8-inch baking pan with parchment paper, leaving an overhang on two sides for easy removal.
- Make the Oreo crust. Crush 24 Oreo cookies into fine crumbs using a food processor or rolling pin. Combine the crumbs with 5 tablespoons of melted butter and mix until evenly coated.
- Press the crust. Transfer the Oreo mixture to the prepared baking pan. Press firmly into an even layer using the bottom of a measuring cup. Refrigerate for 15-20 minutes while preparing the filling.
- Beat the cream cheese. In a large mixing bowl, beat softened cream cheese with an electric mixer until smooth and creamy, approximately 1-2 minutes.
- Add sugar and vanilla. Add powdered sugar and vanilla extract. Continue beating until completely smooth and combined.
- Whip the heavy cream. In a separate bowl, beat cold heavy whipping cream with an electric mixer until stiff peaks form, approximately 2-4 minutes.
- Combine the filling. Gently fold the whipped cream into the cream cheese mixture in several additions until smooth and fluffy.
- Add the Oreos. Fold in the 10 chopped Oreo cookies until evenly distributed throughout the cheesecake filling.
- Assemble the cheesecake. Spread the filling evenly over the chilled Oreo crust. Smooth the top with a spatula.
- Chill. Cover and refrigerate for at least 6 hours, or preferably overnight, until the cheesecake is firm enough to slice.
- Slice and serve. Lift the cheesecake from the pan using the parchment paper handles. Cut into 16 bars using a sharp knife, wiping the blade between cuts. Top with extra Oreo crumbs, if desired, and serve chilled.