

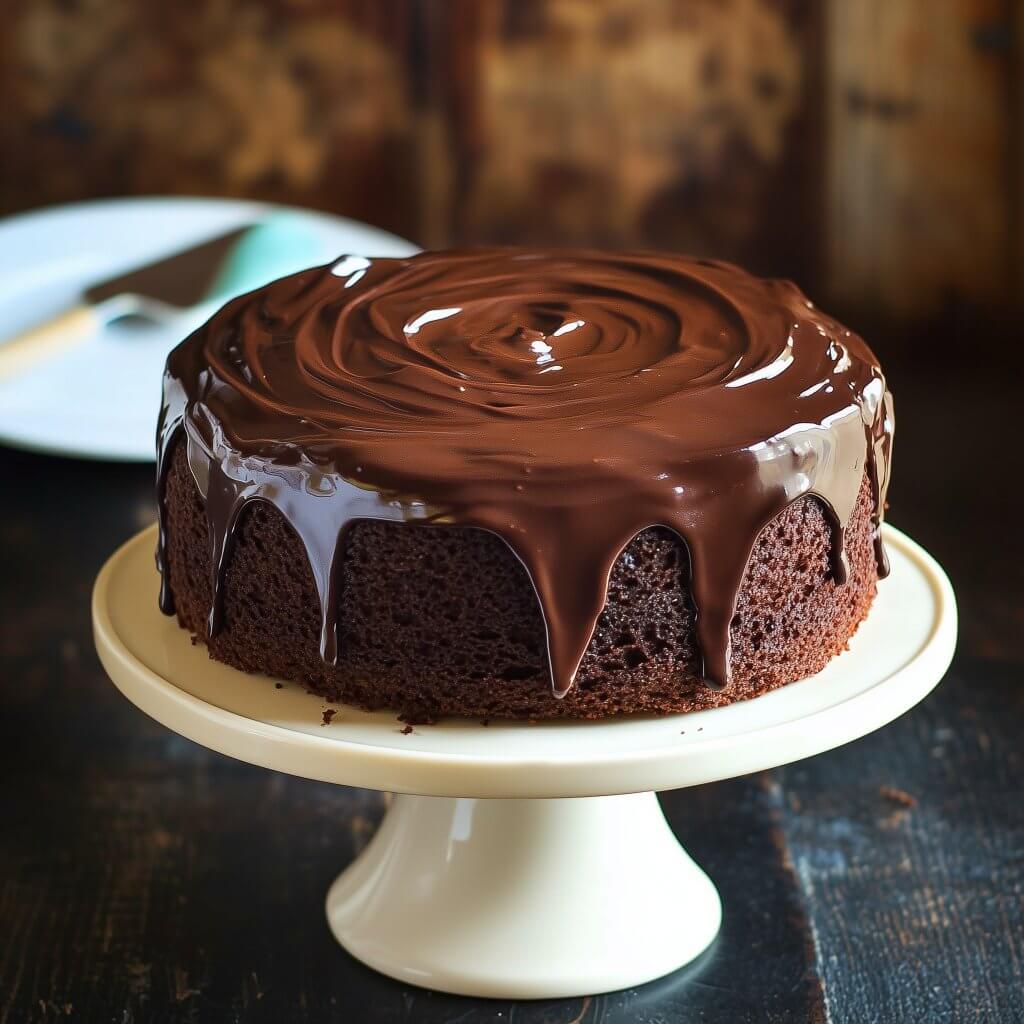
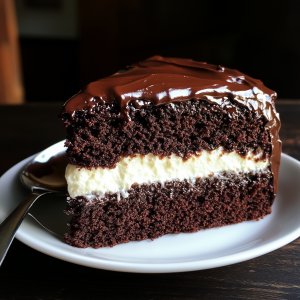
If you grew up loving chocolate snack cakes, this one feels familiar in the best way. Soft chocolate cake. A thick, fluffy cream filling. Then a glossy chocolate topping that sets up like a bakery-style ganache.
It’s rich, it’s neat to slice, and it’s one of those desserts that looks fancy without requiring fancy skills. Make it for birthdays, bake sales, holidays, or a random weekend when you want a chocolate cake that actually tastes like chocolate.
Save this recipe, because once you make it once, you’ll start thinking of reasons to make it again.
Why you’ll love this cake
-
It has that classic snack-cake vibe, but with real-deal homemade flavor.
-
The filling is thick and creamy, not runny or overly sweet.
-
The ganache sets up into a sliceable topping that still melts in your mouth.
-
You can make parts of it ahead, which makes assembly feel easy.
-
It feeds a crowd, and the leftovers stay good for days.
Frequently asked questions
Can I use a boxed chocolate cake mix
Yes. If you want to save time, bake two 9-inch layers from a chocolate cake mix and keep the homemade filling and ganache. The filling and topping are what make this taste like the real thing.
Does coffee make the cake taste like coffee
No. It strengthens the chocolate flavor. If you still prefer not to use it, use hot water.
Can I make the filling without marshmallow creme
You can, but the flavor changes. Marshmallow creme gives that classic Ding Dong style filling. If you skip it, use a vanilla buttercream or a whipped cream cheese filling instead.
How do I keep the filling from squeezing out
Leave a border around the edge, chill the cake before topping, and don’t overfill. A slightly thicker filling is easier to control, so chill it briefly if it feels soft.
My ganache looks dull
That usually happens if the chocolate overheats or if it’s stirred aggressively while still very hot. Let the cream sit on the chocolate first, then whisk gently. A small spoonful of corn syrup also helps keep the shine.
Ingredients
Here I explain the best ingredients for this Ding Dong Cake recipe, what each one does, and substitution options. For the exact ingredient measurements, jump to the recipe card at the bottom of this post.
For the chocolate cake
All-purpose flour – This gives the cake structure. If you prefer a slightly softer crumb, you can swap in cake flour, but I still recommend all-purpose for sturdy layers that slice clean.
Granulated sugar – Sweetens the cake and helps keep it moist. This cake is meant to be sweet, but the cocoa and ganache balance it.
Unsweetened cocoa powder – Use a good unsweetened cocoa. Natural cocoa works great here. If you only have Dutch-process cocoa, it will still work, but the flavor will be a little deeper and darker.
Baking soda + baking powder – This combo gives the cake lift and keeps it tender. It also helps the batter rise evenly in the pans.
Salt – Makes the chocolate taste stronger and keeps the cake from tasting flat.
Eggs – Bind everything together and add richness.
Buttermilk – Key for tenderness. No buttermilk in the fridge. Mix 1 tablespoon lemon juice or white vinegar with 1 cup milk, let it sit 5 minutes, then use it.
Neutral oil – Oil keeps the cake soft for days. I use vegetable, canola, or avocado oil.
Vanilla extract – Adds warmth and rounds out the cocoa.
Hot coffee or hot water – Hot liquid blooms the cocoa and makes the cake taste more chocolatey. Coffee does not make the cake taste like coffee. It just makes the chocolate pop.
For the cream filling
Unsalted butter – Softened, not melted. Butter gives the filling richness and structure so it holds between the layers.
Marshmallow creme – This is the classic “snack cake” flavor. It makes the filling fluffy and smooth.
Powdered sugar – Sweetens and thickens the filling.
Heavy cream – Whips into the filling and lightens it. You can use milk in a pinch, but heavy cream makes it thicker and more stable.
Vanilla extract + salt – A little vanilla and a tiny pinch of salt make the filling taste like a real bakery cream, not just sugar.
For the chocolate ganache topping
Semi-sweet chocolate – Use chocolate chips or chopped bars. Chopped bars melt smoother, but chips work perfectly.
Heavy cream – The base of a glossy ganache. Don’t swap in milk here or the topping won’t set the same.
Corn syrup (optional) – Just a tablespoon gives the ganache extra shine and a slightly softer bite. It’s optional, but it’s a nice touch.
Step-by-step instructions
For the full detailed recipe instructions, scroll to the recipe card at the bottom of this post.
1) Prep the pans and oven
Preheat the oven to 350°F.
Grease two 9-inch round cake pans, line the bottoms with parchment paper, then grease the parchment. Lightly dust with cocoa powder instead of flour. Cocoa keeps the outside of the cake dark and clean.
2) Mix the dry ingredients
In a large bowl, whisk together flour, sugar, cocoa powder, baking powder, baking soda, and salt.
This step matters. Cocoa likes to clump, and whisking now saves you from dry pockets later.
3) Add the wet ingredients
Add eggs, buttermilk, oil, and vanilla to the bowl.
Mix until the batter looks smooth and thick. Scrape down the sides of the bowl so everything is evenly combined.
4) Add the hot coffee
Slowly pour in the hot coffee (or hot water) while mixing on low speed.
The batter will look thinner. That’s exactly right. Thin batter bakes up into a moist cake.
5) Bake the cakes
Divide the batter evenly between the two prepared pans.
Bake for 28–35 minutes, or until a toothpick inserted in the center comes out with a few moist crumbs.
Let the cakes cool in the pans for 15 minutes, then turn them out onto a cooling rack to cool completely.
6) Make the cream filling
In a large bowl, beat softened butter until smooth.
Add marshmallow creme and beat again until fully combined.
Add powdered sugar, vanilla, and salt. Beat until thick and fluffy.
Add heavy cream and beat for 2–3 minutes, until the filling looks light, smooth, and spreadable.
If it feels too soft, chill it for 15 minutes. If it feels too thick, add 1–2 teaspoons extra cream.
7) Level the cakes and fill
Once the cakes are completely cool, level the tops with a serrated knife if they domed.
Place one cake layer on a serving plate or cake stand.
Spread the filling evenly over the top, leaving about ½ inch around the edge. The filling will spread slightly when you add the second layer.
Place the second layer on top, gently pressing down just enough to level it.
Chill the cake for 20–30 minutes before adding ganache. Cold cake = cleaner ganache.
8) Make the ganache
Place chocolate in a heat-safe bowl.
Heat heavy cream until it’s steaming and just starting to bubble at the edges. Do not boil hard.
Pour the hot cream over the chocolate. Let it sit for 2 minutes, then whisk until smooth and glossy.
Whisk in corn syrup if using.
Let the ganache cool for 10–15 minutes, until it thickens slightly but is still pourable.
9) Pour and set the topping
Pour ganache over the chilled cake, starting in the center and gently nudging it outward with an offset spatula.
Let it drip naturally down the sides. Stop when you like the look.
Refrigerate the cake for at least 30 minutes so the topping sets.
Tips for clean layers and a smooth finish
Use room temperature ingredients for the filling. Cold butter makes lumps. Warm butter makes it greasy. Softened butter is the goal.
Cool the cakes completely. Even a slightly warm cake will melt the filling. That makes the layers slide. Let them cool fully, then chill if you want extra insurance.
Chill before ganache. This is the easiest “pro” move in the whole recipe. A cold cake helps the ganache set faster and stay glossy.
Don’t rush the ganache. If it’s too hot, it will run right off the cake. If it’s too cool, it won’t spread. You want it thickened slightly, like warm syrup.
Slice with a hot, clean knife. Run a sharp knife under hot water, wipe dry, slice, then repeat. This keeps the layers crisp and picture-perfect.
Variations
Sheet cake version – Bake the cake batter in a greased 9 x 13-inch pan for about 30–38 minutes. Cool completely. Spread filling on top. Pour ganache over the filling. Chill, then slice into squares.
Cupcakes – Bake as cupcakes for 18–22 minutes. Core the centers and pipe in filling. Spoon ganache over the tops.
Extra dark chocolate – Use a mix of semi-sweet and dark chocolate in the ganache. Keep it mostly semi-sweet so the topping still sets nicely.
Peppermint – Add ¼ teaspoon peppermint extract to the filling and sprinkle crushed peppermint candies on top right after pouring ganache.
Peanut butter – Beat ½ cup creamy peanut butter into the filling with the butter. Chocolate + peanut butter always works.
Make ahead, storage, and freezing
Make ahead – Bake the cake layers up to 2 days ahead. Wrap each cooled layer tightly in plastic wrap and store at room temperature for 1 day or in the fridge for 2 days. Bring to room temp before filling.
Storage – Store the finished cake covered in the refrigerator for up to 5 days. The ganache protects the cake, so it stays moist.
Serving – For the best texture, let slices sit at room temperature for 10–15 minutes before serving. The filling softens slightly and the chocolate topping becomes extra silky.
Freezing – You can freeze slices. Wrap each slice in plastic wrap, then foil. Freeze up to 2 months. Thaw overnight in the fridge.
Ding Dong Cake
Ingredients
Chocolate cake
- 2 cups all-purpose flour
- 2 cups granulated sugar
- ¾ cup unsweetened cocoa powder
- 2 teaspoons baking powder
- 1 ½ teaspoons baking soda
- 1 teaspoon salt
- 2 large eggs
- 1 cup buttermilk
- ½ cup neutral oil
- 2 teaspoons vanilla extract
- 1 cup hot coffee or hot water
Cream filling
- ½ cup unsalted butter softened
- 1 ½ cups marshmallow creme
- 1 ½ cups powdered sugar
- 2 teaspoons vanilla extract
- ¼ teaspoon salt
- 3 tablespoons heavy cream
Chocolate ganache
- 10 ounces semi-sweet chocolate chips or chopped chocolate
- 1 cup heavy cream
- 1 tablespoon corn syrup optional
Instructions
- Preheat the oven to 350°F. Grease two 9-inch cake pans, line with parchment, grease again, and dust with cocoa powder.
- Whisk flour, sugar, cocoa powder, baking powder, baking soda, and salt in a large bowl.
- Add eggs, buttermilk, oil, and vanilla. Mix until smooth.
- Slowly pour in hot coffee (or hot water) while mixing on low. Mix just until combined.
- Divide batter between pans. Bake 28–35 minutes, until a toothpick comes out with a few moist crumbs. Cool 15 minutes in pans, then cool completely on a rack.
- Make the filling. Beat butter until smooth. Add marshmallow creme and beat until fluffy. Add powdered sugar, vanilla, and salt and beat again. Add heavy cream and beat 2–3 minutes until light.
- Assemble. Level cakes if needed. Spread filling over the first layer, leaving a ½-inch border. Add the second layer. Chill 20–30 minutes.
- Make ganache. Place chocolate in a bowl. Heat cream until steaming. Pour over chocolate, rest 2 minutes, then whisk smooth. Stir in corn syrup if using. Cool 10–15 minutes until slightly thickened.
- Pour ganache over the chilled cake and spread gently. Refrigerate 30 minutes to set before slicing.


Yummy