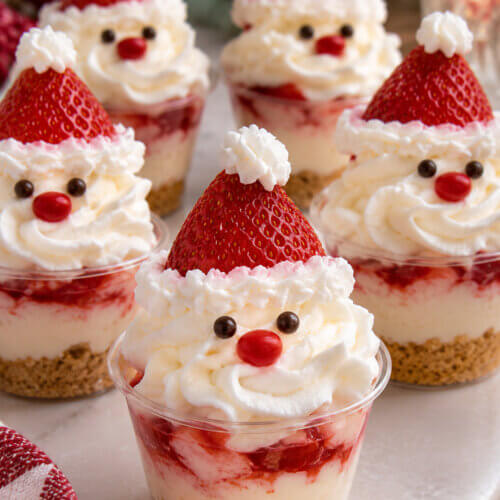
Santa Strawberry Cheesecake Cups
Make the cutest Santa Strawberry Cheesecake Cups with layers of buttery vanilla wafer crumbs, fluffy no-bake vanilla cheesecake filling, and sweet strawberries. Each individual dessert cup is topped with an adorable Strawberry Santa made from fresh strawberries, cheesecake cream, and mini chocolate chip eyes. These easy Christmas treats are perfect for holiday parties, family gatherings, and festive dessert tables!
Ingredients
For the vanilla wafer cookie layer
- 1½ cups finely crushed vanilla wafer cookie crumbs
- 4 tablespoons unsalted butter melted
- For the vanilla cheesecake filling
- 16 ounces full-fat brick-style cream cheese softened
- ½ cup powdered sugar
- 1 teaspoon vanilla extract
- 1 cup cold heavy whipping cream
For the strawberry layer
- 1½ cups fresh strawberries finely diced
- 3 tablespoons thick strawberry preserves
- 1 teaspoon fresh lemon juice
- For the Strawberry Santa toppers
- 12 large fresh strawberries washed and thoroughly dried
- ½ cup cheesecake filling reserved from the prepared filling above
- 24 miniature semisweet chocolate chips
Optional decorations
- Additional crushed vanilla wafer cookies
- Fresh mint leaves
- White chocolate curls
- Christmas sprinkles
Instructions
- Prepare the dessert cups. Arrange 12 clear 6-ounce dessert cups on a large tray or baking sheet.
- Make the cookie crumbs. In a medium mixing bowl, combine finely crushed vanilla wafer cookies and melted butter. Stir until the crumbs are evenly coated.
- Beat the cream cheese. In a large mixing bowl, beat softened cream cheese with an electric hand mixer for 1-2 minutes, until smooth and creamy.
- Add sugar and vanilla. Mix in powdered sugar and vanilla extract until smooth and evenly combined.
- Whip the heavy cream. In a separate chilled mixing bowl, whip cold heavy whipping cream until stiff peaks form.
- Combine the cheesecake filling. Gently fold the whipped cream into the cream cheese mixture in several additions until smooth and fluffy.
- Reserve decorating cream. Transfer ½ cup of the cheesecake filling to a small piping bag fitted with a round tip. Refrigerate for decorating the Strawberry Santas later.
- Prepare the strawberries. In a medium bowl, combine 1½ cups of finely diced strawberries, strawberry preserves, and lemon juice. Stir gently until evenly coated. Drain away any excess liquid if needed.
- Add the cookie layer. Spoon approximately 2 tablespoons of vanilla wafer crumbs into the bottom of each dessert cup. Press gently into an even layer.
- Add cheesecake filling. Pipe or spoon approximately 2 tablespoons of cheesecake filling over the cookie crumbs in each cup.
- Add the strawberry layer. Spoon approximately 2 tablespoons of the strawberry mixture over the cheesecake filling.
- Add the final cheesecake layer. Pipe approximately 2 more tablespoons of cheesecake filling over the strawberries, leaving room for the Santa topper.
- Chill. Refrigerate the cheesecake cups for at least 2 hours, until the filling is slightly firmer.
- Prepare the Santa strawberries. Remove the green tops from the 12 large strawberries. Trim the wide ends to create flat bases.
- Cut the Santa hats. Slice the pointed top one-third off each strawberry, keeping the tops with their matching bases.
- Pipe the Santa faces. Using the reserved cheesecake filling, pipe approximately 1 teaspoon of cream onto each strawberry base.
- Add the hats. Gently place the pointed strawberry tops over the cheesecake cream to create Santa's red hats.
- Make the eyes. Press two miniature chocolate chips into the front of each white cheesecake face.
- Add the pom-poms. Pipe a tiny dot of reserved cheesecake cream onto the tip of each strawberry hat.
- Chill the Santas. Refrigerate the decorated strawberries for approximately 15-20 minutes to help the cream firm up. This can be done during the cheesecake cups' chilling time.
- Assemble. Carefully place one Strawberry Santa on top of each chilled cheesecake cup, gently pressing the flat base into the cream for support.
- Decorate and serve. Add extra cookie crumbs, mint leaves, white chocolate curls, or Christmas sprinkles if desired. Serve chilled.
Notes
Dessert cups: Use 12 clear dessert cups that hold approximately 6 ounces each.
Cream cheese: Full-fat brick-style cream cheese creates the thickest, creamiest filling. Avoid whipped or spreadable cream cheese from a tub.
Softening: Allow cream cheese to soften before mixing to prevent lumps.
Whipped cream: Keep heavy whipping cream cold and whip until stiff peaks form before folding into the cheesecake filling.
Decorating cream: Reserve ½ cup of the cheesecake filling before assembling the dessert cups. This will be used for the Santa faces and hat pom-poms.
Vanilla wafers: Crush cookies into fine crumbs for a neat, buttery bottom layer.
Graham cracker variation: Substitute 1½ cups of graham cracker crumbs for the vanilla wafer crumbs.
Strawberry layer: Use ripe but firm strawberries and thick strawberry preserves for the best texture.
Extra moisture: Drain excess liquid from the strawberry mixture to keep the dessert layers neat.
Santa strawberries: Choose 12 large, firm strawberries with pointed tips for the cutest decorations.
Drying: Pat the strawberries thoroughly dry to help the cheesecake cream stay in place.
Flat bases: Trim the wide ends of the strawberries so the little Santas can stand upright.
Chocolate eyes: Miniature chocolate chips work best because they're small enough for the little Santa faces.
Chilling: Refrigerate the assembled cheesecake cups for at least 2 hours before decorating.
White chocolate variation: Add 3 ounces of melted and cooled white chocolate to the cream cheese mixture before folding in the whipped cream.
Chocolate variation: Add 3 tablespoons of unsweetened cocoa powder to the cheesecake filling. Reserve some plain filling first for the white Santa decorations.
Lemon variation: Add 1 teaspoon of finely grated lemon zest to the cheesecake filling.
Raspberry variation: Replace half of the diced strawberries with fresh raspberries.
Chocolate cookie variation: Replace the vanilla wafer crumbs with chocolate sandwich cookie crumbs.
Mini dessert option: Use smaller dessert cups and smaller strawberries to make approximately 16-18 miniature servings.
Make ahead: Prepare the cheesecake filling up to 24 hours in advance. Assemble the cups several hours before serving, but add the Strawberry Santa toppers shortly before serving.
Storage: Refrigerate finished dessert cups in an airtight container and enjoy within 24 hours for the freshest strawberry decorations. Undecorated cups keep for up to 2 days for the best quality.
Freezing: Freezing the assembled dessert cups isn't recommended because the strawberries may become watery and the filling can change texture.
Food safety: Keep the cheesecake cups refrigerated at 40°F or below. Don't leave at room temperature for more than 2 hours, or more than 1 hour when temperatures exceed 90°F.
Allergens: Contains milk and wheat. Mini chocolate chips may contain soy or other allergens depending on the brand.
Serving suggestion: Arrange the cheesecake cups on a white Christmas serving tray with all the little Santa faces pointing forward. Add a few fresh mint leaves or Christmas sprinkles for a beautiful festive dessert display.
Tried this recipe?Let us know how it was!