

Some pots of chili are “nice.” You eat a bowl, you move on.
This one sticks with you.
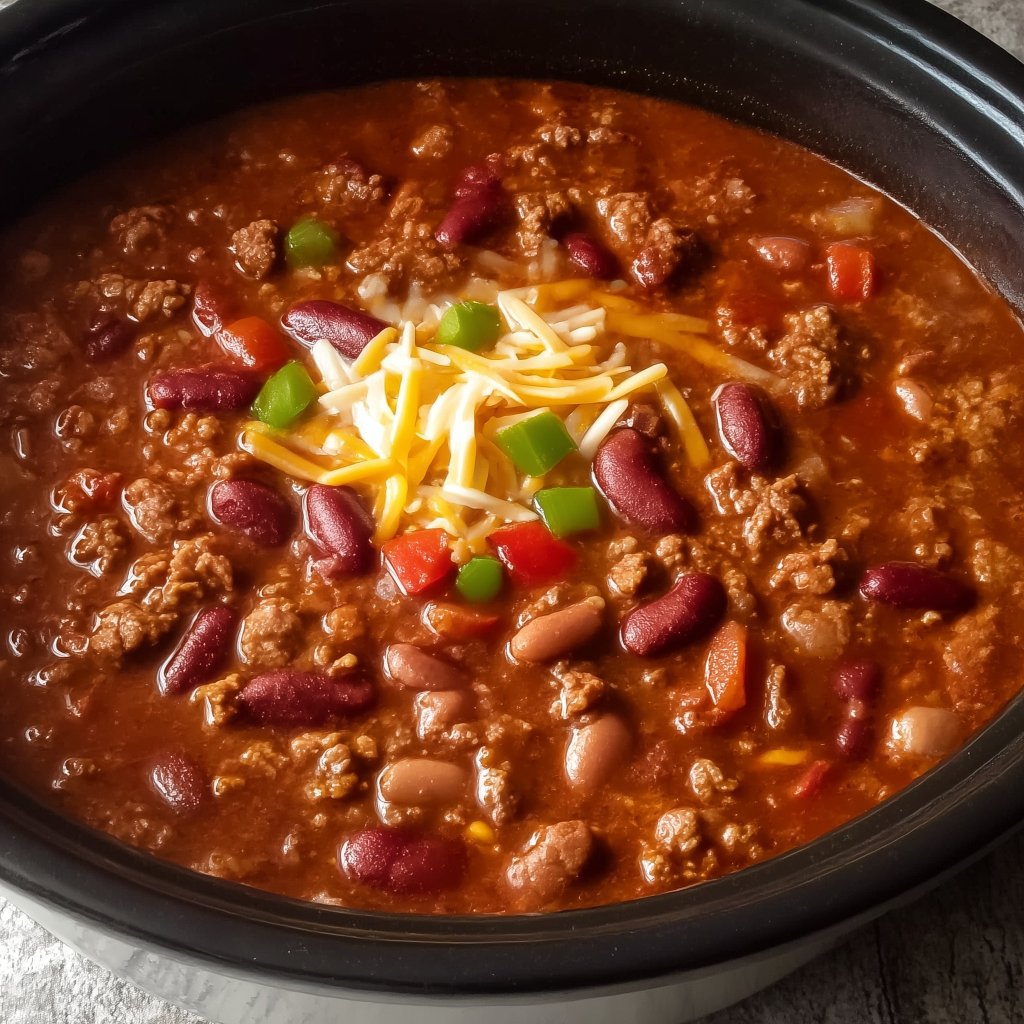
It’s thick without being pasty. Beefy without tasting greasy. Tomato-rich, a little smoky, and just spicy enough to keep every bite interesting. The beans hold their shape, the vegetables soften into the base, and the whole pot tastes better the longer it hangs out on the stove. That’s exactly the vibe people love about Wendy’s-style chili—simple ingredients, steady simmer, big payoff.
This recipe is built for real life. Weeknights when you want dinner to handle itself. Game-day bowls that can sit warm for hours. Leftovers that somehow taste even deeper the next day. And if you like chili piled onto baked potatoes, spooned over rice, or served with crackers for scooping… you’re in the right place.
Why You’ll Love This Recipe
-
That familiar Wendy’s-style flavor at home. Beef + beans + tomato base, balanced seasoning, and a slow simmer that brings it all together.
-
Thick, hearty, and spoon-coating. Not watery, not soup-y.
-
Easy to scale up. Make a big pot and freeze leftovers for future dinners.
-
Great for topping everything. Fries, baked potatoes, hot dogs, nachos, you name it.
-
Flexible heat level. Keep it mild, or add a little kick without wrecking the flavor.
Frequently Asked Questions (FAQs)
1) What makes this taste like Wendy’s chili?
It’s the combination of a tomato-forward base, mild chili spices, two kinds of beans, and a long simmer that blends everything into one smooth, cozy pot. The beef is browned well, then the vegetables and seasoning do the rest.
2) Can I make it thicker like the restaurant version?
Yes. Simmer it uncovered for the last 15–20 minutes. If you want it even thicker, mash a small scoop of beans and stir it back in, or add a quick cornstarch slurry at the end.
3) Can I make it in a slow cooker?
Absolutely. Brown the beef first (for flavor), then let the slow cooker handle the simmer. Full slow cooker instructions are included below.
4) How long does it last in the fridge?
Chili keeps well for up to 6 days in an airtight container. Reheat on the stove or in the microwave until hot throughout.
Ingredients
Here I explain the best ingredients for this Wendy’s chili recipe, what each one does, and substitution options. For the exact ingredient measurements, see the recipe card at the bottom of this post.
Beef
Ground beef (80/20 preferred)
That little bit of fat carries flavor and keeps the beef from tasting dry after a long simmer. You’ll drain excess grease, so you still end up with a clean-tasting chili.
Want a leaner option?
Use 90/10 ground beef, or ground turkey. If you go lean, add an extra tablespoon of oil when sautéing the vegetables so the base doesn’t taste flat.
Beans
Kidney beans + pinto beans
This combo gives you texture variety. Kidney beans stay firm and hearty. Pintos soften slightly and make the chili feel thicker.
Canned beans tip:
Rinse and drain them well. It keeps the chili from tasting overly salty and helps the tomato base shine.
Tomato base
Tomato sauce + diced tomatoes + a touch of tomato paste
Tomato sauce creates the smooth base. Diced tomatoes add little bursts and body. Tomato paste deepens the flavor and gives that darker, more “cooked all day” taste without extra work.
If you only have one tomato product:
Use what you have and adjust with broth or water. You just want enough liquid to simmer, not drown.
Vegetables
Onion + celery + green bell pepper
These vegetables soften into the chili and create that classic background flavor that tastes familiar, not “vegetable soup.”
Garlic
Adds warmth. You’ll taste it, but it won’t take over.
Seasoning
Chili powder + cumin + paprika
This trio builds the chili flavor without making it fiery. Paprika adds a gentle smoky note (especially if you use smoked paprika).
Sugar (small amount, optional but helpful)
A pinch rounds out acidity from the tomatoes. It doesn’t make the chili sweet. It just smooths the edges.
Salt + black pepper
Always adjust at the end. Beans and canned tomatoes vary a lot.
Liquid
Beef broth or water
Broth adds depth. Water works fine too, especially if you’re using tomato paste and enough seasoning.
Optional “restaurant-style” boost
A dash of Worcestershire
Gives a savory depth that makes the chili taste more “finished.” Keep it subtle.
Why the Ingredients Matter
This chili is simple on purpose, so each ingredient has a job.
-
Browning the beef creates flavor that carries the whole pot. If the beef is pale and steamed, the chili tastes flat.
-
Two beans keep it hearty without feeling heavy.
-
Tomato paste gives that slow-simmered taste fast.
-
Onion, celery, bell pepper melt into the background so the chili tastes rounded, not sharp.
-
Mild spices keep it classic. You can add heat later, but you can’t un-add it once it’s too spicy.
Small choices. Big difference.
How to Make Wendy’s Chili
This method gives you the best flavor with the least fuss. One pot, steady simmer, done.
Step 1: Brown the beef
Place a large Dutch oven or heavy-bottomed pot on the stove over medium-high heat.
Add the ground beef and break it up. Let it sit for a minute before stirring so it actually browns. Cook until no longer pink, about 7–9 minutes.
Drain excess grease if needed, then return the beef to the pot.
Quick texture tip:
If you want the beef to feel more like fine “chili meat,” break it up smaller as it cooks. You’re aiming for spoon-friendly pieces.
Step 2: Sauté the vegetables
Add the diced onion, celery, and green bell pepper to the beef.
Cook 5–6 minutes until the vegetables soften and the onion turns translucent. Add the garlic and cook 30 seconds, just until fragrant.
This step matters. Soft vegetables blend into the chili and make the base taste cooked, not raw.
Step 3: Bloom the spices
Sprinkle chili powder, cumin, paprika, salt, and pepper over the beef and vegetables.
Stir for 30–60 seconds. The spices will smell stronger and warmer. That’s exactly what you want.
Step 4: Build the base
Stir in the tomato paste first and cook it for 30 seconds. Then add tomato sauce, diced tomatoes, beans, and broth (or water).
Add Worcestershire if using. Add the small pinch of sugar if you like.
Stir well.
Step 5: Simmer low and slow
Bring the pot to a gentle simmer, then reduce heat to low.
Cover partially and simmer for 45–60 minutes, stirring occasionally. If it’s bubbling too hard, turn it down. Chili likes a calm simmer.
As it cooks, the flavor deepens, the tomato base softens, and everything starts tasting like one unified pot.
Step 6: Taste and adjust
Taste the chili and adjust seasoning.
-
Needs more depth? Add a pinch more cumin or chili powder.
-
Too thick? Add a splash of broth.
-
Too thin? Simmer uncovered 15–20 minutes.
-
Needs brightness? A tiny squeeze of lime at serving time can help (optional, not traditional, but useful).
Let it sit 10 minutes off heat before serving if you can. The texture settles and thickens slightly.
Slow Cooker Instructions
If you want chili that takes care of itself, this is the move.
-
Brown the ground beef in a skillet, drain grease, then transfer beef to the slow cooker.
-
Sauté onion, celery, and bell pepper for 3–4 minutes (optional, but it improves flavor), then add to slow cooker. Add garlic.
-
Add tomato paste, tomato sauce, diced tomatoes, beans, broth, and seasonings. Stir.
-
Cook on LOW 6–8 hours or HIGH 3–4 hours.
-
If you want it thicker, remove the lid for the last 30 minutes, or mash a small scoop of beans and stir back in.
Slow cooker chili is great for serving a crowd because it stays warm without drying out.
Instant Pot Instructions
Instant Pot is perfect when you want chili flavor fast.
-
Use Sauté mode to brown the ground beef. Drain if needed.
-
Add onion, celery, and bell pepper. Cook 4–5 minutes. Add garlic for 30 seconds.
-
Stir in spices and tomato paste.
-
Add tomato sauce, diced tomatoes, beans, and broth. Stir.
-
Pressure cook on HIGH for 12 minutes, then natural release 10 minutes.
-
If you want thicker chili, use Sauté mode for a few minutes to simmer and reduce.
Recipe Tips
Brown the beef like you mean it
Color = flavor. A good brown on the beef makes the whole pot taste richer.
Don’t skip the simmer
Even 30 minutes makes a difference. At 60 minutes, it tastes like you worked harder than you did.
Adjust thickness the easy way
-
Thicker: simmer uncovered, mash a few beans, or add a cornstarch slurry (1 tbsp cornstarch + 1 tbsp cold water).
-
Thinner: add broth a splash at a time.
Keep the seasoning mild, then build
This chili is meant to taste classic. If you want heat, add cayenne or hot sauce in small amounts at the end so you don’t overshoot.
Make it ahead on purpose
Chili is one of those foods that improves after a night in the fridge. The spices mellow and the tomato base tastes deeper.
Optional Additions
These are small tweaks that keep the chili in the Wendy’s-style lane, just with a little personalization.
-
Smoked paprika instead of regular paprika for a smokier base
-
A pinch of cayenne for gentle heat
-
A diced jalapeño sautéed with the vegetables for a fresher kick
-
Extra beans if you want it stretch farther
-
A splash of broth if your chili thickens too much while simmering
Try one change at a time. Chili is forgiving, but it’s easy to overwhelm the classic flavor if you pile on too many extras.
What to Serve It With
Wendy’s chili is famous for being simple, and the sides can stay simple too.
-
Crackers (classic, salty, perfect for scooping)
-
Cornbread (soft, slightly sweet, great contrast)
-
Baked potatoes (chili on a potato is always a good idea)
-
Rice (stretches the pot and makes it extra filling)
-
Macaroni (chili mac style, cozy and hearty)
-
Side salad (something crisp to balance the rich bowl)
If you’re feeding picky eaters, crackers and shredded cheese go a long way.
Toppings Bar Ideas
Set out bowls and let everyone build their own. It’s easy and keeps the pot simple.
-
shredded cheddar or cheddar-jack
-
diced white onion
-
sliced green onions
-
sour cream
-
crushed crackers
-
pickled jalapeños (for the heat lovers)
You don’t need ten toppings. Four or five is plenty.
Storage and Reheating
Refrigerator:
Store leftover chili in an airtight container in the refrigerator for up to 6 days.
Reheat on the stove:
Add chili to a saucepan over medium heat. Stir occasionally until hot, about 8–10 minutes. If it’s too thick, add a splash of broth or water.
Reheat in the microwave:
Microwave in a bowl in 60–90 second bursts, stirring between, until hot throughout.
Chili thickens as it sits. That’s normal. It’s usually even better the next day.
Freezing Tips
Chili freezes beautifully.
-
Cool chili to room temperature.
-
Portion into freezer-safe containers or bags.
-
Freeze up to 3 months.
-
Thaw overnight in the fridge for best texture.
-
Reheat gently on the stove, adding a splash of broth if needed.
If you freeze in flat freezer bags, it thaws faster and stacks neatly.
Troubleshooting
My chili tastes too acidic.
Add a pinch of sugar or a small pat of butter and stir. Also check salt—sometimes it tastes acidic because it’s under-salted.
My chili is too thin.
Simmer uncovered, stirring occasionally. If you’re in a hurry, use a cornstarch slurry.
My chili is too thick.
Add broth a splash at a time and stir until it loosens.
My chili tastes bland.
Add salt first. Then add a pinch more chili powder and cumin. A small dash of Worcestershire can help too.
My beans are mushy.
They simmered too aggressively or too long. Keep the heat low and use a gentle simmer, not a rolling boil.
Recipe Notes
-
Browning beef well builds flavor in the whole pot.
-
Simmer low and steady for the best texture.
-
Rinse beans for a cleaner, less salty flavor.
-
Want the thickest chili? Simmer uncovered at the end and mash a few beans into the base.

Wendy’s Chili (Homemade Copycat-Style)
Ingredients
- 2 pounds ground beef 80/20 preferred
- 1 medium yellow onion diced
- 2 celery stalks diced
- 1 green bell pepper diced
- 3 cloves garlic minced
- 2 tablespoons tomato paste
- 2 cans 15 oz each kidney beans, rinsed and drained
- 2 cans 15 oz each pinto beans, rinsed and drained
- 1 can 28 oz diced tomatoes (with juices)
- 1 can 15 oz tomato sauce
- 2 cups beef broth or water, as needed
- 3 tablespoons chili powder
- 2 teaspoons ground cumin
- 1 teaspoon paprika smoked or regular
- 1 ½ teaspoons salt plus more to taste
- ½ teaspoon black pepper
- 1 teaspoon Worcestershire sauce optional
- 1 teaspoon granulated sugar optional, for balancing tomatoes
Instructions
- Place a large pot or Dutch oven on the stove over medium-high heat.
- Add the ground beef, break it up, and cook until browned, 7–9 minutes. Drain excess grease if needed.
- Add onion, celery, and bell pepper. Cook 5–6 minutes until softened. Add garlic and cook 30 seconds.
- Stir in chili powder, cumin, paprika, salt, and pepper for 30–60 seconds.
- Add tomato paste and stir 30 seconds.
- Add kidney beans, pinto beans, diced tomatoes, tomato sauce, broth, Worcestershire (optional), and sugar (optional). Stir well.
- Bring to a gentle simmer, reduce heat to low, and simmer 45–60 minutes, stirring occasionally.
- Taste and adjust seasoning. Simmer uncovered to thicken if needed, or add broth if too thick.
- Rest 10 minutes, then serve warm with desired toppings.
Notes


Thank You