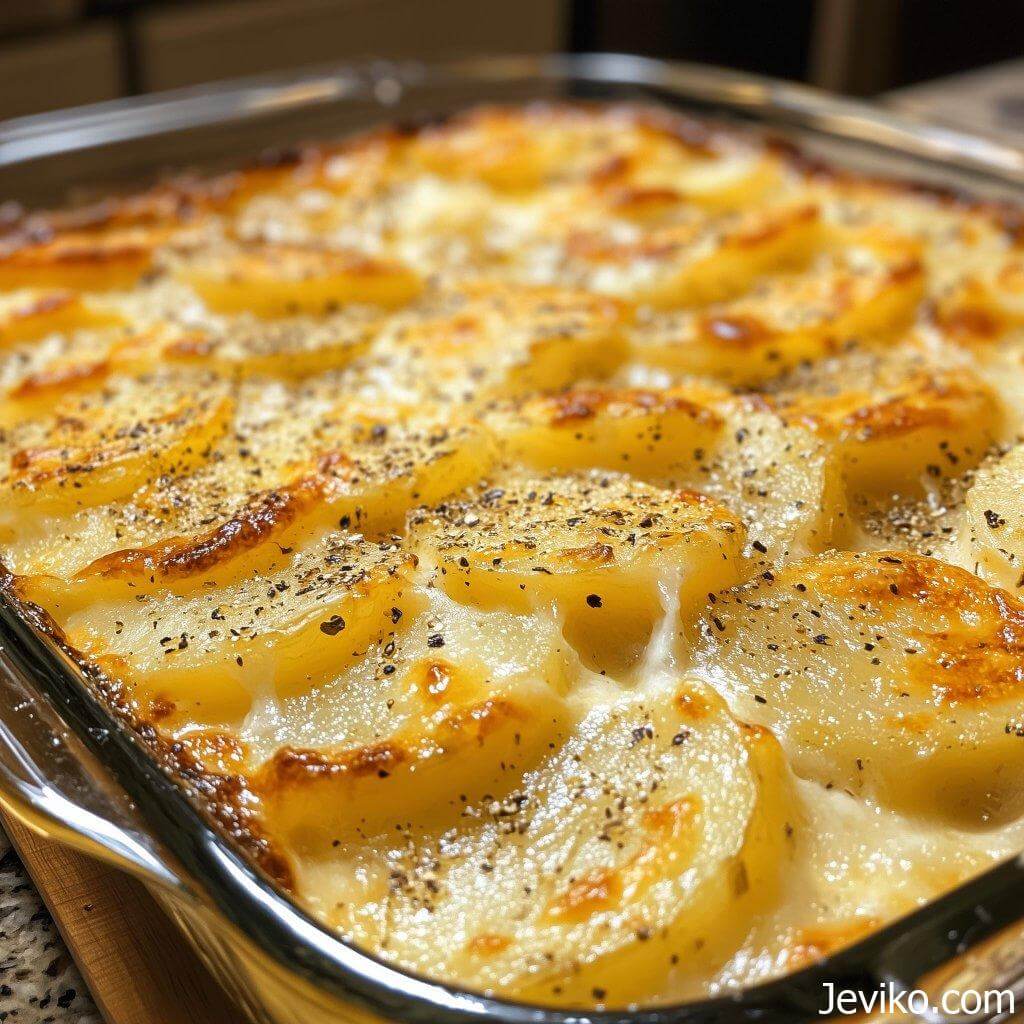
Scalloped Potatoes are the kind of side dish that quietly steals the show. Thin-sliced potatoes bake in a creamy, savory sauce until the edges are bubbling, the top turns lightly golden, and the center is soft and spoonable. You get rich flavor, tender layers, and that cozy baked aroma that makes the kitchen feel like something good is happening.
This is the dish I make when I want comfort food that still feels a little special. Holidays, Sunday dinner, potlucks, or just a regular weeknight where you want the plate to feel complete. It fits every time.
And yes, you can absolutely make it without stress. I’ll walk you through slice thickness, sauce consistency, bake timing, and the little details that keep the potatoes from turning watery or undercooked.
Why you’ll want this recipe
This isn’t the kind of scalloped potatoes recipe that tastes bland in the middle or bakes up uneven. It’s reliable.
Creamy, not soupy. The sauce thickens the right way, so the potatoes aren’t swimming.
Tender layers. The slices cook through evenly, with no random crunchy spots.
Classic flavor. Onion, garlic, and a little thyme make it taste rich without needing a long list of ingredients.
Make-ahead friendly. You can prep parts ahead, bake it later, and it still turns out great.
Easy to customize. Keep it classic, add cheese, tuck in ham, add herbs, make it gluten-free. The method holds up.
If you’ve ever pulled scalloped potatoes out of the oven and thought, “Why is it still firm?” or “Why is there so much liquid?” this version is built to avoid that.
Frequently asked questions
What’s the difference between scalloped potatoes and au gratin potatoes?
Scalloped potatoes are traditionally potatoes baked in a creamy sauce, often without cheese. Au gratin potatoes usually include cheese (and sometimes breadcrumbs) and tend to be richer. This recipe is classic scalloped style, with an easy cheese option if you want it.
What potatoes work best?
Yukon Gold and russet are both great. Yukon Gold gives a naturally buttery flavor and holds shape well. Russets bake up softer and soak up sauce beautifully. If you want neat slices, go Yukon Gold. If you want extra tender, go russet.
Do I have to peel the potatoes?
Not required, but peeling gives you the most classic texture. If you keep the skins on, scrub the potatoes well and slice evenly.
Can I use heavy cream only?
You can, but the dish turns very rich and can feel heavy. I like a mix of milk and cream because it stays creamy without feeling like it coats your mouth. If you only have milk, that works too. If you only have cream, use a little broth or water to lighten it.
How thin should I slice the potatoes?
About ⅛-inch is ideal. Too thick and they take forever. Too thin and the layers can get overly soft. Even slices matter more than perfect slices.
Can I assemble it ahead of time?
Yes, with one small tip: keep the potatoes from browning and don’t let the sauce cool into a thick paste before you pour it. I’ll cover the best make-ahead method below.
Why did my sauce curdle?
Most often it’s high heat + dairy that’s too lean. Use medium heat when thickening the sauce, don’t boil it hard, and avoid low-fat milk if you can. Also, don’t add cold dairy straight to a scorching hot pan.
How do I know it’s done?
The center should be tender when you slide a knife into the middle. Not “almost.” Tender. The top will be bubbly around the edges, and the sauce will look thick, not watery.
Ingredients
Here I explain the best ingredients for this scalloped potatoes recipe, what each one does, and substitution options. For the exact ingredient measurements, jump to the recipe card at the bottom of this post.
Potatoes and aromatics
Potatoes
Yukon Gold or russet. Plan on about 3 pounds for a 9×13-inch pan. That gives you a nice thick casserole that still bakes evenly.
Onion
Thin-sliced onion melts into the layers and gives sweet, savory flavor. Yellow onion is the classic choice.
Garlic
Fresh garlic adds warmth and depth. If you don’t have fresh, use garlic powder in the sauce.
Sauce base
Butter
Starts the roux and adds richness. Unsalted butter gives you better control over seasoning.
Flour
Thickens the sauce so it coats the potatoes instead of pooling. If you need gluten-free, cornstarch works (I’ll show you how).
Milk
Whole milk gives the best creamy texture. 2% works. I don’t recommend skim because the sauce can taste thin.
Heavy cream
Just enough to make the sauce feel rich and velvety. You can use half-and-half instead.
Chicken broth (optional)
A small splash adds savory depth and keeps the sauce from tasting one-note. If you want a fully classic dairy-only sauce, you can skip it.
Seasonings
Salt + black pepper
Potatoes need seasoning. Season the sauce and lightly season the potato layers too.
Thyme
A little thyme tastes perfect with creamy potatoes. Dried thyme works well.
Paprika (optional)
Adds warmth and color. Not required, but nice.
Optional add-ins
Cheese (optional)
A scalloped potato purist might skip it. But if you want a little melty top and extra richness, shredded cheddar, Gruyère, or Parmesan are all excellent.
Fresh herbs (optional)
Parsley or chives on top add a fresh finish.
How to slice potatoes so they bake evenly
This is the difference between “perfect scalloped potatoes” and “some are done, some aren’t.”
Aim for ⅛-inch slices.
A sharp knife works fine if you go slow. A mandoline makes it fast, but use the guard and take your time.
Keep the slices consistent.
Even thickness means even cooking. If some slices are thick and some are thin, the thin ones get soft while the thick ones stay firm.
Soak? Usually no.
Some potato recipes call for soaking to remove starch. For scalloped potatoes, that starch helps the sauce cling and gives the layers body. I don’t soak them.
Dry the slices if they’re wet.
If you rinse them for any reason, pat them dry. Extra water can thin your sauce.
Instructions
For the full detailed recipe instructions, scroll to the recipe card at the bottom of this post.
This method is straightforward: make a creamy sauce, layer potatoes and onions, bake covered until tender, then uncover to brown the top and thicken the finish.
Step 1: Preheat and prep the dish
Preheat the oven to 375°F.
Grease a 9×13-inch baking dish with butter or nonstick spray. Get the corners and sides.
Step 2: Slice the potatoes and onion
Peel the potatoes (optional). Slice them about ⅛-inch thick.
Thinly slice the onion.
Set them aside while you make the sauce.
Step 3: Make the creamy sauce
Place a saucepan on the stove over medium heat.
Melt the butter, then whisk in the flour. Cook for 1 minute, whisking constantly. You’re not trying to brown it, just cook out the raw flour taste.
Slowly whisk in the milk. Keep whisking so it stays smooth. Add the cream (and broth if using).
Bring the sauce to a gentle simmer. It will thicken in 3–5 minutes. You want it thick enough to coat a spoon, but still pourable.
Turn the heat to low and stir in:
-
salt
-
black pepper
-
thyme
-
paprika (if using)
Taste it. This is your moment to adjust. If it tastes bland here, it’ll taste bland baked.
Step 4: Layer the potatoes
Spread a small spoonful of sauce on the bottom of the baking dish. This keeps the first layer from sticking.
Add a layer of potatoes, slightly overlapping. Sprinkle a small pinch of salt and pepper over the potatoes.
Add a layer of sliced onions.
Spoon sauce over the layer—enough to lightly coat.
Repeat layers until you run out, finishing with sauce on top.
If you’re adding cheese, sprinkle some between layers or save it for the top. Both work. (I like a little inside and a little on top.)
Step 5: Bake covered
Cover the dish tightly with foil.
Bake for 60 minutes.
This covered bake is what cooks the potatoes through. You’re trapping steam so the center gets tender without drying out the top.
Step 6: Bake uncovered to finish
Remove the foil and bake for 20–30 minutes more, until:
-
the top is lightly golden
-
the sauce is bubbling around the edges
-
a knife slides into the center easily
If you want extra browning, add cheese during the last 10 minutes.
Step 7: Rest before serving
Let the dish rest for 15–20 minutes before serving.
This is not just a “nice idea.” It helps the sauce thicken and settle so you get creamy layers instead of a runny scoop.
How to make it extra creamy without turning it watery
Creamy scalloped potatoes should feel rich and thick, not loose.
A few things that help:
Don’t skip thickening the sauce.
If the sauce is thin before baking, it usually stays thin. Thicken it on the stove first.
Use a mix of milk and cream.
Milk alone can work, but cream makes the texture smoother. Too much cream can feel heavy, so the mix keeps it balanced.
Keep the dish covered for the first bake.
This cooks the potatoes through. If you uncover too soon, the top can dry while the center stays firm.
Finish uncovered.
That last uncovered bake helps excess moisture evaporate and gives you a better top.
Recipe tips
Season the layers lightly.
A pinch of salt between layers keeps the potatoes from tasting flat.
Don’t crank the heat.
Higher temperature can cause the sauce to split and the top to brown before the center is tender. 375°F is a sweet spot.
Check the center with a knife.
Edges cook faster. The center tells the truth.
If it’s browning too fast, cover loosely.
A loose foil tent for the last 10–15 minutes can prevent overbrowning while the center finishes.
Want a softer onion bite?
Slice the onion very thin. It will melt right into the layers.
Want a stronger onion flavor?
Use a little onion powder in the sauce too. It deepens the flavor without adding more texture.
Optional additions and variations
Cheesy scalloped potatoes
Add 2 cups shredded cheese. Sharp cheddar is classic. Gruyère feels a little more special. Parmesan adds salty depth.
For best results:
-
add a little cheese between layers
-
add the rest on top during the last 10 minutes so it melts and browns
Ham and scalloped potatoes
Add 2–3 cups diced ham (leftover ham is perfect). Sprinkle it between layers. It turns this into a full meal with a salad on the side.
Garlic herb version
Add an extra clove of garlic and stir in chopped fresh parsley or chives after baking. Fresh herbs wake up the whole dish.
Creamier “au gratin” style
Add cheese and a pinch of nutmeg to the sauce. Just a tiny pinch. It adds warmth and makes the sauce taste deeper.
Gluten-free option
Skip the flour. Instead:
-
whisk 2 tablespoons cornstarch into ½ cup cold milk
-
add it after the milk and cream are warm
-
simmer until thickened
Cornstarch thickens quickly, so keep the heat gentle and whisk constantly.
Lighter version
Use all milk and skip the cream. The sauce won’t be as rich, but it still works. Just make sure you thicken it properly and season well.
Make-ahead tips
Scalloped potatoes are a strong make-ahead side, especially for holidays.
Prep ahead (best option)
-
Slice the potatoes and onion.
-
Make the sauce.
-
Store them separately in the fridge up to 24 hours.
When you’re ready, assemble and bake. This keeps the potatoes from sitting in warm sauce too long.
Assemble ahead (works, with one note)
You can assemble the full dish, cover, and refrigerate up to 24 hours. If you do this:
-
let the sauce cool slightly first
-
press plastic wrap directly onto the surface (then foil) to reduce condensation
-
bake straight from the fridge and add 10–15 minutes to the covered bake time
Can you freeze it?
You can, but dairy sauces sometimes change texture after freezing. If you freeze it, freeze it baked, cool completely, wrap well, and thaw overnight in the fridge before reheating. It’ll still taste good, just slightly softer.
Storage and reheating
Refrigerator: Store leftovers in an airtight container for up to 4 days.
Reheat in the oven:
Place in a baking dish, cover with foil, and warm at 350°F for 20–25 minutes (longer for a full pan). Add a splash of milk if it looks dry.
Reheat in the microwave:
Microwave works for individual portions. Heat in 60–90 second bursts until hot.
The sauce thickens in the fridge.
That’s normal. It loosens again when reheated.
What to serve with scalloped potatoes
Scalloped potatoes pair with almost anything, but they’re especially good with:
-
baked ham or pork tenderloin
-
roast chicken
-
meatloaf
-
grilled steak
-
green beans, broccoli, or asparagus
-
a crisp salad with a tangy dressing (it balances the creaminess)
If you’re serving them for a holiday, something fresh and green on the side makes the plate feel bright.
Scalloped Potatoes
Ingredients
- 3 pounds Yukon Gold or russet potatoes peeled (optional) and sliced ⅛-inch thick
- 1 medium yellow onion thinly sliced
- 4 tablespoons unsalted butter
- ¼ cup all-purpose flour
- 2 cups whole milk
- 1 cup heavy cream or half-and-half
- ½ cup chicken broth optional, for extra savory flavor
- 1 ½ teaspoons salt plus more for layering
- ¾ teaspoon black pepper plus more to taste
- 1 teaspoon dried thyme
- ¼ teaspoon paprika optional
- 2 cloves garlic minced
Optional cheese:
- 2 cups shredded cheddar or Gruyère or ½ cup Parmesan
Optional garnish:
- chopped parsley or chives
Instructions
- Preheat oven to 375°F. Grease a 9×13-inch baking dish.
- Slice potatoes about ⅛-inch thick. Thinly slice onion.
- Make the sauce: melt butter in a saucepan over medium heat. Whisk in flour and cook 1 minute. Slowly whisk in milk, then cream (and broth if using). Simmer 3–5 minutes until thickened. Stir in garlic, salt, pepper, thyme, and paprika (optional).
- Spread a spoonful of sauce in the bottom of the baking dish. Layer potatoes, a pinch of salt/pepper, onions, then sauce. Repeat, finishing with sauce on top. Add cheese between layers if using.
- Cover tightly with foil and bake 60 minutes.
- Uncover and bake 20–30 minutes more until golden, bubbling, and a knife slides easily into the center. Add cheese on top during the last 10 minutes if desired.
- Rest 15–20 minutes before serving. Garnish with parsley or chives if you like.