
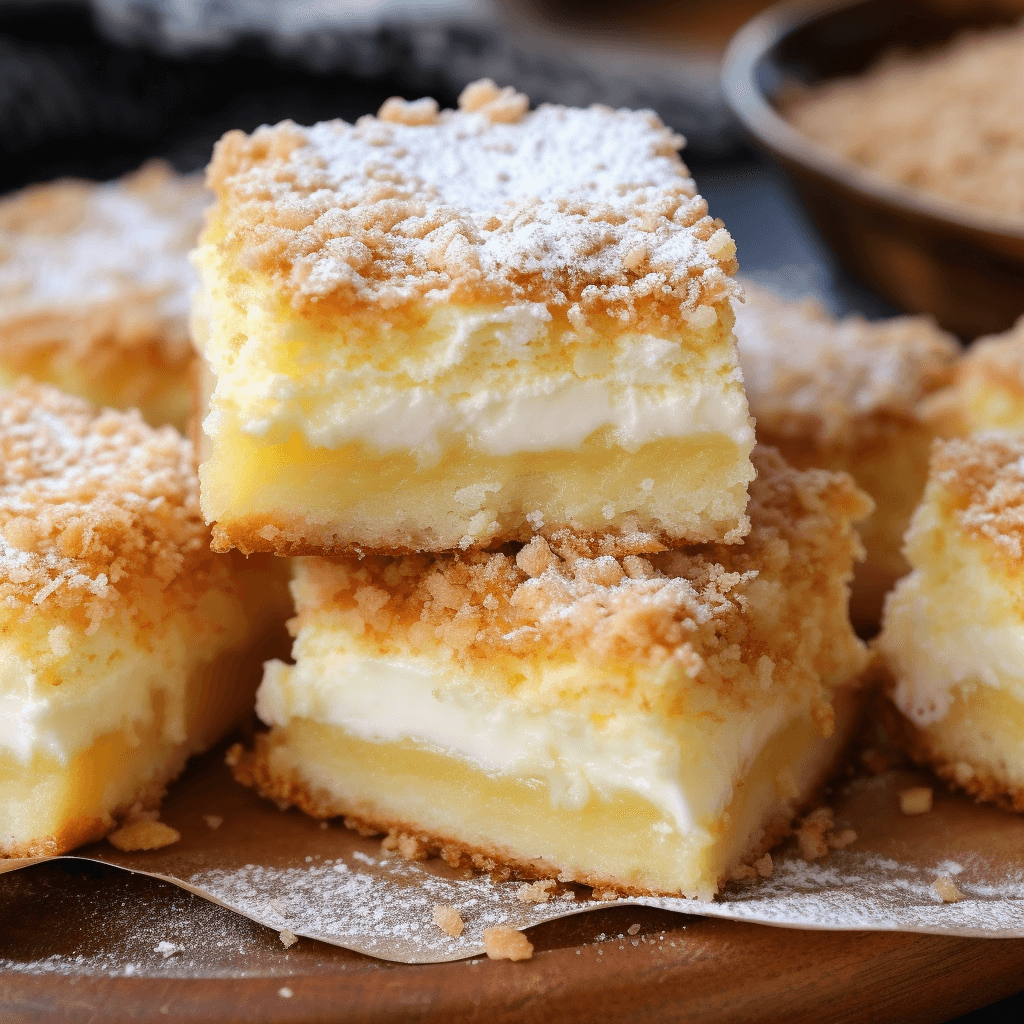
Cream Cheese Squares are the kind of bake that disappears in quiet little ways. One person cuts a small piece “just to taste,” then comes back for a real square. Someone else walks by the pan, pauses, and somehow ends up with a fork in hand. By the time you’re ready to wrap leftovers, the corners are gone and the middle is suspiciously low.
They’re simple, but they don’t taste simple. You get a buttery, flaky base (thank you, crescent dough), a thick layer of sweetened cream cheese that bakes up smooth and soft, then a glossy cinnamon-sugar top that turns lightly crisp around the edges. The finished bars feel like a cross between cheesecake and a warm pastry. Not fussy. Not heavy. Just rich enough to feel like dessert, but easy enough to make on a regular day.
This recipe also has a little built-in flexibility, which is probably why it’s stayed popular for so long. You can keep it classic with vanilla and cinnamon. You can add lemon zest and make it brighter. You can go full dessert-table style and drizzle on a simple glaze. And if you’ve got a crowd coming over, it’s one of those “bake it in a 9×13 and relax” situations.
The best part is how forgiving the process is. You’re not juggling a water bath. You’re not fighting a springform pan. You’re layering, spreading, sprinkling, and baking. The only real “skill” here is patience while it cools, because these slice cleaner once they’ve had time to set.
Why You’ll Love This Recipe
-
Big payoff with minimal effort. It’s a layered bar that looks and tastes like you worked harder than you did.
-
That creamy center. Soft, rich, and smooth with just the right sweetness.
-
Flaky crust without rolling dough. Crescent dough makes it easy and buttery.
-
Perfect for sharing. Potlucks, bake sales, holidays, birthdays—this pan travels well.
-
Easy to customize. Citrus, chocolate, berries, nuts, glaze… it all works.
Frequently Asked Questions (FAQs)
1) Are these the same as sopapilla cheesecake bars?
They’re very similar. Sopapilla-style bars usually lean heavily on cinnamon sugar and sometimes use honey. Cream Cheese Squares can be made the same way, but I keep the flavor balanced so the cream cheese layer still shines.
2) Do I have to use crescent roll dough?
It’s the classic choice because it bakes flaky and buttery with almost no work. If you can find crescent “sheet dough,” it’s even easier. Puff pastry can work, but it bakes differently and can end up taller and crispier than this style is meant to be.
3) Why did my top layer slide around or separate?
That usually happens when the bottom layer wasn’t pressed together well or the cream cheese layer was too warm and loose. Press seams firmly, keep the cream cheese thick (softened, not melted), and let the bars cool completely before slicing.
4) How do I get clean squares instead of messy pieces?
Cool completely, then chill for at least 1 hour before slicing. Use a sharp knife and wipe it clean between cuts. If you lined the pan with parchment, lifting and cutting on a board makes it even easier.
Ingredients
I’ve included notes and descriptions below for each ingredient in this recipe. For the exact ingredient measurements, jump to the recipe card at the bottom of this post.
Crescent roll dough
This is your top and bottom “crust.” Two cans gives you enough dough to fully cover a 9×13 pan.
A helpful upgrade: crescent sheet dough (if your store carries it). No perforations, no seam worries. If you only have regular crescent dough, don’t stress—just pinch the seams closed well.
Cream cheese
Use block cream cheese. It bakes smoother and sets better than whipped cream cheese.
Softened is key. You want it pliable so it whips smooth, but not melty. If it’s too warm, the filling can spread too thin and bake unevenly.
Sugar
Granulated sugar sweetens the cream cheese layer and also helps the cinnamon-sugar topping melt into a glossy finish.
Vanilla
Vanilla rounds out the richness and keeps the flavor warm. It’s subtle, but it makes the filling taste finished.
Egg
One egg helps the cream cheese layer set into neat slices. You can make the bars without it, but they’ll be softer and a little looser in the middle.
Butter
Melted butter goes over the top dough layer. This is what helps the cinnamon sugar stick and bake into that lightly crisp, glossy top.
Cinnamon
Classic. Warm. Familiar. It’s what makes these taste like a bakery pastry instead of just cheesecake bars.
Salt
A tiny pinch matters here. It keeps the sweetness from tasting flat and makes the cream cheese taste richer.
Optional: lemon zest
If you want the bars to taste a little brighter and less “heavy,” lemon zest does it without turning the recipe into lemon dessert.
Optional: glaze
A quick powdered sugar glaze makes these look bakery-ready, especially if you’re serving them for a party.
Instructions
For the full detailed recipe instructions and ingredient quantities, scroll to the recipe card at the bottom of this post.
1) Prep the oven and pan
Preheat your oven to 350°F.
Grease a 9×13-inch baking dish. If you want easy lifting and super neat cuts, line it with parchment paper, leaving an overhang on the long sides.
2) Build the bottom layer
Unroll one can (or one sheet) of crescent dough and press it into the bottom of the pan.
If you’re using perforated crescent dough, pinch all seams closed. Take your time here. A well-sealed bottom layer helps the bars slice clean and keeps the filling from sneaking into cracks.
3) Make the cream cheese filling
In a mixing bowl, beat the softened cream cheese until smooth.
Add sugar and beat again until creamy. Scrape the bowl so you don’t get little cream cheese streaks.
Add the egg, vanilla, and salt. Beat just until smooth and combined.
The mixture should look thick, creamy, and spreadable—like a soft cheesecake batter.
4) Spread the filling
Spoon the cream cheese mixture over the bottom dough layer.
Spread it evenly all the way to the edges. A small offset spatula makes this easy, but a regular spoon works too.
5) Add the top dough layer
Unroll the second can of crescent dough and place it over the filling.
This part feels tricky, but it doesn’t need to be perfect. If the dough tears, patch it. If the seams show, pinch them lightly. Once it bakes, no one will care. They’ll be busy eating.
6) Butter + cinnamon sugar topping
Pour melted butter evenly over the top layer.
Mix sugar and cinnamon together, then sprinkle it evenly over the buttered dough.
Don’t dump it all in the center. Sprinkle from a height so it lands in a more even layer.
7) Bake
Bake for 28–35 minutes, or until the top is golden brown and the edges are set.
The center should look baked and slightly puffed, not wet or jiggly.
8) Cool completely
Cool at room temperature for about 1 hour, then refrigerate for at least 1 hour if you want clean slices.
You can absolutely eat them warm, but they’ll be softer and messier. Chilled bars cut into neat, bakery-style squares.
What cream cheese squares taste like
If you’re trying to picture them before baking, here’s the vibe.
The crust tastes like a buttery pastry. Not flaky like a croissant, but soft, tender, and lightly crisp at the edges. The filling is rich and creamy, like cheesecake—but less dense than a full cheesecake slice. And the topping adds that cinnamon-sugar finish that tastes like a warm pastry from a bakery case.
They’re sweet, but not candy-sweet. They’re rich, but not heavy in the way a thick cheesecake can be. Each bite has three textures: soft crust, creamy center, slightly crisp topping.
It’s comfort dessert. Classic. Familiar. Reliable.
Best pan and why it matters
A 9×13 pan is the sweet spot for this recipe.
-
Metal pan: browns faster, gives a slightly crisper edge.
-
Glass pan: bakes a little slower and can keep the center softer.
Both work. Just watch the bake time. Glass pans sometimes need a few extra minutes.
If you use a smaller pan, the bars will be thicker and need more bake time. The center can stay too soft if you don’t adjust. If you use a larger sheet pan, the bars will be thinner and bake quicker, and the cream cheese layer can dry out.
If you’re baking for a crowd and want more servings, make two 9×13 pans instead of resizing. It’s easier and more consistent.
How to avoid a soggy bottom
Nobody wants bars that feel wet underneath. Good news: this is mostly preventable.
Seal the seams
If you’re using perforated crescent dough, pinch seams closed firmly. Gaps let filling seep down and can create soft spots.
Don’t over-soften the cream cheese
Softened is good. Melted is not. If your cream cheese gets too warm, the filling becomes thin and can leak into seams more easily.
Bake until the top is properly golden
Underbaked crust = softer bottom. The top should be golden and the edges should look set.
Cool before cutting
Warm cream cheese filling is naturally looser. Cooling lets it firm and helps everything hold together.
Cinnamon sugar topping tips
This topping is simple, but small details make it better.
Mix the cinnamon and sugar first
If you sprinkle cinnamon and sugar separately, you can end up with bitter cinnamon pockets. Mixing gives you an even flavor.
Sprinkle evenly
Try to cover the surface fairly evenly so every square has that glossy, sweet finish.
Want more crunch?
Add 1–2 tablespoons of coarse sugar (like turbinado) to the topping mix. It gives a little sparkle and a slight crunch.
Want a lighter topping?
Reduce the cinnamon sugar by a third. The bars will still taste great, just less “pastry top.”
Optional glaze
A glaze isn’t required, but it looks polished, especially if you’re serving these at a party.
Simple glaze idea
Powdered sugar + a splash of milk + a small drop of vanilla.
Drizzle over cooled, sliced squares.
If you drizzle on warm bars, the glaze melts into the topping (still tasty, just not as pretty). If you drizzle on chilled bars, you get clean lines and a nice finish.
Variations you’ll actually want to make
Cream Cheese Squares are easy to tweak without ruining what makes them good. Here are variations that still feel like the original recipe, just with a different mood.
Lemon cream cheese squares
Add lemon zest to the cream cheese filling. You can also replace a tablespoon of the sugar with a tablespoon of lemon juice, but zest gives better flavor without thinning the filling too much.
Berry swirl squares
Spoon small dollops of thick jam or fruit preserves over the cream cheese layer and swirl gently with a knife before adding the top crust. Strawberry, raspberry, and blueberry all work well.
Use a thick preserve, not a watery sauce.
Chocolate chip cream cheese squares
Fold mini chocolate chips into the cream cheese filling. Mini chips distribute better and don’t sink as much.
Pumpkin spice version
Add pumpkin pie spice to the cinnamon sugar topping. For a stronger pumpkin vibe, beat in a few spoonfuls of pumpkin puree to the cream cheese mixture, but keep it small so you don’t thin the filling too much.
Nutty topping
Sprinkle chopped pecans or walnuts over the cinnamon sugar topping. It adds crunch and makes the bars feel extra “holiday.”
Extra-rich cheesecake style
Add an extra egg yolk to the cream cheese filling. The texture becomes slightly more custardy and rich.
Serving ideas
These bars are great straight from the pan, but they also dress up easily.
-
Serve chilled for neat squares that hold their shape.
-
Serve slightly warm for a softer, gooier center.
-
Add a spoonful of whipped cream if you’re making a dessert plate.
-
Add fresh berries on the side to balance the richness.
-
Dust lightly with powdered sugar if you skip the glaze and still want a finished look.
If you’re putting these out on a dessert table, cut them into smaller squares. They’re rich, and smaller pieces disappear faster because people don’t feel “committed” to a big slice.
Storage and reheating
Refrigerator
Store in an airtight container in the fridge for up to 5 days.
The texture gets even better after the first chill because the filling firms and slices clean.
Room temperature
They can sit out for a couple hours while serving, but because of the cream cheese layer, refrigeration is best for longer storage.
Reheating
You don’t have to reheat them, but if you like them warm:
-
Microwave a square for 8–12 seconds.
Just enough to soften the center a bit.
Freezing and make-ahead
These freeze better than people expect.
To freeze
Cool completely, chill until firm, then cut into squares.
Wrap each square tightly and store in a freezer-safe container. Freeze up to 2 months.
To thaw
Thaw in the fridge overnight, or at room temperature for about 30–45 minutes.
If you want the “fresh baked” feel, warm a thawed square for a few seconds in the microwave.
Make-ahead tip
Bake the bars the day before serving. Chill overnight. Slice the next day. This is the easiest way to get clean, sharp-edged squares with no mess.
Cream Cheese Squares
Ingredients
- 2 cans 8 oz each crescent roll dough (or 2 crescent dough sheets)
- 16 oz cream cheese softened (2 blocks)
- 1 cup granulated sugar
- 1 large egg
- 2 teaspoons vanilla extract
- ¼ teaspoon fine salt
- ½ cup unsalted butter melted
- ¼ cup granulated sugar for topping
- 1 tablespoon ground cinnamon for topping
Optional:
- 1 teaspoon lemon zest
- Powdered sugar glaze powdered sugar + milk + vanilla
Instructions
- Preheat oven to 350°F. Grease a 9x13-inch baking dish (or line with parchment).
- Press 1 can/sheet of crescent dough into the bottom of the pan. Pinch seams closed.
- Beat cream cheese until smooth. Add 1 cup sugar and beat until creamy. Add egg, vanilla, salt (and lemon zest if using) and mix until smooth.
- Spread filling evenly over the bottom dough layer.
- Place the second dough layer on top, patching as needed and pinching seams lightly.
- Pour melted butter over the top. Mix ¼ cup sugar + cinnamon and sprinkle evenly over the butter.
- Bake 28–35 minutes, until golden brown and set.
- Cool 1 hour at room temp, then chill at least 1 hour before slicing for clean squares.
- Optional: drizzle with glaze after cooling and slicing.


Thank you!