A Little Slice of Sunshine in Every Bite!
Ohhh, I cannot wait to share this recipe with you because these Pineapple Bliss Bars have become a whole thing in our house. It all started a couple months ago when my sister came to visit for the weekend. She’s a pineapple fanatic—she puts it on everything (yes, even pizza, and no, we are NOT debating that here 😄). I wanted to make a little treat that felt tropical, creamy, and not too heavy after dinner. So I started tinkering with a few ideas and bam—these were born.
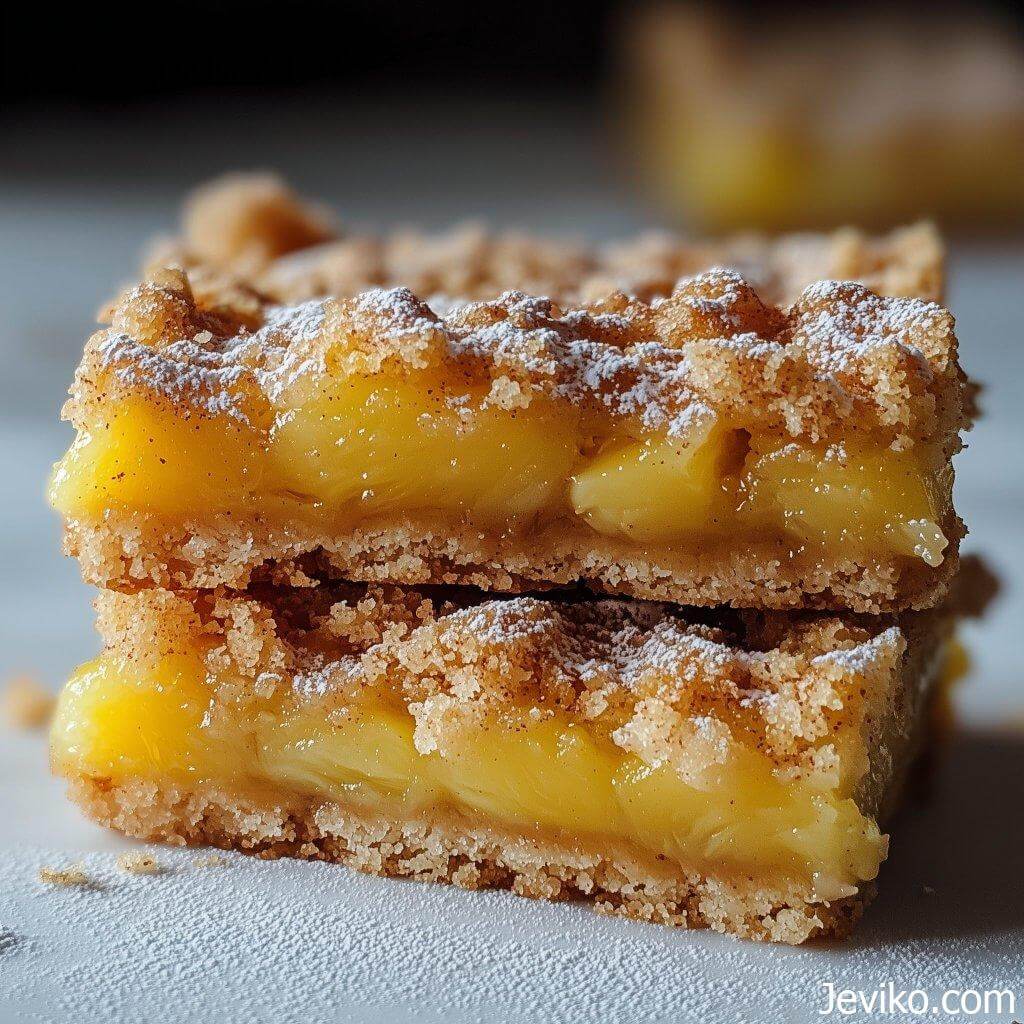
Imagine this: a buttery shortbread crust, topped with a luscious, creamy pineapple filling, then finished with a sweet coconut crumble that gets all golden and toasty in the oven. The smell alone had us dancing in the kitchen. I served them chilled with a cup of tea on the porch while the sun dipped low and the air was warm and lazy… y’all, it was magic.
This is the kind of recipe that makes you feel like you’re on vacation, even if you’re just barefoot in your kitchen with a toddler clinging to your leg and a pile of laundry in the corner.
Why You’ll Love These Pineapple Bliss Bars:
- Tropical Flavor Explosion – Juicy pineapple, creamy filling, and toasted coconut make every bite feel like you’re somewhere sunny.
- Creamy Meets Crunchy – Soft, custard-like filling nestled between a crisp shortbread base and a golden coconut topping.
- Perfect Make-Ahead Dessert – They chill beautifully and slice even better the next day.
- Crowd Pleaser – Potlucks, brunches, baby showers—these bars are always the first to disappear!
Frequently Asked Questions (FAQs)❓
My pineapple filling came out too runny. What did I do wrong, and how can I fix it next time?
The most common culprit here is extra moisture from the crushed pineapple. Even though it’s packed in juice (not syrup), canned pineapple can still hold more liquid than you think, and that can water down your filling.
Here’s how to prevent that next time:
Drain well: After opening the can, pour the crushed pineapple into a fine mesh sieve or colander. Let it sit for a few minutes to drain off the juice. Then press it gently with the back of a spoon to squeeze out any extra liquid.
Don’t overmix the filling: Once you stir the pineapple into the condensed milk mixture, just fold it in gently. Overmixing can sometimes loosen the filling too much.
Bake until just set: Make sure the bars are fully baked before removing them from the oven. The edges should look firm and slightly puffed, and the center should have a very slight jiggle—like Jell-O, not soup.
If you’ve already baked them and they’re a little soft, don’t worry—they’ll still taste amazing! Just refrigerate them overnight before slicing. The filling will firm up as it chills.
Can I make these bars ahead of time, and how should I store them?
Absolutely, yes! These bars are actually even better the next day, once they’ve had time to chill and all the flavors meld together. Here’s how to plan ahead and store them properly:
Make Ahead Tips:
You can make the full batch the night before or even up to 2 days ahead.
After they cool completely, cover the pan tightly with plastic wrap or foil and store it in the refrigerator overnight.
Storage:
Once they’ve chilled, cut them into bars and store them in an airtight container in the fridge for up to 5 days.
If stacking them, place a piece of parchment or wax paper between layers to keep the coconut topping from sticking.
Freezing Instructions:
These bars freeze surprisingly well! Wrap each one tightly in plastic wrap and place in a freezer-safe bag or container. They’ll keep in the freezer for up to 2 months.
Thaw overnight in the refrigerator. They taste just as dreamy after defrosting!
These bars are ideal for parties, potlucks, or any time you want a no-stress dessert that you can make ahead and serve chilled.
Is there a way to make this recipe a little less sweet without losing the flavor?
Great question! These bars definitely lean toward the sweeter side thanks to the condensed milk and coconut, but there are a few simple tweaks you can make if you prefer a more balanced bite:
Add extra lemon juice or zest: A tablespoon more of fresh lemon juice—or a bit of lemon zest—will give the filling a brighter, tangier edge to cut through the sweetness.
Use unsweetened coconut: If you can find unsweetened shredded coconut, it works wonderfully in the topping and helps dial back the sugar. You may want to add an extra teaspoon of brown sugar to help it brown nicely.
Reduce the topping amount slightly: The coconut-butter topping is rich and sweet. You could scale it back by ¼ cup or skip the sugar in that layer altogether if you’re using sweetened coconut.
Try Greek yogurt: For a fun twist, you can swap ¼ cup of the condensed milk with plain Greek yogurt. It adds a little tang and cuts the sugar while still giving you a creamy texture.
These little changes make a big difference without sacrificing that tropical flavor you’re craving!
Ingredients:
For the shortbread crust:
- 1 cup (2 sticks) unsalted butter, cold and cubed
- 2 cups all-purpose flour
- ½ cup powdered sugar
- ¼ teaspoon salt
For the pineapple filling:
- 1 can (20 oz) crushed pineapple in juice (not syrup), well-drained
- 1 can (14 oz) sweetened condensed milk
- 4 large egg yolks
- 2 tablespoons fresh lemon juice (bottled is fine, but fresh is best!)
- 1 teaspoon pure vanilla extract
For the coconut topping:
- 1½ cups sweetened shredded coconut
- ¼ cup light brown sugar, packed
- 3 tablespoons unsalted butter, melted
- Pinch of salt
Instructions:
- Preheat and Prep:
Preheat your oven to 350°F. Line a 9×13-inch baking pan with parchment paper, leaving an overhang on the sides so you can lift the bars out later. (Trust me, it makes slicing them so much easier!) - Make the Crust:
In a medium bowl, mix the flour, powdered sugar, and salt. Cut in the cold butter with a pastry cutter (or your fingers, if you’re like me and don’t want to dirty another tool!) until it resembles coarse crumbs.
Press the mixture evenly into the bottom of the prepared pan—don’t overthink it, just get a good, even layer. Bake for 18–20 minutes, or until the edges are just starting to turn golden.
- Prepare the Filling:
While the crust is baking, whisk together the egg yolks, condensed milk, lemon juice, and vanilla in a large bowl. Then fold in the crushed pineapple. It should look silky and smell like sunshine.
Once the crust comes out of the oven, pour this luscious mixture right on top and spread it evenly.
- Make the Topping:
In a small bowl, combine the shredded coconut, brown sugar, melted butter, and that little pinch of salt. Mix until everything’s coated in buttery goodness.
Sprinkle the coconut mixture evenly over the pineapple layer. Don’t press it down—just let it sit lightly on top.
- Bake:
Pop it back in the oven and bake for 25–30 minutes, until the topping is golden brown and the filling is just set. You’ll know it’s ready when the edges look firm and the center has just the tiniest jiggle. - Chill & Slice:
Let it cool completely at room temp, then cover and refrigerate for at least 3 hours (overnight is best if you can wait!). Once chilled, lift it out using the parchment overhang and cut into bars.
Pro Tips for Success:
- Drain that pineapple well! Too much juice will make the filling runny.
- Use cold butter in the crust for the flakiest texture—room temp just won’t give you the same snap.
- Don’t skip the lemon juice—it adds brightness that keeps the sweetness in check.
- Let it chill completely before slicing, or you’ll end up with a gooey mess (a tasty mess, but still 😄).
Storage & Serving Suggestions:
- These bars keep wonderfully in the fridge for up to 5 days—just store them in an airtight container. If you want to be extra, serve them with a dollop of whipped cream and a little lime zest on top. SO good.
- They also freeze great! Wrap them individually in plastic wrap, then stash in a zip-top bag. Thaw overnight in the fridge when you’re ready to serve.