

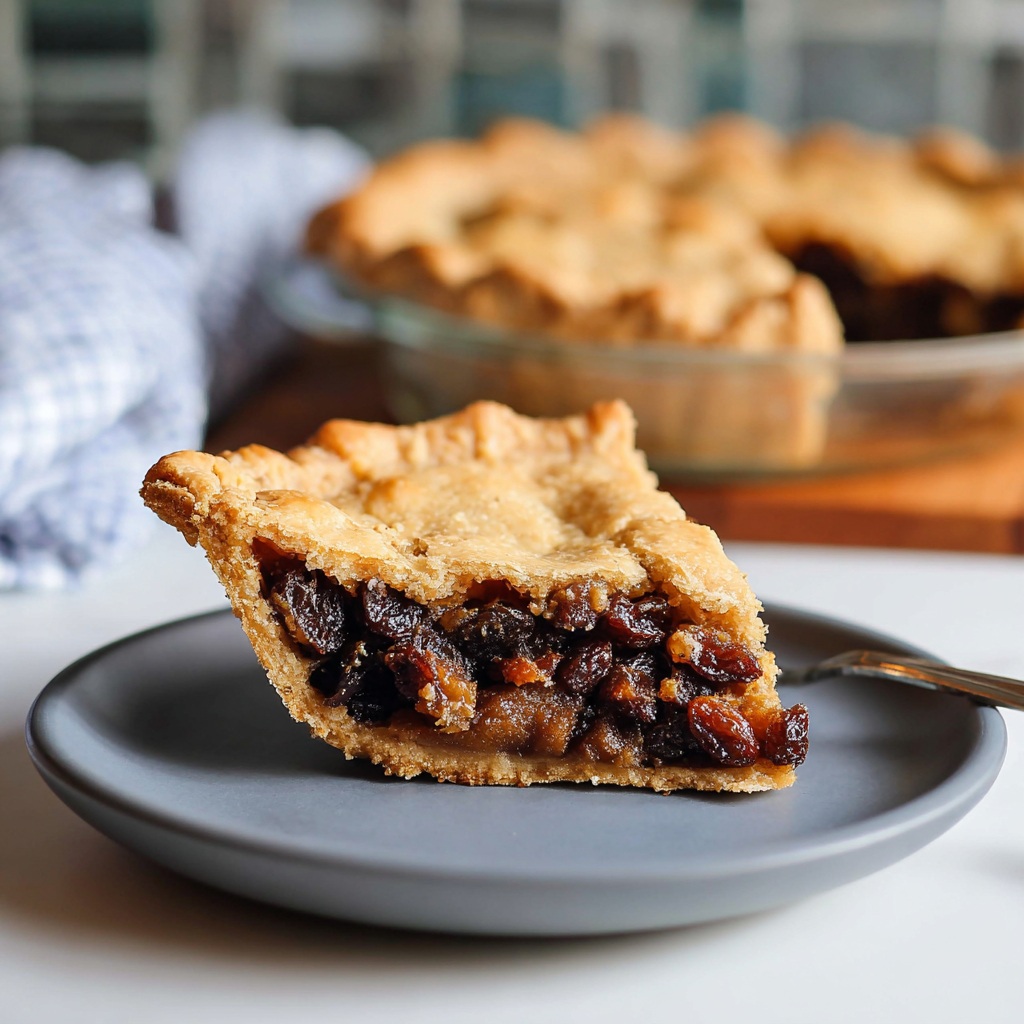
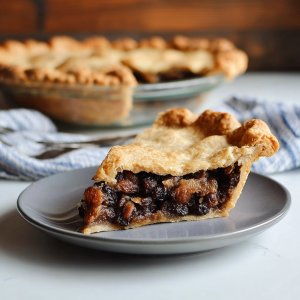
Raisin pie is one of those desserts that surprises people. They hear the name and picture something dry or overly sweet, then they take a bite and suddenly the whole idea clicks. The filling isn’t just raisins. It’s a silky, spiced custard-style fruit filling that turns glossy on the stove, then bakes into a slice that holds together like a proper pie should.
This is a pantry pie in the best sense of the word. Raisins last forever. Sugar is always around. A couple lemons in the fruit bowl and you’re basically ready. It’s the kind of recipe that feels practical, but still tastes like you made something special on purpose.
What I love most is the balance. Raisins bring natural sweetness. A little cinnamon gives warmth. Lemon adds brightness so it doesn’t taste heavy. And butter stirred in at the end makes the filling taste rich and smooth, not sticky.
The other thing? The smell. When this bakes, the kitchen fills up with that warm, “something good is happening” scent—spice, butter, and sugar caramelizing just enough around the crust edges. Let it cool, slice it clean, and you’ve got a pie that’s old fashioned for a reason. It works.
Why You’ll Love This Recipe
-
Classic flavor, no fuss. Simple ingredients, straightforward steps, real payoff.
-
A filling that slices clean. Glossy, thickened on the stove first, so it sets up beautifully.
-
Not overly sweet. Lemon and a pinch of salt keep the sweetness in check.
-
Make-ahead friendly. It actually gets better after it cools and rests.
-
Perfect for sharing. It travels well and serves neat slices without falling apart.
Frequently Asked Questions (FAQs)
1) What does raisin pie taste like?
Think of it like a spiced fruit custard pie. The filling is sweet and warm with cinnamon, but the lemon keeps it bright. The raisins soften and plump so they feel tender, not chewy.
2) Do I have to cook the filling before baking?
For this version, yes. Cooking the filling first thickens it properly and helps prevent a runny pie. It also gives the raisins time to soften and absorb flavor before they go into the crust.
3) Can I use dark raisins, golden raisins, or both?
All work. Dark raisins give a deeper, classic flavor. Golden raisins taste a little lighter and more honey-like. A mix of both looks pretty and tastes great.
4) How do I know when the pie is done?
The crust should be golden and the filling should look set, not wet or sloshy. If you gently nudge the pie dish, the center shouldn’t ripple like liquid. Let it cool completely before slicing—this pie firms as it cools.
Ingredients
I’ve included notes and descriptions below for each ingredient in this recipe. For the exact ingredient measurements, jump to the recipe card at the bottom of this post.
Pie crust
2 pie crusts (one for the bottom, one for the top)
Homemade or store-bought is fine. This filling has plenty of personality, so you don’t need a complicated crust to make it good.
If you’re using store-bought refrigerated crusts, let them sit at room temperature for about 10 minutes so they roll without cracking.
Raisins
Dark raisins, golden raisins, or a mix
Raisins are the heart of this pie, so choose ones that are soft and plump, not dried out and hard. If your raisins are old and stiff, you can still use them—just give them a little extra simmer time to soften.
A mix of dark and golden raisins makes the filling look prettier and adds a nice flavor contrast.
Sugar
Granulated sugar
This sweetens the filling, but it also helps create that glossy texture when cooked with the thickener.
Thickener
Cornstarch (preferred) or flour
Cornstarch gives a clear, glossy filling that sets nicely. Flour works too, but the filling can look slightly more opaque and “pudding-like.”
Cornstarch is what I recommend if you want that classic jewel-toned look.
Liquid
Water
Simple, reliable, pantry-friendly. You don’t need juice or fancy extras for this to taste great.
Lemon
Fresh lemon juice + optional zest
Lemon is what keeps raisin pie from tasting like straight sugar. It adds brightness and makes the flavor feel layered.
If you love a stronger citrus note, add a little lemon zest too. It perfumes the filling without making it “lemon pie.”
Butter
Unsalted butter
Butter stirred in at the end makes the filling smooth and rich. It also rounds out the spice.
Egg yolks (optional, but delicious)
Some old fashioned versions use egg yolks to give the filling a slightly creamier, custard-like finish. This recipe includes them as optional because the pie is still fantastic without them.
If you use yolks, you’ll temper them gently so they don’t scramble.
Spices
Cinnamon + a tiny pinch of nutmeg (optional)
Cinnamon gives warmth. Nutmeg is optional and should be very subtle. You’re going for cozy, not spicy.
Salt
A small pinch makes the sweetness taste cleaner and keeps the pie from feeling flat.
Vanilla (optional)
Vanilla adds a soft, bakery-style warmth. Not required, but it’s a nice touch.
Egg wash (optional)
1 egg + 1 tablespoon water
Brushing the top crust helps it bake up golden and shiny. It also makes the pie look finished with almost zero effort.
Instructions
For the full detailed recipe instructions and ingredient quantities, scroll to the recipe card at the bottom of this post.
1) Prep the oven and crust
Preheat your oven to 400°F.
Roll out one pie crust and fit it into a 9-inch pie dish. Trim the edges if needed, leaving a little overhang.
Place the pie dish in the fridge while you make the filling. Cold crust helps the bottom bake better.
2) Start the raisin filling on the stove
In a medium saucepan, combine:
-
raisins
-
water
-
sugar
-
cinnamon
-
salt
Bring it to a gentle simmer over medium heat.
Let it simmer 5–7 minutes, stirring occasionally, until the raisins begin to plump and soften. You’ll notice the liquid darken slightly. That’s what you want.
3) Thicken the filling
In a small bowl, whisk the cornstarch with a few tablespoons of cool water (taken from the measured amount if you prefer, or just use a splash—either way works). Stir until smooth.
Pour the cornstarch slurry into the simmering raisin mixture while stirring.
Keep stirring and simmer for 1–2 minutes until the filling turns glossy and thick enough to coat a spoon.
4) Add lemon and butter
Remove the pan from the heat.
Stir in:
-
lemon juice (and zest if using)
-
butter
-
vanilla (if using)
Stir until the butter melts completely.
At this point, the filling should look shiny, thick, and rich. It will loosen a little as it sits, then thicken again as it cools.
5) Optional egg yolks (only if using)
If you’re using egg yolks, do it gently:
In a small bowl, whisk the yolks. Spoon in a few tablespoons of the hot filling while whisking constantly. This warms the yolks slowly.
Pour that yolk mixture back into the saucepan and whisk well until fully blended. The residual heat thickens it slightly and gives the filling a smoother, custard-style finish.
6) Cool the filling slightly
Let the filling cool for 10–15 minutes.
This helps in two ways:
-
it protects the bottom crust from getting overly soft
-
it makes the filling easier to pour and spread evenly
7) Fill the pie
Pour the warm (not piping hot) filling into the chilled pie crust and smooth it into an even layer.
8) Add the top crust
Place the second pie crust over the top.
Trim excess, then fold and crimp the edges. Cut a few vents in the top crust so steam can escape.
If you want to do a lattice crust, go for it. Raisin pie looks beautiful with a lattice.
9) Egg wash and bake
Brush the top crust with egg wash if using.
Bake at 400°F for 20 minutes.
Then reduce the oven temperature to 350°F and bake for 25–35 minutes, until the crust is golden brown and the filling looks set.
If the edges brown too quickly, cover them with foil or a pie shield during the last part of baking.
10) Cool completely before slicing
This part matters.
Let the pie cool at room temperature for at least 3 hours before slicing. The filling sets as it cools. If you cut it warm, it can look loose even if it’s fully cooked.
Why this raisin pie sets up so well
Raisin pie can be tricky if you treat it like a “just pour it in and bake” pie. Raisins don’t naturally create a thick sauce the way berries do. They need help.
This recipe solves that with a cooked filling.
Cooking the raisins first does three things:
-
softens them so they feel tender in the slice
-
infuses them with cinnamon and lemon instead of leaving the flavor on the surface
-
activates the thickener so the filling doesn’t rely on oven time alone to set
That last part is the big one. Cornstarch thickens when it’s heated and simmered. If you skip the stovetop step, the pie can come out runny because the thickener never had a chance to fully do its job.
A little rest time after baking finishes it off. The pie cools, the filling firms, and you get clean slices with that glossy look.
Raisins: what to use and how to plump them
Raisin pie is only as good as the raisins you start with. They don’t need to be fancy, but they should be soft.
Dark raisins
Classic choice. Deeper flavor, slightly more “caramel” vibe once they bake into the filling.
Golden raisins
Lighter flavor. Slightly more honey-like. They also look pretty in the slice.
A mix
My favorite for both taste and looks. The filling ends up with more dimension.
Quick plumping tip
If your raisins feel dry, you can soak them in hot water for 10 minutes, then drain before cooking the filling.
It’s a small step, but it makes a big difference with older raisins.
Crust tips for a better bake
Raisin pie isn’t a super-wet fruit pie, but it still benefits from a few crust habits that keep the bottom from going pale.
Chill the bottom crust
A cold crust going into a hot oven helps prevent shrinkage and gives the bottom a better chance to bake through.
Bake on a sheet pan
Set the pie on a baking sheet in the oven. It helps heat circulate and saves you from drips.
Don’t skip the vents
Steam needs a place to go. Vents keep the crust from puffing strangely and help the filling settle evenly.
Egg wash for color
If you like a golden top, egg wash is the easiest way. It also makes the pie look bakery-finished with almost no work.
Troubleshooting
Raisin pie is simple, but a few things can go sideways. Here’s how to spot it and fix it next time.
“My filling is runny”
Most common causes:
-
filling wasn’t simmered long enough after adding the cornstarch
-
pie was sliced too soon
-
thickener amount was short (easy to do if you eyeballed it)
Fix: make sure the filling turns glossy and noticeably thick on the stove. Then cool the pie fully before slicing.
“My filling is too thick or gummy”
This can happen if:
-
too much cornstarch was used
-
filling simmered too long at a hard boil
Fix: keep the simmer gentle. Once it thickens and turns glossy, stop.
“My crust edge is too dark”
Use foil on the edges earlier. Some ovens brown edges aggressively. It’s not you.
“The pie tastes flat”
Usually it needs:
-
a little more salt
-
a little more lemon
-
or both
Sweet pies need salt to taste “awake.” Lemon keeps raisin pie from tasting like sugar syrup.
Variations
Once you’ve made the classic version, these twists are easy and still feel true to the recipe.
Walnut raisin pie
Stir ½ cup chopped walnuts into the filling right before pouring it into the crust. It adds crunch and makes the pie feel heartier.
Orange-raisin pie
Swap lemon zest for orange zest, and use a mix of lemon juice + orange juice (not all orange, just a little). It gives a softer citrus flavor.
Spiced raisin pie
Add a pinch of ground clove or allspice. Tiny pinch. Those spices take over quickly.
Crumb-topped raisin pie
Skip the top crust and add a buttery crumb topping instead. Bake until golden and crisp on top. It turns the pie into something closer to a crumble, still sliceable once cooled.
Single-crust version
Make it like a custard-style pie with no top crust. Bake until set and golden. It’s simpler, and it’s a great way to show off that glossy filling.
Serving ideas
Raisin pie is good plain. The flavor stands on its own. Still, a few serving touches can make it feel extra nice.
-
Whipped cream (lightly sweetened, soft peaks)
-
Vanilla ice cream if you like warm pie and cold ice cream together
-
A dusting of powdered sugar right before serving
-
A small pinch of flaky salt on top if you love sweet-salty contrast
If you want the cleanest slices, chill the pie in the fridge for an hour before serving, then slice with a sharp knife wiped clean between cuts.
Storage and make-ahead
Refrigerator
Cover and refrigerate for up to 4 days.
Raisin pie holds up well because the filling is already cooked and stable.
Make-ahead
This is a great pie to bake the day before. The flavors settle, the filling firms up, and slicing is easier.
Serving from cold
Many people love raisin pie chilled. The filling becomes slightly firmer, almost like a fruit custard bar inside a crust.
Freezing notes
You can freeze raisin pie.
-
Cool completely.
-
Wrap tightly in plastic wrap, then foil.
-
Freeze up to 2 months.
-
Thaw overnight in the refrigerator.
For best texture, thaw slowly in the fridge, not on the counter.
Old Fashioned Raisin Pie
Ingredients
- 2 9-inch pie crusts (homemade or store-bought)
- 3 cups raisins dark, golden, or a mix
- 2 ¼ cups water
- 1 ¼ cups granulated sugar
- ¼ cup cornstarch
- 1 teaspoon ground cinnamon
- ¼ teaspoon fine salt
- 2 tablespoons lemon juice
- 1 teaspoon lemon zest optional
- 3 tablespoons unsalted butter
- 1 teaspoon vanilla extract optional
- 2 egg yolks optional, for a creamier filling
Egg wash (optional):
- 1 egg
- 1 tablespoon water
Instructions
- Preheat oven to 400°F. Fit 1 pie crust into a 9-inch pie dish; chill while making filling.
- In a saucepan, combine raisins, water, sugar, cinnamon, and salt. Simmer 5–7 minutes to plump raisins.
- Whisk cornstarch with a few tablespoons cool water to form a smooth slurry. Stir into saucepan and simmer 1–2 minutes until glossy and thick.
- Remove from heat. Stir in lemon juice, zest (optional), butter, and vanilla (optional).
- Optional yolks: Temper yolks with a few spoonfuls of hot filling, whisk back into pot until blended.
- Cool filling 10–15 minutes, then pour into chilled crust.
- Top with second crust, crimp edges, and cut vents. Brush with egg wash if using.
- Bake 20 minutes at 400°F, then reduce to 350°F and bake 25–35 minutes until crust is golden and filling looks set.
- Cool at least 3 hours before slicing.
Notes


