
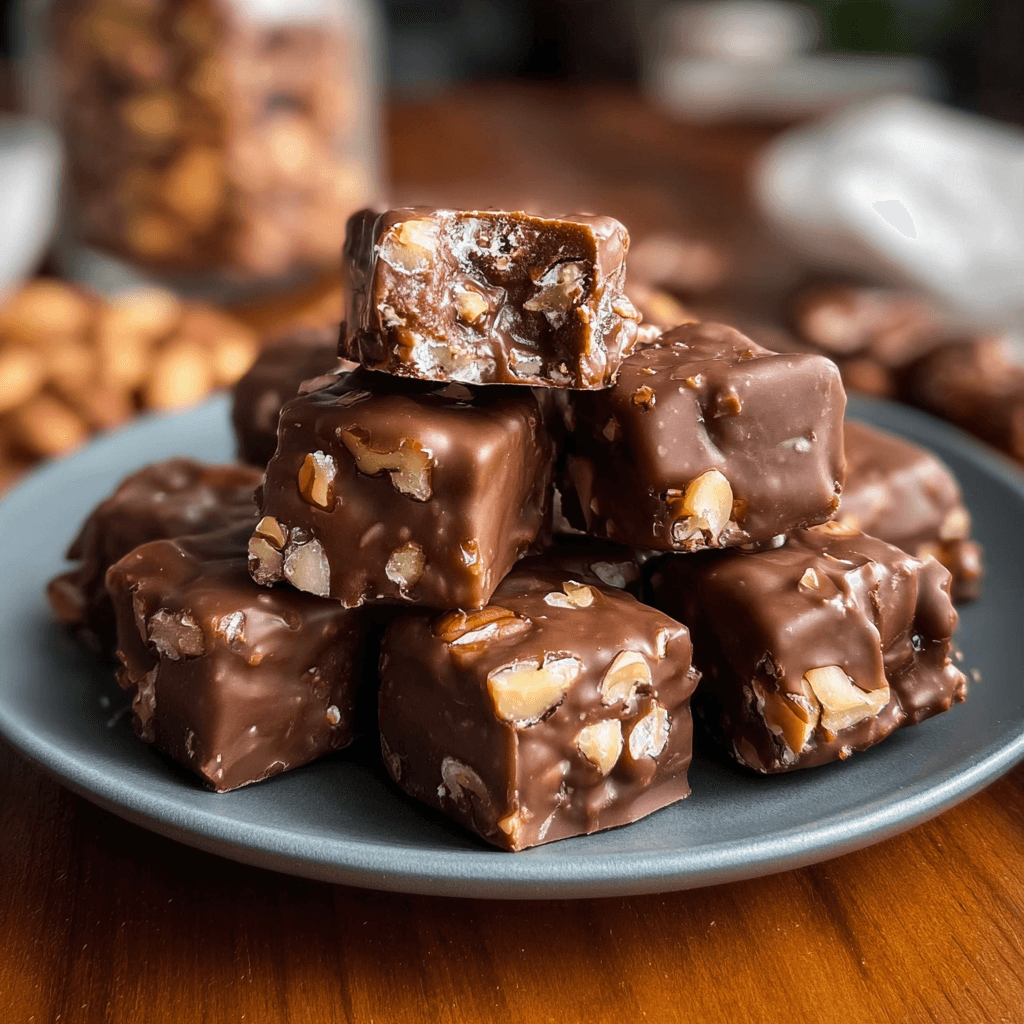
If you grew up around old-fashioned holiday candy trays, you know the look. Little golden-brown mounds. Shiny at first, then matte once they set. Packed with toasted nuts and the kind of caramel flavor that tastes like it came from a well-used handwritten recipe card.
That’s Oklahoma nut candy.
It’s rich and buttery, with a texture that lands somewhere between a chewy praline and a soft, creamy caramel. It’s not fussy, but it does ask for your attention at the stove for a short stretch. The payoff is worth it. One batch makes a big pile of candy, perfect for gifting, potlucks, cookie swaps, or “I just want something sweet after dinner” moments.
And once you’ve made it once, you’ll understand why people guard their method. Sugar + cream + nuts doesn’t sound like much. But the way it comes together? That’s the whole thing.

Ingredients
Here I explain the best ingredients for this nut candy recipe, what each one does, and substitution options. For the exact ingredient measurements, see the recipe card at the bottom of this post.
Granulated sugar
This is the foundation. It sweetens, it caramelizes, it sets the candy. You’ll use a lot of it, and that’s normal for a traditional candy recipe.
A key detail: this method uses divided sugar. Some gets melted into a deep amber caramel first, which gives the candy its signature “brown candy” flavor. The rest dissolves into warm cream, so you don’t end up with a grainy mixture.
Heavy cream
Heavy cream makes the finished candy taste rich and smooth, not sharp or overly sweet. It also helps create that creamy, slightly chewy texture instead of a hard crack.
Substitution: you can use half-and-half, but the candy won’t be as rich. If you go that route, keep the temperature control tight and don’t rush the cook.
Butter
Butter rounds out the flavor and keeps the texture tender. It also gives the candy that old-school, melt-in-your-mouth finish.
Use unsalted butter so you control the salt level. If you only have salted, reduce the added salt (or skip it completely).
Baking soda
This is the quiet trick in the recipe.
When you stir baking soda into hot candy syrup, it bubbles and lightens the mixture slightly. It softens the bite and helps the candy set with a smoother texture instead of feeling dense and glassy.
Vanilla extract
Vanilla makes the caramel flavor taste warmer and more “finished.” Add it off the heat so it doesn’t cook out.
Nuts
Pecans are classic here, and they feel right with the caramel base. Walnuts also work, especially if you like a slightly earthier flavor.
A mix is great too. The only non-negotiable? Toast them first. Even a quick toast makes the nuts taste fuller and keeps them from feeling soft inside the candy.
Salt (optional but recommended)
A pinch brings the sweetness into balance. This candy is meant to be sweet, but it shouldn’t taste flat.
What the candy texture should be like
This isn’t brittle. And it’s not fudge.
The finished pieces should be:
-
firm enough to pick up without sticking to your fingers
-
chewy at the center, not hard
-
slightly creamy on the bite
-
packed with nutty crunch in every piece
If you’ve ever had a praline that’s a little softer and less crumbly, you’re in the right neighborhood.
Best nuts to use
You’ve got options, and this is where you can make the recipe feel like yours.
Pecans
Classic, buttery, slightly sweet. They blend into the caramel flavor like they belong there (because they do).
Walnuts
A little more bold, slightly bitter in a good way. They balance the sweetness nicely.
Mixed nuts
If you have a container of mixed nuts that needs using, this is a great place for it. Just avoid heavily seasoned nuts unless you want the flavor to take a hard turn.
Whole vs. chopped
Chopped nuts give you a more even bite. Whole halves look pretty and give you bigger crunch pockets. I like a mix—mostly chopped, with a handful of halves tossed in at the end.
Candy thermometer vs. cold water test
A candy thermometer makes life easier. No question.
You’re aiming for 244°F, which is in the “firm ball” zone for candy. That’s the sweet spot for a chewy, set texture.
No thermometer? You can still do it.
Cold water test:
Drop a small spoonful of the hot candy mixture into a glass of cold water. Let it sit for a second, then pinch it between your fingers in the water.
-
If it dissolves or won’t hold shape: too early
-
If it forms a soft blob that flattens: still early
-
If it forms a ball that holds shape and feels firm but pliable: you’re there
-
If it turns hard and brittle: you went too far
If you make candy often, you’ll get a feel for this fast. If you don’t, a thermometer is the easiest way to protect your batch.
How to make Oklahoma nut candy
This method uses two pans: one for caramelizing some of the sugar, and one for warming the cream with the rest of the sugar. It sounds like more work than it is. Once you do it, it feels straightforward.
Before you start, set up your space. Candy waits for no one.
Step 1: Prep the pan and the nuts
Line two large baking sheets with parchment paper (or wax paper).
Toast the nuts:
-
Spread them on a dry sheet pan.
-
Bake at 350°F for 6–8 minutes, stirring once halfway through.
-
Let them cool, then chop if needed.
You want them warm-to-room-temp when they go into the candy, not hot from the oven. Hot nuts can thin the mixture when you’re trying to set it.
Step 2: Warm the cream and dissolve most of the sugar
In a large, heavy-bottom pot (a Dutch oven is perfect), add:
-
heavy cream
-
4 cups of the sugar (remember, it’s divided)
-
a pinch of salt (optional)
Set the heat to low and stir until the sugar is fully dissolved and the mixture is steaming. You’re not boiling hard here. You’re creating a smooth, warm base that’s ready to accept caramel.
Keep it on low while you melt the rest of the sugar in the second pan.
Step 3: Caramelize the remaining sugar
In a separate heavy skillet or saucepan, add the remaining 2 cups of sugar in an even layer.
Set heat to medium-low and let it start melting. Don’t stir right away. Once the edges begin to liquify, gently move the pan or use a heatproof spatula to help the dry sugar melt evenly.
This part takes patience. Rushing it can scorch the caramel, and burnt sugar makes the whole batch taste bitter.
You’re looking for a deep amber color. Think “dark honey.” Not pale. Not almost black. Deep amber.
Step 4: Combine the caramel and the cream mixture
This is the moment where you pay attention.
With the cream mixture on low heat and stirred smooth, slowly pour the melted caramel into the cream pot while stirring continuously. It will bubble and hiss a bit. That’s normal.
Stir until the caramel is fully incorporated. You should have a smooth, caramel-colored mixture with no hard chunks.
If a few small sugar bits seize up, keep the heat low and stir patiently. They usually melt back in as the mixture warms.
Step 5: Cook to 244°F
Now turn the heat up to medium and bring the mixture to a steady simmer.
Clip your candy thermometer to the pot, making sure the tip isn’t touching the bottom. Stir occasionally, especially as it approaches temperature.
Cook until it reaches 244°F.
This can take around 8–12 minutes once it’s at a good simmer, depending on your stove and pot. Don’t crank the heat to “get there faster.” Fast boiling can scorch the bottom.
Step 6: Add baking soda, butter, and vanilla (off the heat)
Once it hits 244°F, remove the pot from the heat.
Immediately stir in the baking soda. It will foam. Stir steadily until it settles down.
Then add butter and vanilla. Stir until the butter is fully melted and the mixture looks glossy and smooth.
Step 7: Rest, then add nuts
Let the mixture sit for 15–20 minutes.
This rest time helps the candy start thickening so it doesn’t spread into flat puddles when you drop it on the paper.
After resting, stir in the toasted nuts.
Now keep stirring until the candy loses some of its shine and thickens slightly. You’ll see the texture change. It starts out glossy and fluid, then turns a little more matte and scoopable.
Step 8: Drop and set
Use a spoon or small cookie scoop to drop mounds onto the prepared parchment.
Work fairly quickly. Once it starts setting, it gets harder to portion neatly.
Let the candy sit at room temperature until fully set, about 1–2 hours.
Then… try not to eat half of it standing at the counter.
Recipe tips that save a batch
Use a heavy pot
Thin pans scorch. Heavy-bottom cookware cooks more evenly, which matters with sugar.
Don’t walk away during the temperature climb
You can step away while sugar dissolves. You can’t step away once it’s boiling up to temp. Candy goes from “not ready” to “oops” fast.
Toast the nuts
This isn’t a fancy step. It’s a flavor step. Toasted nuts taste deeper and stay crunchier inside the finished candy.
Let it rest before adding nuts
Skipping the rest time usually leads to candy that spreads too thin. That rest is what helps you get those nice thick pieces.
Make a clear landing zone
Before you start cooking, have your parchment ready, nuts measured, butter unwrapped, vanilla open, baking soda measured. When the candy hits temp, you won’t have time to hunt for anything.
Variations
Once you’ve made the classic version, it’s easy to tweak.
Salted nut candy
After you drop the mounds onto parchment, sprinkle each piece with a tiny pinch of flaky salt while the tops are still warm.
It’s a small change. Big payoff.
Chocolate drizzle
Once the candy is fully set, drizzle melted chocolate over the top.
Use:
-
semisweet for a classic candy-shop vibe
-
dark chocolate if you like a less-sweet finish
-
white chocolate if you want a more dessert-tray look
Let the drizzle set before stacking.
Different nuts
Try:
-
all pecans
-
all walnuts
-
pecans + almonds
-
pecans + peanuts
If you use salted nuts, skip the added salt in the candy mixture.
Spiced version
Add ½ teaspoon cinnamon with the vanilla. Keep it subtle. Cinnamon can take over quickly in caramel candy.
Maple twist
Swap the vanilla for ½ teaspoon maple extract, or add 1–2 tablespoons pure maple syrup with the vanilla. Don’t add too much liquid or you’ll affect the set.
How to store and gift it
This candy is made for sharing. It travels well and holds up at room temp.
Storage
Store in an airtight container at room temperature for up to 2 weeks.
If your kitchen is warm or humid, you can refrigerate it, but the texture becomes firmer. If you do refrigerate, let it sit at room temp for 10–15 minutes before serving for the best bite.
Gifting
For a clean, classic look:
-
cut wax paper into small squares
-
place one candy mound in the center
-
twist the ends like a little wrapped candy
Or layer pieces in a tin with parchment between layers so they don’t stick.
If you’re stacking, make sure the candy is fully set first. Warm candy will glue itself together.
Troubleshooting
Candy has a learning curve. If something goes sideways, it’s usually fixable.
“My candy is too soft and won’t set.”
Most likely: it didn’t reach 244°F.
Fix: return the mixture to the pot, bring it back to a simmer, and cook to 244°F. Then repeat the off-heat additions. Don’t add extra baking soda or extra butter. It’s usually just a temperature issue.
“My candy is hard.”
It cooked past the target temperature.
If it’s only slightly too firm, it’s still good. It just eats more like a chewy caramel. If it’s very hard, next time pull it off the heat right at 244°F.
“My candy is grainy.”
Graininess usually comes from sugar crystals forming.
A few things that help:
-
make sure the sugar is fully dissolved in the cream at the start
-
avoid scraping the sides of the pot during cooking
-
stir gently and only as needed while boiling
If you want an extra safeguard, you can brush down the sides of the pot with a damp pastry brush early in the simmer stage. That washes down crystals before they cause trouble.
“It spread into flat puddles.”
The candy was too warm and too fluid when portioned.
Next time, let it rest the full 15–20 minutes before adding nuts and dropping. That rest time matters.
“The caramel seized into hard chunks when I poured it.”
It happens if the cream mixture is too cool or if the caramel is poured too quickly.
Fix: keep the heat low and stir. Most seized caramel melts back into the mixture as it warms. Patience helps.
Oklahoma Nut Candy
Ingredients
- 6 cups granulated sugar divided
- 2 cups heavy cream
- ½ cup unsalted butter
- ¼ teaspoon baking soda
- 1 teaspoon vanilla extract
- 1 ½ cups pecans or walnuts toasted and chopped (or a mix)
- ¼ teaspoon salt optional
Instructions
- Prep. Line two baking sheets with parchment paper (or wax paper). Toast nuts at 350°F for 6–8 minutes, cool, then chop.
- Warm cream base. In a large heavy-bottom pot, combine heavy cream, 4 cups of the sugar, and salt (optional). Heat on low, stirring until the sugar dissolves and the mixture is steaming. Keep it on low.
- Caramelize sugar. In a separate heavy saucepan, add the remaining 2 cups sugar in an even layer. Heat over medium-low until melted and deep amber, gently moving the pan as needed to melt evenly.
- Combine. Slowly pour the caramelized sugar into the warm cream mixture while stirring continuously. Keep stirring until smooth.
- Cook to temp. Increase heat to medium and simmer, stirring occasionally, until the mixture reaches 244°F on a candy thermometer.
- Finish off heat. Remove from heat. Stir in baking soda (it will foam). Add butter and vanilla; stir until the butter melts and the mixture is smooth.
- Rest. Let the mixture rest 15–20 minutes to thicken slightly.
- Add nuts. Stir in toasted nuts. Continue stirring until the candy thickens and loses some shine.
- Drop and set. Drop spoonfuls onto prepared parchment. Let set at room temperature 1–2 hours until firm.
Notes


