The ultimate sweet ‘n smoky appetizer that disappears faster than you can say “just one more!”
Welcome to My Kitchen!
Y’all, this recipe came to life one Saturday afternoon when I had friends coming over to watch the game and—honestly?—I didn’t want to do a ton of work, but I still wanted something warm, cozy, and crowd-pleasing. I had a pack of kielbasa in the fridge (because of course I did), some leftover BBQ sauce, and a tiny bottle of fancy maple syrup that I’d been hoarding like gold. And just like that, Maple BBQ Hasselback Kielbasa Bites were born.
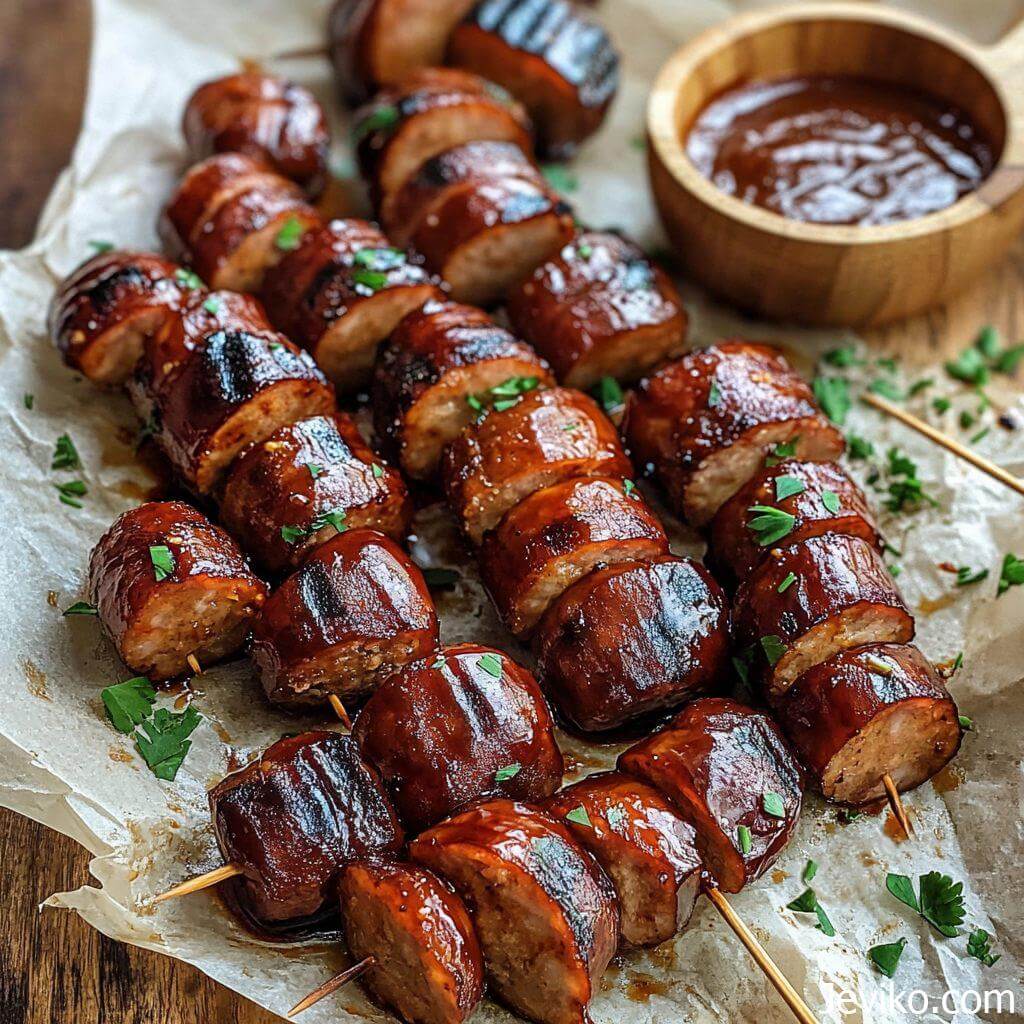
These little bites are smoky, juicy, sweet, sticky, and just a little bit spicy if you want them to be. The way the maple caramelizes with the BBQ sauce while the kielbasa crisps up in all those little hasselback cuts? Mercy. I’ve made them three times since that first batch—and not a single one has survived past halftime.
🤤 Why You’ll Love These Kielbasa Bites:
Caramelized and crispy edges from the hasselback slices = flavor in every nook.
Sticky-sweet glaze made from real maple syrup and your favorite BBQ sauce.
5 ingredients, minimal prep, and bakes up in just 25 minutes!
Perfect for game day, potlucks, holiday spreads, or lazy Saturday snacking.
Can be prepped ahead and baked when ready—yes please!
Frequently Asked Questions (FAQs) ❓
- Can I make these in the air fryer instead of the oven?
Absolutely! The air fryer works like a charm and gives the kielbasa those beautifully crispy edges in even less time. Preheat your air fryer to 375°F, then place the glazed kielbasa slices in a single layer in the basket—make sure they’re not overlapping so the air can circulate. Air fry for 12–15 minutes, giving them a shake or flip halfway through to make sure they cook evenly and get that golden caramelization on both sides. If your air fryer runs hot, start checking at the 10-minute mark. The glaze will bubble and darken slightly, and the kielbasa should be sizzling and glossy—perfection!
- What kind of kielbasa works best for this recipe?
For that juicy, smoky, slightly charred flavor, smoked pork kielbasa is my go-to. It holds up really well to the hasselback slicing and crisps up nicely while still staying tender inside. That said, turkey kielbasa is a great leaner option if you’re looking for something lighter—it won’t be quite as rich but still delicious. You can also use beef kielbasa for a heartier bite with a more robust flavor. Just make sure it’s fully cooked kielbasa, not raw, since this recipe is all about baking to heat and caramelize, not to cook from scratch.
- Can I prep these ahead of time?
Yes, and it’s one of the best things about this recipe! You can slice the kielbasa, make the hasselback cuts, and coat them in the maple BBQ glaze up to 24 hours in advance. Just arrange the glazed slices in a single layer in a container or on a sheet pan, cover tightly with plastic wrap or foil, and refrigerate. When you’re ready to bake, just pop them straight onto a lined baking sheet (no need to let them come to room temp), and bake as directed. You might need to add 1–2 extra minutes to the cook time if they go into the oven cold, but that’s it. It’s a total time-saver for parties or busy weeknights!
- My glaze didn’t caramelize—what went wrong?
Great question! If your glaze came out more runny than sticky or didn’t darken and thicken in the oven, there could be a couple of culprits. First, make sure your oven is fully preheated to 400°F—if it’s running cooler, the sugars in the maple syrup and BBQ sauce won’t caramelize properly. Also, double-check your BBQ sauce consistency—some lighter or vinegar-based sauces don’t thicken as much. If yours is on the thin side, you can simmer the glaze on the stove for 3–5 minutes before brushing it on to help it thicken up. Finally, don’t overcrowd the pan—if the slices are too close together, they’ll steam instead of crisp, which affects how the glaze behaves. A few minutes under the broiler at the end can also help get that caramelized finish you’re after!
Ingredients You’ll Need:
Here’s what makes the magic happen:
- 1 (14 oz) package of smoked kielbasa sausage, sliced into ½-inch rounds
- (Make sure it’s the fully cooked kind—turkey kielbasa works too!)
- ½ cup of your favorite BBQ sauce
- (I love a smoky one with a hint of spice, but you do you.)
- 3 tablespoons of pure maple syrup
- (Go for the real deal here—it makes a difference!)
- 1 tablespoon Dijon mustard
- (Adds a subtle tang that balances the sweetness.)
- Optional: pinch of red pepper flakes or dash of hot sauce
- (If you like a little kick!)
Instructions:
Step 1: Preheat and Prep
Set your oven to 400°F and line a baking sheet with parchment paper or foil for easy cleanup. Trust me, you’ll thank yourself later.
Step 2: Slice That Sausage
Cut the kielbasa into ½-inch thick rounds. Now here comes the fun part: make tiny vertical cuts across the top of each slice—about 3–4 per piece, but don’t cut all the way through! Think of it like hasselback potatoes but in sausage form. These little cuts soak up all the saucy goodness.
Step 3: Mix Up the Glaze
In a small bowl, stir together the BBQ sauce, maple syrup, Dijon mustard, and red pepper flakes (if using). It should be smooth and a little runny.
Step 4: Glaze and Bake
Place the kielbasa slices on your lined baking sheet, cut side up. Use a pastry brush (or spoon) to slather on that glaze, making sure it gets down into the cuts.
Step 5: Bake Until Bubbling
Pop them in the oven and bake for about 20–25 minutes, until the glaze is bubbly and starting to caramelize. If you want extra crispy edges, broil for an extra 2–3 minutes at the end—but keep a close eye!
Step 6: Serve and Watch ‘Em Vanish
Remove from the oven, let cool for just a few minutes (they’re lava hot at first), and serve warm. Toothpicks optional but strongly encouraged.
💡 Pro Tips for Success:
Use a wooden spoon trick for hasselback slicing: place the kielbasa round between two chopsticks or wooden spoon handles to avoid cutting all the way through.
Don’t overcrowd the pan. Leave a bit of space between slices so the edges crisp up instead of steaming.
Double the glaze if you want extra for dipping—it’s that good!
For even more flavor, let the slices marinate in the glaze for 30 minutes before baking. Totally optional, but whoa.
🥶 Storage + Serving Suggestions:
Storing Leftovers: If, by some miracle, you have any left, store them in an airtight container in the fridge for up to 4 days.
Reheating: Pop them back in the oven at 375°F for 8–10 minutes, or air fry for 4–5 minutes at 350°F. They’ll crisp right back up.
Serving Ideas:
- Stick ’em with toothpicks and pile onto a platter with pickles and cubes of cheddar.
- Tuck into slider buns with coleslaw for an easy snack-sized sandwich.
- Add to a charcuterie board for a hot-and-cold mix that folks will not stop talking about.