
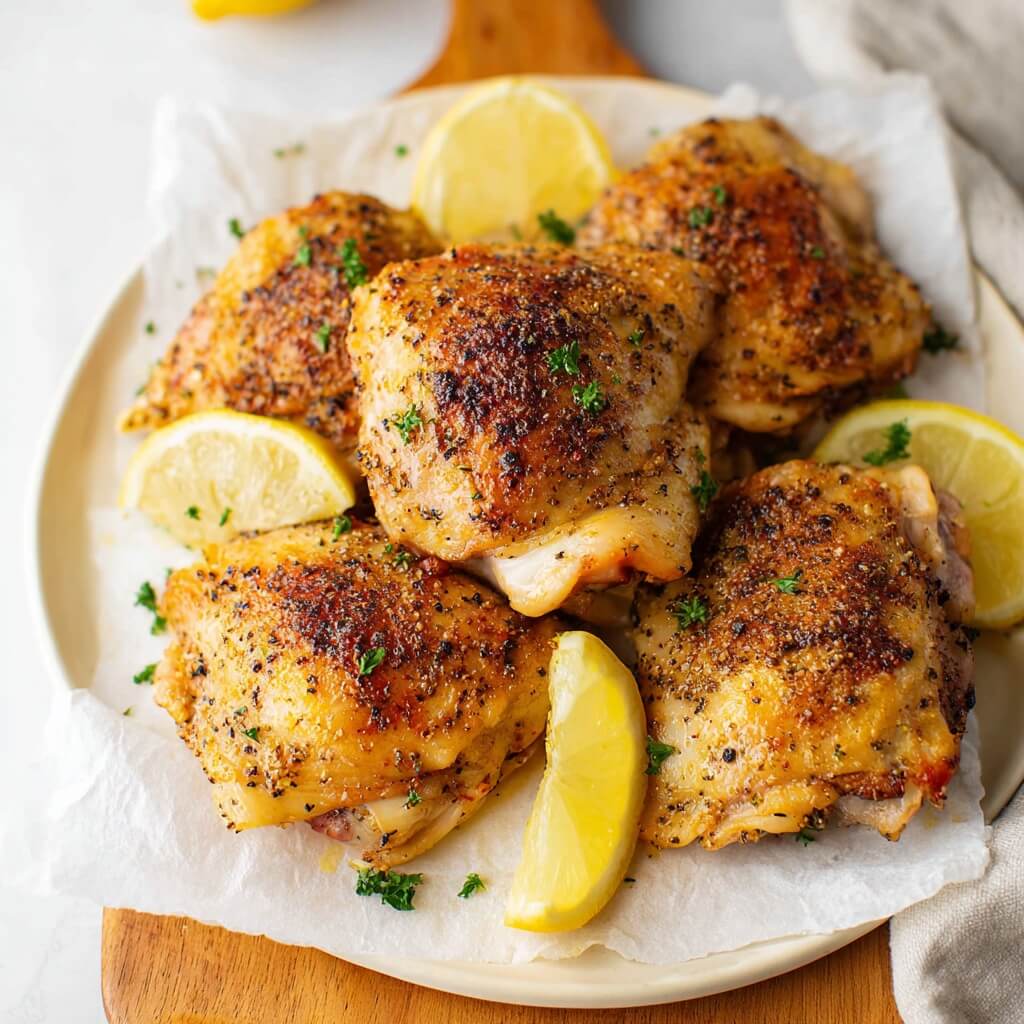
Lemon pepper chicken thighs are one of those dinners that feel like you did a lot, even when the steps stay simple. You get crisp edges, juicy meat, and a bright, peppery flavor that wakes everything up. No heavy sauce needed. No complicated breading. Just chicken that tastes clean, savory, and satisfying.
Chicken thighs are the perfect cut for this. They stay tender even if you cook them a little longer than planned. They handle bold seasoning well. And when you roast them at a higher temperature, the skin turns into the best part of the pan—deep golden, a little crackly, and full of flavor.

The lemon pepper part matters too. It’s not just lemon and pepper tossed on at the end. The best version has layers: lemon zest in the seasoning, black pepper that’s freshly cracked so it smells sharp and warm, and a buttery finish that carries those flavors into every bite. If you’ve ever had lemon pepper chicken that tasted flat or bitter, it usually comes down to one thing—too much dried lemon peel without balance. This recipe fixes that with fresh lemon, a measured hand with seasoning, and a quick pan sauce that stays bright instead of harsh.
This is a great recipe for a weeknight. It’s also a great recipe when you want leftovers you’ll actually look forward to. Lemon pepper chicken thighs reheat well, and the flavor stays lively the next day.
You’ll smell the garlic and butter as soon as it hits the pan. You’ll hear the chicken sizzling while it roasts. And when you squeeze fresh lemon over the top right before serving, it smells like dinner should.
Frequently asked questions
Can I use boneless, skinless chicken thighs instead of bone-in, skin-on?
Yes. Boneless, skinless thighs cook faster, so plan on a shorter bake time. You’ll miss the crispy skin, but the flavor still works. Roast at 425°F for about 18–25 minutes, depending on thickness, and aim for 170–175°F in the thickest part. Spoon the lemon butter sauce over the chicken after it comes out of the oven so it stays juicy.
How do I keep the skin crispy with lemon pepper seasoning?
Dry chicken is crispy chicken. Pat the thighs very dry with paper towels before seasoning. Roast at a higher temperature (425°F), and don’t crowd the pan—space lets heat circulate. Also, wait to spoon sauce on until right before serving. If you want extra crispness, broil for 2–3 minutes at the end, watching closely.
Can I make lemon pepper chicken thighs ahead of time?
You can season the chicken up to 24 hours ahead and keep it covered in the refrigerator. That “rest” time helps the seasoning sink in and the skin dry out, which can lead to better browning. Cook when ready. For leftovers, store the sauce separately if possible and reheat gently.
Do I have to use fresh lemons, or can I use bottled lemon juice?
Fresh lemons are better here, especially for the zest. Bottled lemon juice works in a pinch for the sauce, but it usually tastes a little dull compared to fresh. If you only have bottled juice, use it in the sauce and still add a small splash of something fresh at the end—like a thin slice of lemon or a pinch of fresh zest if you have it.
Ingredients
Here I explain the best ingredients for this lemon pepper chicken thighs recipe, what each one does, and substitution options. For the exact ingredient measurements, see the recipe card at the bottom of this post.
Chicken thighs
Bone-in, skin-on chicken thighs give you the best results in the oven. The skin turns crisp, the bone helps the meat cook evenly, and you get that rich “roasted chicken” flavor that feels like a full dinner.
If you only have boneless thighs, the recipe still works. You’ll just adjust cook time, and the finish will be more saucy than crispy.
Lemon pepper seasoning
You can use store-bought lemon pepper seasoning, but the label matters. Some blends are salt-heavy. Others are salt-free. Some include a lot of dried lemon peel, which can taste bitter if you overdo it.
That’s why I like pairing a measured amount of lemon pepper seasoning with fresh lemon zest. The zest adds a bright lemon aroma without needing a heavy pour of dried peel.
If your lemon pepper blend already includes salt, you’ll reduce added salt. If it’s salt-free, you’ll add salt separately.
Fresh lemons
You’ll use lemons in two ways:
-
Zest in the seasoning, for aroma and brightness
-
Juice in the sauce, for a clean finish
Zest is where lemon flavor really lives. Juice adds acidity, but zest adds the lemon “smell” that makes the dish taste fresh.
Butter
Butter makes the sauce taste rich and smooth. It softens the pepper and carries the lemon flavor so it doesn’t feel sharp. If you want the sauce lighter, you can reduce the butter slightly, but I wouldn’t remove it completely.
Garlic
Garlic + butter + lemon is a classic combination for a reason. It adds depth without competing with the lemon pepper.
Chicken broth
A splash of broth helps build a sauce without making it heavy. It also pulls up the flavorful browned bits if you make the sauce in a skillet.
Olive oil
Oil helps the seasoning stick, encourages browning, and keeps the skin from drying out in a harsh way.
Seasoning helpers
Lemon pepper is the main flavor, but a few supporting seasonings make it taste complete:
-
garlic powder
-
onion powder
-
smoked paprika (optional, for warmth and color)
-
kosher salt (as needed, depending on your lemon pepper blend)
Optional: honey
Not for sweetness, exactly. A small amount can round out lemon’s sharp edge and help the sauce taste balanced. If you don’t like any hint of sweetness in savory food, skip it.
Fresh parsley (optional)
Parsley isn’t required, but a handful of chopped parsley on top makes the dish look fresh and adds a clean bite.
Instructions
I’ve included step-by-step instructions below to make this recipe easy to follow at home. For the full detailed recipe instructions and ingredient quantities, scroll to the recipe card at the bottom of this post.
Step 1: Heat the oven and prep the pan
Preheat the oven to 425°F.
Line a sheet pan with foil for easy cleanup, then place a wire rack on top if you have one. A rack helps hot air circulate around the thighs, which can lead to crispier skin. If you don’t have a rack, bake directly on the sheet pan—still delicious.
Step 2: Dry the chicken (this step matters)
Pat the chicken thighs very dry with paper towels.
Dry skin browns better. Wet skin steams. You want roasting, not steaming.
If you have time, you can place the thighs on a plate and refrigerate them uncovered for 30 minutes. Even a short chill helps the skin dry out.
Step 3: Mix the seasoning
In a small bowl, stir together:
-
lemon pepper seasoning
-
garlic powder
-
onion powder
-
smoked paprika (if using)
-
fresh lemon zest
If your lemon pepper seasoning is salt-free, add salt here. If it already contains salt, wait and taste the sauce at the end before adding extra.
Step 4: Season the thighs
Drizzle the thighs with olive oil, then rub the seasoning all over the chicken.
If the thighs have skin, lift it gently and rub a little seasoning under the skin too. That’s where flavor stays, even after roasting.
Arrange the thighs skin-side up on the sheet pan, leaving space between them.
Step 5: Roast
Roast for 35–45 minutes, depending on size, until the skin is golden and the thickest part reaches at least 175°F.
Chicken thighs are forgiving, and they often taste best closer to 180°F because the connective tissue breaks down and the meat becomes more tender.
If you want extra crisp skin, broil for 2–3 minutes at the end. Don’t walk away. Skin can go from “perfect” to “too dark” fast.
Step 6: Make the lemon butter sauce
While the chicken roasts, make the sauce.
In a small saucepan (or skillet), melt the butter over medium heat. Add the garlic and cook for about 30 seconds, just until fragrant.
Stir in chicken broth and lemon juice. Bring to a gentle simmer and cook 3–5 minutes, until it smells bright and the sauce looks slightly reduced.
Taste it.
-
If it needs balance, add a small drizzle of honey.
-
If it needs salt, add a pinch (especially if you used a salt-free lemon pepper blend).
-
If you want it sharper, add another squeeze of lemon.
Keep the sauce warm on low heat until the chicken is ready.
Step 7: Finish and serve
Let the chicken rest for 5 minutes after it comes out of the oven. This helps juices settle.
Serve the thighs with the lemon butter sauce on the side, or spoon a little sauce over each thigh right before serving. Add chopped parsley if you like.
Lemon pepper seasoning notes
Lemon pepper seasoning seems straightforward, but different brands taste very different. Some are pepper-forward. Some are lemon-forward. Some have a strong dried peel flavor that can taste bitter if you use too much.
A few tips that help no matter which blend you buy:
Start with the amount in the recipe
You can always add more at the end, especially if you’re finishing with sauce. It’s harder to fix an overly bitter lemon peel flavor once it’s baked into the skin.
Add fresh zest for real lemon flavor
This is the easiest way to make the dish taste bright without piling on dried lemon peel.
Watch the salt content
If your blend contains salt, reduce added salt and adjust at the end. If it’s salt-free, be sure you add salt somewhere—either on the chicken or in the sauce.
Best chicken thighs to use
This recipe works with several types of chicken thighs, but results vary.
Bone-in, skin-on thighs
Best for crisp skin and deep roasted flavor. The cook time is longer, but the texture is hard to beat.
Boneless, skinless thighs
Faster cooking and still very juicy. You won’t get crisp skin, so lean into the sauce. These are great for quick dinners, meal prep, or slicing over salads.
Trimmed vs. untrimmed thighs
Some thighs come with extra skin hanging off the sides. You can trim it for a cleaner look and more even browning. Leave enough skin to cover the top of the thigh.
How to make lemon butter sauce the right way
This sauce should taste bright, not sour. Rich, not heavy. Peppery, but not harsh.
A few small habits help:
Don’t brown the garlic
Garlic can turn bitter fast if it browns deeply. You want it fragrant and soft. Thirty seconds is usually enough.
Simmer gently
A rolling boil can reduce too quickly and make the sauce taste sharp. A gentle simmer keeps it smooth.
Taste before you serve
Lemon varies in strength. Broth varies in salt. Butter varies in richness. Taste and adjust at the end so it lands where you want.
Recipe tips
If your thighs aren’t browning well
Two likely reasons:
-
the chicken wasn’t dry enough
-
the pan is too crowded
Pat dry and space them out. If needed, broil at the end for color.
If the lemon flavor tastes bitter
This is usually dried lemon peel overload. Use the measured amount of lemon pepper seasoning, add fresh zest, and let the sauce provide most of the lemon “pop.”
If the chicken tastes under-seasoned
Salt is often the missing piece, especially with salt-free lemon pepper seasoning. Add a pinch of salt to the sauce and spoon it over the chicken. That small adjustment can bring the whole dish into focus.
Use a thermometer if you can
Chicken thighs are forgiving, but a thermometer makes timing easy. Aim for 175–185°F in the thickest part, not touching bone.
Sauce timing
For crispy skin, keep sauce off the chicken until the last moment. Serve sauce on the side, or spoon it over right before eating.
Variations
Air fryer lemon pepper chicken thighs
Air fryer chicken thighs are great when you want crisp skin fast.
-
Preheat air fryer to 380°F
-
Cook skin-on thighs for 22–26 minutes, flipping once
-
Confirm 175°F+ internal temp
-
Spoon sauce over right before serving
Boneless thighs cook faster—start checking around 14–16 minutes.
Spicy lemon pepper version
Add:
-
¼ teaspoon cayenne to the seasoning
-
or a pinch of red pepper flakes to the sauce
Keep it subtle so lemon and pepper stay in front.
Creamy lemon pepper sauce
If you want a richer sauce, stir in:
-
2–3 tablespoons heavy cream
or -
1 tablespoon cream cheese
Do this off heat, then whisk smooth. It turns the sauce silky and a little more mellow.
Sheet pan dinner version
Add vegetables to the pan:
-
baby potatoes (halved)
-
broccoli
-
green beans
-
carrots (thin pieces cook faster)
Toss vegetables with olive oil, salt, and pepper. Potatoes may need a 10–15 minute head start in the oven before adding chicken.
What to serve with it
Lemon pepper chicken thighs pair well with sides that soak up sauce or add something fresh.
-
mashed potatoes or roasted potatoes
-
rice or couscous
-
roasted broccoli or asparagus
-
green beans with a little butter
-
a simple salad with a light dressing
If you’re serving this for guests, rice plus a green vegetable looks complete without adding extra work.
Storage and reheating
How long will leftovers stay good?
Store leftover chicken in an airtight container in the refrigerator for up to 4 days.
Keep sauce separate if possible. It reheats better that way, and it helps keep the skin from turning soft.
Reheating (best methods)
Oven (best for skin):
Reheat at 375°F for 10–15 minutes on a baking sheet.
Air fryer (quick and crisp):
Reheat at 350°F for 4–6 minutes.
Microwave (fast, softer skin):
Use short bursts and don’t overheat. Chicken dries out when it gets too hot.
Freezing and meal prep
You can freeze lemon pepper chicken thighs, especially boneless ones. Skin-on thighs can still freeze, but the skin won’t stay crisp after thawing and reheating. The flavor will still be good, but the texture changes.
How to freeze
Cool chicken completely, then wrap tightly and store in a freezer-safe container for up to 3 months.
Freeze sauce separately in a small container.
How to reheat from frozen
Thaw overnight in the refrigerator, then reheat in the oven at 375°F until warmed through. Warm the sauce gently in a saucepan.

Lemon Pepper Chicken Thighs
Ingredients
Chicken
- 6 bone-in skin-on chicken thighs (about 2½–3 pounds)
- 1 tablespoon olive oil
- 1 ½ tablespoons lemon pepper seasoning see notes
- 1 teaspoon garlic powder
- 1 teaspoon onion powder
- ½ teaspoon smoked paprika optional
- Zest of 1 lemon
- ½ –1 teaspoon kosher salt only if your lemon pepper seasoning is salt-free
Lemon butter sauce
- 4 tablespoons unsalted butter
- 4 cloves garlic minced
- ½ cup chicken broth
- 3 tablespoons fresh lemon juice about 1 lemon
- 1 teaspoon honey optional
- Chopped parsley optional, for serving
Instructions
- Preheat the oven to 425°F. Line a sheet pan with foil. Add a wire rack if you have one.
- Pat the chicken thighs very dry with paper towels.
- In a small bowl, mix lemon pepper seasoning, garlic powder, onion powder, smoked paprika (optional), and lemon zest. Add salt only if using a salt-free lemon pepper blend.
- Rub chicken thighs with olive oil, then season all over (and under the skin if possible). Place skin-side up on the sheet pan with space between pieces.
- Roast for 35–45 minutes, until the skin is golden and the internal temp reaches 175°F in the thickest part. Broil 2–3 minutes at the end for extra crisp skin if desired.
- While the chicken roasts, make the sauce: melt butter in a saucepan over medium heat. Add garlic and cook 30 seconds. Stir in broth and lemon juice. Simmer 3–5 minutes. Add honey if using. Taste and adjust salt if needed.
- Rest chicken 5 minutes. Serve with sauce and parsley if desired.
Notes


