

Chicken pot pie is one of those dinners that feels steady. Reliable. The kind of meal that makes the kitchen smell like you actually planned ahead, even if you started with leftover chicken and whatever vegetables were sitting in the freezer.
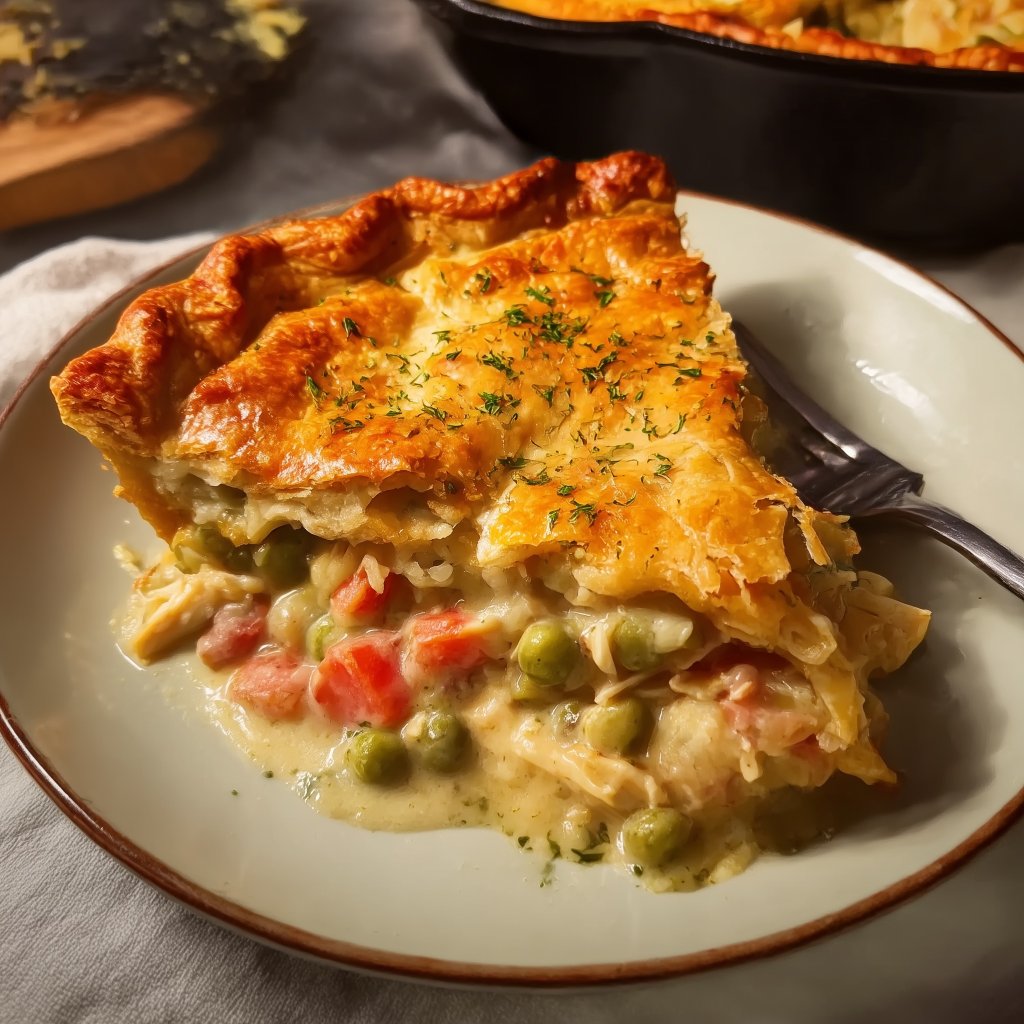
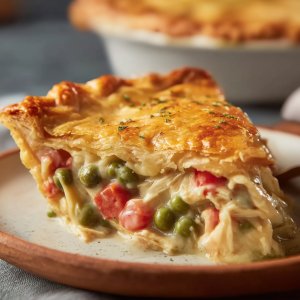
What I love most about a good pot pie is the contrast. The filling is creamy and savory, packed with tender chicken, soft potatoes, sweet carrots, and peas that pop a little when you bite into them. Then there’s the crust—golden, flaky, and buttery, shattering at the edges where it browns against the dish.
It’s comfort food, sure. But it’s also practical.
One pot pie can feed a whole table. It reheats well. It freezes well. And if you learn a couple small habits—how thick the filling should be before it goes in the oven, how to keep the crust crisp, when to vent the top—you end up with a pan you’ll want to make again the next week.
This recipe leans classic. No strange ingredients. No extra steps that don’t pay you back. Just a real, old-school chicken pot pie that slices clean, tastes rich without being heavy, and has that cozy “first cold night” vibe any time of year.
Alright. Let’s get into it.
Frequently Asked Questions (FAQs)
1) Can I use rotisserie chicken?
Yes, and it’s one of the easiest ways to make this pot pie on a weeknight. Pull the meat while it’s still slightly warm so it shreds easily. A mix of white and dark meat tastes especially good in the creamy filling.
2) Should I use a bottom crust and a top crust, or just a top crust?
Both work. A top crust only version is quicker and tends to stay crispier. A double crust version feels more traditional and hearty, but it can take a little more care to avoid a soggy bottom.
3) How do I keep the crust from getting soggy?
Two big helpers:
-
Let the filling cool for 10–15 minutes before adding the crust (hot steam can soften dough fast).
-
Bake on the lower-middle rack so the bottom of the dish gets more heat.
If you’re doing a bottom crust, you can also brush it lightly with egg wash before adding filling to create a thin barrier.
4) Can I make chicken pot pie ahead of time?
Yes. You can make the filling up to 2 days ahead and refrigerate it. Assemble and bake when you’re ready. If baking from cold, it usually needs extra time in the oven.
Why You’ll Love This Pot Pie
-
Thick, creamy filling that isn’t runny. Slices hold their shape instead of sliding into a puddle.
-
Real flavor, not bland “cream sauce.” Butter, onion, garlic, and herbs do the work.
-
Flexible ingredients. Fresh vegetables, frozen vegetables, leftover chicken, rotisserie chicken—use what you have.
-
Perfect for leftovers. It reheats like a dream and tastes even better the next day.
-
Freezer-friendly. Make one for now and one for later, if you want.
Ingredients
I’ve included notes and descriptions below for each ingredient in this recipe. For the exact ingredient measurements, jump to the recipe card at the bottom of this post.
For the filling
Butter
This builds flavor from the start and helps create a smooth sauce.
Onion + celery + carrots
This trio is classic for a reason. Onion brings sweetness, celery adds a savory backbone, carrots add mild sweetness and color.
Garlic
Just enough to warm up the flavor, not overwhelm it.
Flour
Flour thickens the filling. It turns the broth and milk into a creamy sauce that coats everything.
Chicken broth
Use low-sodium if possible. Pot pie can get salty fast, especially if the chicken is seasoned.
Milk or half-and-half
Half-and-half gives the richest filling. Whole milk works too. If you use 2%, the filling is still good, just a bit lighter.
Cooked chicken
Shredded or diced. Rotisserie chicken is perfect here.
Potatoes
I like Yukon Gold for pot pie because they stay tender and creamy. Russets work too, but they can break down more.
Frozen peas
Add them near the end so they stay bright and don’t go soft.
Seasonings
Salt, black pepper, thyme, parsley. A small pinch of poultry seasoning is optional but very cozy.
Optional splash of lemon juice
Sounds small. Tastes big. It brightens the whole filling right at the end.
For the crust
Refrigerated pie crusts (2)
One for the bottom, one for the top. Or use just one for the top if you prefer.
Egg + water (egg wash)
This is how you get that golden, glossy top crust.
Best Vegetables to Use
Pot pie is forgiving, but texture matters.
Classic mix (always a win)
-
carrots
-
celery
-
peas
-
potatoes
-
onions
Easy shortcut option
A bag of frozen mixed vegetables works great. If it includes green beans, that’s fine. Just know they stay firmer than peas and carrots.
If you want extra vegetables
Add one or two, not five. Pot pie can get crowded fast.
-
mushrooms (sauté first so they don’t water out the filling)
-
corn (sweet and nice with chicken)
-
chopped green beans (steam or sauté briefly first)
Best Chicken to Use
You’ve got options.
Rotisserie chicken
Fast, flavorful, and already tender. Remove the skin, then shred or dice the meat.
Leftover chicken
Roasted, grilled, baked—any of it works. Just cut it into small pieces so every slice has chicken.
Quick-cook chicken (if starting from raw)
Season chicken breasts lightly, bake at 400°F for 18–22 minutes, rest 10 minutes, then shred. Resting keeps it juicy.
Crust Options
This recipe is written for a classic pie crust. But if you like to switch things up, you can.
Top crust only
Simpler, less chance of sogginess, still feels like pot pie. Just pour filling into the dish and lay crust over the top.
Double crust
Traditional and hearty. If you do it, keep the filling thick and don’t assemble while the filling is boiling hot.
Puff pastry top
Very flaky and dramatic. Bake according to the package directions, and vent well so steam can escape.
Biscuit topping
More like a chicken pot pie bake. Soft and cozy. Not flaky, but still delicious.
How to Make Chicken Pot Pie
I’ve included clear step-by-step instructions below to make this recipe easy to follow at home. For the full detailed recipe instructions and ingredient quantities, scroll to the recipe card at the bottom of this post.
Step 1: Prep the crust
If using a bottom crust, place one pie crust into a 9-inch pie dish. Press it gently into the edges. Trim excess if needed.
Place it in the refrigerator while you make the filling. Cold crust holds its shape better.
Step 2: Cook the vegetables
In a large pot or deep skillet over medium heat, melt the butter.
Add onion, celery, and carrots. Cook for 6–8 minutes, stirring often, until the vegetables soften and the onions turn translucent.
Add garlic and cook for 30 seconds, just until fragrant.
Step 3: Build the sauce
Sprinkle flour over the vegetables and stir well. Cook for 1–2 minutes so the flour doesn’t taste raw.
Slowly pour in the chicken broth while stirring. The mixture will thicken quickly.
Add milk (or half-and-half) and stir until smooth. Let it simmer for 3–5 minutes until it coats the back of a spoon.
Step 4: Add chicken and potatoes
Stir in the cooked chicken and diced potatoes.
Simmer gently for 10–12 minutes, stirring occasionally, until the potatoes are just tender. You want them cooked, but not falling apart.
Stir in peas during the last 2 minutes.
Taste and season with salt, black pepper, thyme, parsley, and poultry seasoning if using.
Turn off the heat. Let the filling cool for 10–15 minutes so it thickens slightly and stops steaming aggressively.
Step 5: Assemble
Pour the filling into the pie dish (over the bottom crust if using).
Lay the top crust over the filling. Trim and crimp the edges.
Cut 4–6 small slits in the top crust to vent steam. This keeps the crust crisp and prevents blowouts.
Step 6: Egg wash
Whisk egg with a tablespoon of water. Brush it over the crust.
If you like a little texture, you can sprinkle a tiny pinch of flaky salt on top. Optional.
Step 7: Bake
Bake at 400°F (205°C) for 35–45 minutes, until the crust is deeply golden and the filling is bubbling.
If the crust browns too quickly, cover the edges loosely with foil for the last 10–15 minutes.
Let the pie rest for 15 minutes before slicing. That rest time helps the filling set so slices hold together.
How to Get a Golden Crust
A few small moves make the crust look bakery-level.
-
Use egg wash. It’s the difference between pale and golden.
-
Vent the top. Steam needs an escape route.
-
Bake hot. 400°F gives you better browning and flakiness than a low oven.
-
Lower rack helps. If your oven tends to leave bottoms underbaked, place the pie on the lower-middle rack.
Recipe Tips
Make the filling thick before it goes into the pie
If the filling looks watery in the pot, it will look watery in the pie. Simmer a few minutes longer until it coats a spoon.
Keep the crust cold
Warm crust + warm filling can slump. Refrigerating the crust while you cook the filling helps a lot.
Don’t skip the rest time
Right out of the oven, the filling is very loose. Give it 15 minutes and it thickens into that perfect creamy texture.
Cut the chicken small
Big chunks look impressive, but they make slicing messy. Smaller pieces = cleaner slices.
If you want extra flavor
Stir in ¼ cup grated parmesan at the end. It adds savory depth and makes the sauce taste fuller.
Optional Additions
Keep it simple, but if you want to customize:
-
½ teaspoon smoked paprika for gentle warmth
-
1–2 teaspoons Dijon mustard stirred into the sauce for a subtle tang
-
chopped fresh rosemary (use lightly—strong flavor)
-
sautéed mushrooms
-
a handful of shredded cheddar for a slightly richer filling
What to Serve It With
Chicken pot pie is already a full meal, so sides should be light and fresh.
-
simple green salad with a bright dressing
-
roasted broccoli or green beans
-
a crisp cucumber salad
-
applesauce or a fruit salad (surprisingly good contrast)
If you’re serving guests, a fresh side keeps the plate balanced.
Make-Ahead Instructions
Make the filling ahead
Make the filling up to 2 days ahead. Cool completely, then store in an airtight container in the fridge.
When you’re ready to bake, assemble the pie and bake as directed. If the filling is cold, it may need 5–10 extra minutes.
Assemble ahead
You can assemble the whole pie, cover, and refrigerate for up to 24 hours.
Bake straight from the fridge. Keep an eye on browning and cover with foil if needed.
Storage and Reheating
Refrigerator
Store leftovers covered in the fridge for up to 4 days.
Reheating (best method)
Reheat slices in the oven at 350°F for 15–20 minutes. This keeps the crust from turning soft.
Microwave works for convenience, but the crust loses its crispness.
Freezing Tips
Chicken pot pie freezes well.
Freeze unbaked (best texture)
Assemble the pie fully, but don’t bake it.
Wrap tightly in plastic wrap, then foil. Freeze up to 2 months.
Bake from frozen at 400°F. It usually takes 60–75 minutes. Cover with foil if the crust browns too fast.
Freeze baked slices
Cool completely, slice, then wrap portions and freeze. Reheat in the oven for best texture.
Troubleshooting
My filling is runny.
It likely needed more simmer time on the stove, or it wasn’t rested long enough after baking. Next time, thicken the sauce more before assembling and rest 15 minutes before slicing.
My crust browned before the center was hot.
Cover with foil and keep baking. Ovens vary a lot.
My bottom crust is soggy.
Try top-crust only next time, or brush the bottom crust with egg wash before adding filling. Also bake on a lower rack.
My potatoes are still firm.
Dice them smaller, or simmer the filling a few minutes longer before assembling.
Recipe Notes
-
Rotisserie chicken makes this recipe fast, and it tastes great.
-
Half-and-half gives the richest filling, but whole milk works fine.
-
Vent the top crust so steam can escape and the crust stays crisp.
-
Resting the pie before slicing helps the filling set and keeps portions neat.
Chicken Pot Pie
Ingredients
For the filling
- 6 tablespoons unsalted butter
- 1 medium yellow onion diced
- 2 celery stalks diced
- 3 carrots peeled and diced
- 3 cloves garlic minced
- ⅓ cup all-purpose flour
- 2 ½ cups chicken broth low-sodium if possible
- 1 cup milk or half-and-half
- 3 cups cooked shredded chicken
- 2 cups Yukon Gold potatoes peeled and diced small
- 1 cup frozen peas
- 1 teaspoon salt more to taste
- ½ teaspoon black pepper
- 1 teaspoon dried thyme
- 1 teaspoon dried parsley
- ½ teaspoon poultry seasoning optional
- 1 teaspoon lemon juice optional, added at the end
For the crust
- 2 refrigerated pie crusts or 1 for top-only
- 1 egg + 1 tablespoon water egg wash
Instructions
- Preheat oven to 400°F (205°C). Place bottom crust in a 9-inch pie dish (if using) and refrigerate.
- Melt butter in a large pot over medium heat. Add onion, celery, carrots. Cook 6–8 minutes. Add garlic and cook 30 seconds.
- Stir in flour and cook 1–2 minutes. Slowly whisk in broth, then milk. Simmer 3–5 minutes until thickened.
- Add chicken and potatoes. Simmer 10–12 minutes until potatoes are tender. Stir in peas during the last 2 minutes. Season with salt, pepper, thyme, parsley, and poultry seasoning if using. Turn off heat and cool 10–15 minutes.
- Pour filling into pie dish. Top with second crust. Trim and crimp edges. Cut slits on top.
- Brush with egg wash.
- Bake 35–45 minutes until golden and bubbling. If browning too fast, tent with foil.
- Rest 15 minutes before slicing.
Notes


