Oh friends, do I have a treat for you today!
This Cheesecake Fruit Salad has been a surprise hit at every single family gathering we’ve had this year—and trust me, we’ve had a lot of them! It all started with Memorial Day weekend. I was hosting our annual backyard BBQ, and while I had burgers on the grill and corn in the pot, I realized I needed something sweet and refreshing that wouldn’t require me to turn on the oven. (It was 87 degrees and climbing—no thank you, ma’am!)
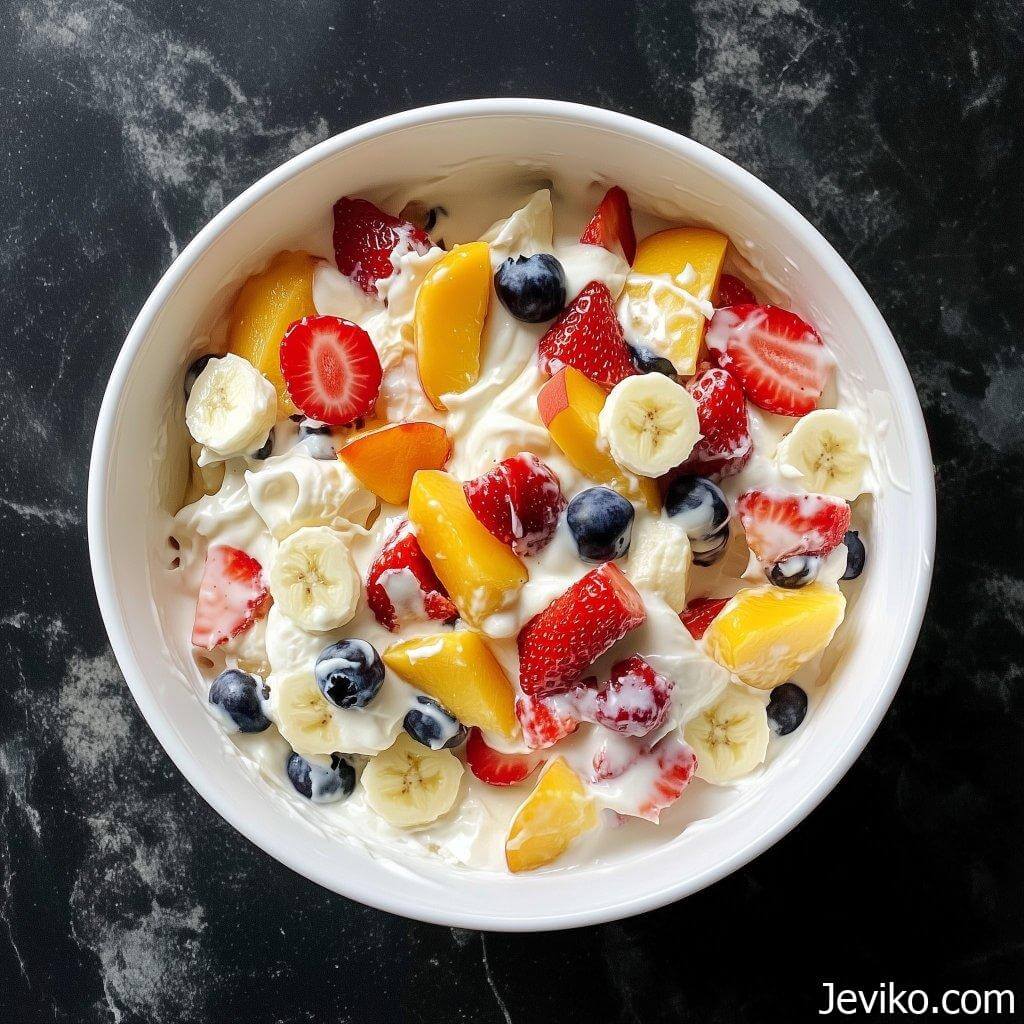
So, I rummaged through the fridge and pantry and came up with what I now lovingly call my Cheesecake Fruit Salad. It’s rich, fluffy, tangy, and sweet—all the things I love about a slice of cheesecake, but in spoonable, scoopable, chilled form…with juicy, fresh fruit tucked into every bite.
You know that moment when everyone goes quiet at the table because they’re too busy eating? Yeah. That happened. Even my cousin Mark, who swears he “doesn’t do fruit in dessert,” went back for seconds.
Why You’ll Love This Cheesecake Fruit Salad:
No-bake & fuss-free – Perfect for hot days when you want something sweet without turning on the oven.
Creamy cheesecake flavor – Like a no-bake cheesecake in a bowl, thanks to a dreamy blend of cream cheese, whipped topping, and pudding.
Packed with fresh fruit – A colorful medley of strawberries, grapes, pineapple, blueberries, and bananas adds natural sweetness and texture.
Make-ahead friendly – It actually gets better after a little chill time in the fridge.
Totally customizable – Swap in your favorite fruits or even add a handful of mini marshmallows (my niece swears by it!).
Can I use fresh whipped cream instead of whipped topping?
Yes, you definitely can—but there are a few important things to keep in mind. Freshly whipped cream makes a beautiful, more natural alternative to store-bought whipped topping, and it gives the salad a lighter, more delicate texture.
Here’s how to do it right:
Use heavy cream or heavy whipping cream (not half-and-half or light cream). It needs to have at least 36% fat so it whips properly.
Whip it to stiff peaks. This means when you lift the whisk out, the cream stands straight up without folding over. It’s crucial that it’s stiff enough to hold up when folded into the cream cheese and pudding mixture—otherwise, your salad might turn out soupy.
Don’t overwhip! If you go too far, you’ll start making butter. Stop once it’s thick and holds shape.
Add a touch of sweetness. I like to whip mine with 1–2 tablespoons of powdered sugar and a splash of vanilla to match the sweetness of the original recipe.
One more thing: Fresh whipped cream is a bit more delicate than whipped topping, so the salad won’t hold up quite as long in the fridge. If you’re making this more than a few hours in advance, you may want to stick with the whipped topping—or give your fresh whipped cream a stabilizer boost (a spoonful of instant pudding mix or gelatin can help!).
What fruits should I avoid?
Great question—because while most fruits are fair game, a few can turn your creamy masterpiece into a watery mess.
Fruits to be cautious with:
Watermelon: It’s juicy and refreshing, but it releases a lot of liquid as it sits, which can dilute the creamy base and make the salad runny.
Oranges or mandarins: Fresh citrus segments tend to “weep” after being cut. If you must use them, go with canned mandarin oranges that have been drained very well and patted dry.
Kiwi (sometimes): Kiwi is delicious, but it has an enzyme that can break down dairy over time and cause the salad to separate if it sits too long. Add it just before serving if you want to include it.
Stick with:
Berries (strawberries, blueberries, raspberries—but keep raspberries firm and dry)
Grapes
Pineapple (fresh or well-drained canned)
Bananas (added last-minute)
Apples or pears (if used, toss in lemon juice to prevent browning)
The key is choosing fruit that’s firm, ripe, and not overly juicy, so the salad keeps its lovely texture and doesn’t get soggy.
Can I make it ahead of time?
Yes, and honestly—it tastes even better after a few hours in the fridge! The flavors get to know each other, and the cream base sets up a bit more, making it easier to scoop and serve.
Here’s how to prep ahead smartly:
Make the cream base and mix in all the firmer fruits (grapes, berries, pineapple) up to 6 hours ahead. Cover the bowl tightly with plastic wrap or transfer to an airtight container.
Hold off on the bananas and any softer fruit until right before serving. Bananas tend to brown quickly, and softer fruits like kiwi or raspberries can break down if they sit too long in the cream.
Give it a gentle stir before serving to freshen everything up and redistribute the creamy goodness.
Bonus tip: If you’re prepping for a big event and want to get ahead, you can even make the cream base a day in advance and keep it in the fridge, covered. Just fold in the fruit a few hours before serving.
Ingredients:
Here’s what you’ll need to whip up this heavenly treat:
- 1 (8 oz) package cream cheese, softened – Go for full-fat for the richest flavor.
- 1 (3.4 oz) package instant cheesecake pudding mix – This is the secret that gives that classic cheesecake flavor.
- 1/2 cup powdered sugar – Just enough to sweeten the cream without overpowering the fruit.
- 1 teaspoon vanilla extract – Adds that warm, bakery-style flavor.
- 1 (8 oz) tub whipped topping – Thawed; it makes everything extra fluffy.
- 2 cups strawberries, hulled and quartered
- 1 cup red grapes, halved
- 1 cup fresh pineapple chunks – Or use drained canned if fresh isn’t available.
- 1 cup blueberries – Fresh is best here!
- 2 ripe bananas, sliced – Add these last to keep them pretty.
- Optional: 1 cup mini marshmallows – For the kids… or the kid in you 😉
👩🍳 How to Make Cheesecake Fruit Salad:
Step 1: Make the Cheesecake Base
In a large mixing bowl, beat the softened cream cheese until smooth and fluffy. This takes a couple of minutes, and yes, it’s worth it!
Add in the pudding mix, powdered sugar, and vanilla extract. Mix again until well combined—it’ll be thick and a little crumbly at this stage.
Step 2: Fold in the Whipped Topping
Gently fold in the whipped topping using a spatula. Don’t rush this step—you want to keep all that lovely airiness. The mixture should become light, smooth, and irresistible.
Step 3: Add the Fruit
Gently fold in the strawberries, grapes, pineapple, and blueberries. Save the bananas for last so they don’t get mushy. If you’re using marshmallows, toss them in now too!
Step 4: Chill & Serve
Cover and refrigerate for at least 1 hour before serving. This helps all the flavors meld together and makes the salad delightfully cool and refreshing. Right before serving, give it a gentle stir and top with a few extra pieces of fruit for that “wow” factor.
Pro Tips for Success:
- Soften your cream cheese – Cold cream cheese won’t blend well and can leave little lumps.
- Use ripe, but firm fruit – Overripe fruit will make the salad watery.
- Bananas browning? Toss the slices in a little lemon juice before adding them to the salad to keep them fresh-looking.
- Want it extra fluffy? You can beat in a second tub of whipped topping if you like a lighter texture!
- Serving for a crowd? This recipe easily doubles (or triples) and disappears just as fast.
Storage and Serving Suggestions:
Store leftovers in an airtight container in the fridge for up to 2 days. Any longer and the fruit can start to get too soft.
Don’t freeze it—the texture won’t survive the thaw.
Serving ideas:
- Spoon it into individual cups and top with crushed graham crackers for a parfait-style treat.
- Use it as a dip with vanilla wafers or cinnamon pita chips.
- It makes the best potluck dish—don’t be surprised if it’s gone before the main course!